Grundig GDR740DABER Instruction Manual Download Page 9

Grundig Replay 


Turning on your DAB+ Radio 


1. 

Connect the Power Adaptor to the DC Socket on the back of the unit. Then insert the Power Adaptor into the 

desired wall outlet.  

2. 

Press the


Button to turn on the unit or press again when you wish to turn off the radio. Then carefully extend 

antenna for the best possible reception.  


3. 

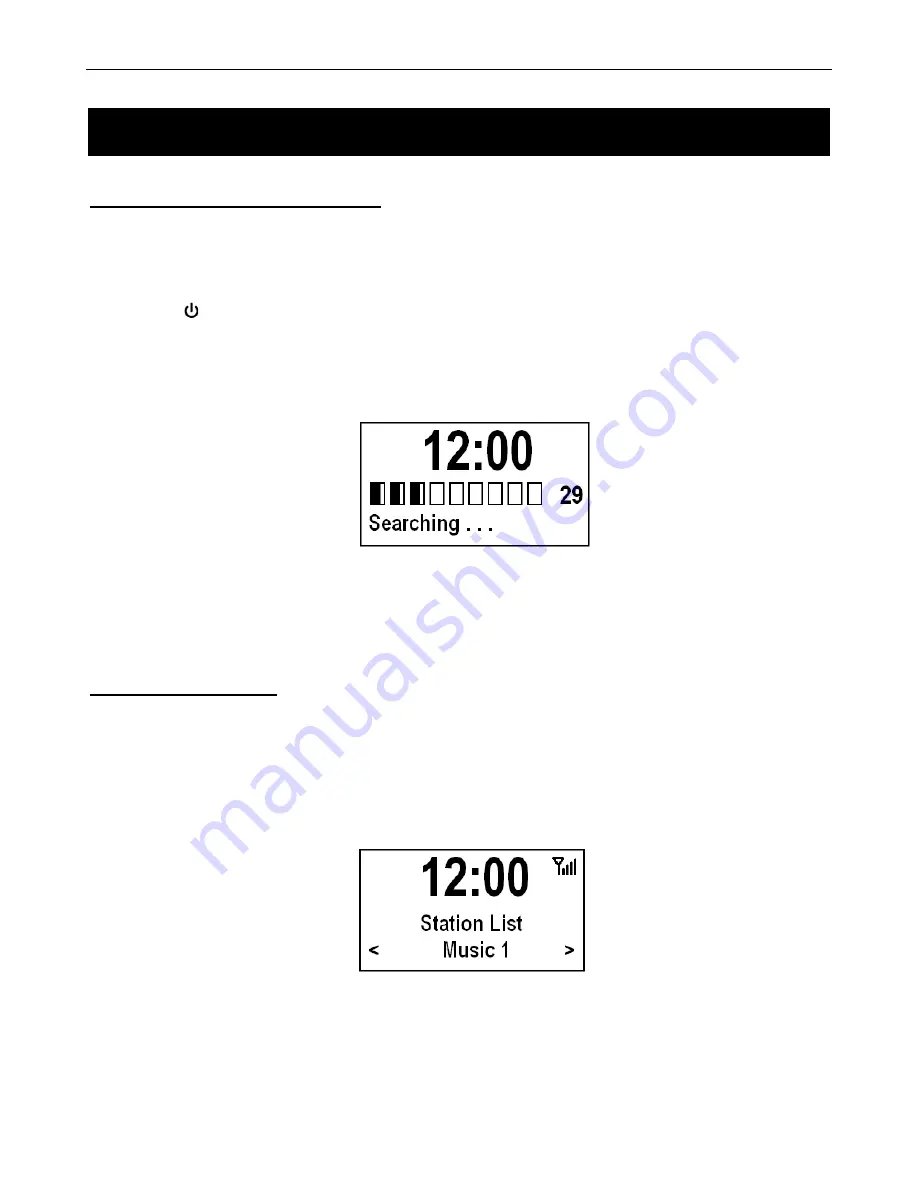
When you turn on your DAB+ Radio for the first time it will conduct a full station scan and store all the available 

Radio Stations in the stations list. This may take a few minutes.  


 Note

: a. The DAB+ stations will be displayed in alphanumeric order. The first station in the list will be played after the scan 

has been completed. 


b. If no DAB+ signal is found in your area, it may be necessary for you to relocate your radio.   


Changing Stations 


To change scroll through the station list and change the DAB+ Station playing, press the Tune


Button on the unit or 

the Select Button on the remote control to activate the station list then use the Select Knob or Navigation Buttons to 

scroll through the Station List.  When you have found a station you would like to play press the Select Knob or Select 

Button to confirm and the station will begin to play. 


DAB+ Radio 

Summary of Contents for GDR740DABER

Page 1: ...DIGITAL RADIO WITH EPG AND RECORD GDR740DABER Toll Free Warranty and Service 1800 509 394 The Gold Technical Support Line 1902 215 259 Charges will apply at 2 95 per minute for gold technical support...

Page 2: ...nstructions Safety is important Your safety is very important Please therefore ensure you read the Safety Instructions before you operate this unit Warranty In the unlikely event that your product fai...

Page 3: ...the ventilation holes with items such as tablecloths or curtains etc This may cause the unit to overheat No naked flame sources such as candles should be placed on or near the unit Do not place object...

Page 4: ...ntents 4 Your DAB Radio 5 Remote Control 6 What is DAB 7 Getting Started 8 DAB Radio 9 15 DAB and FM Radio 16 17 FM Radio 17 19 AUX IN Mode 20 SD Mode 20 System Setup 21 25 Troubleshooting and Technic...

Page 5: ...ESET Button Press the Preset Button to access your favourite DAB or FM stations quickly 10 MENU Button Press the Menu Button to enter the selected mode s Main Menu 11 INFO Button Press the Info Button...

Page 6: ...n the alarm is activated 7 PRESET Button Press the Preset Button to access your favourite DAB or FM stations quickly 8 EPG Button The EPG Electronic Program Guide is an on screen radio guide that make...

Page 7: ...cted signals to reinforce the end result allowing for better service more of the time No Need to Re tune A single DAB frequency can be used to cover the whole of the Australia so solving many problems...

Page 8: ...ation will be poor Where it will be dusty Where it will be damp or a possibility of water dripping or splashing onto the unit Adjusting the Antenna The antenna should be extended to ensure good recept...

Page 9: ...take a few minutes Note a The DAB stations will be displayed in alphanumeric order The first station in the list will be played after the scan has been completed b If no DAB signal is found in your ar...

Page 10: ...dating the Station List In DAB Mode you can update your station list by conducting a full scan as outlined above and then deleting any weak stations This will update the station list by removing all i...

Page 11: ...listening to Frequency This is the transmission frequency of the station you are listening to Signal Information Shows the digital bit rate and the signal mode Signal Strength Shows a signal bar with...

Page 12: ...Grundig Replay 12 DAB Menu Options DAB Radio...

Page 13: ...ll DAB stations are broadcasting an EPG for you to view No EPG Available will be displayed on screen for all stations that are not broadcasting an EPG 3 When the EPG has downloaded you will be able to...

Page 14: ...nfirm the one time recording option you would like to set 5 Turn the Select Knob to scroll through the recording timer options Off Once Every Day Weekly Weekday and Weekends and press Select to confir...

Page 15: ...s as long as your SD Card is large enough to save this amount of recording 10 Turn the Select Knob to select the hour for your recording period and then press the Select Knob to confirm Then adjust th...

Page 16: ...g Note When the unit is recording you are not able to open the EPG Menu or change the station being played 3 To stop recording press the Record Button and then use the Select Button to confirm your se...

Page 17: ...on and then select Tune Mode Press Select Knob to confirm The screen will then display Seek press the Select Knob to confirm again You can also press the Tune Button on the front of the unit to select...

Page 18: ...Grundig Replay 18 FM Menu Options FM Radio...

Page 19: ...he radio broadcaster and their broadcast transmissions Some FM Stations may not be equipped to send this information through their digital transmissions Program Type PTY This is a description of the t...

Page 20: ...d before entering this mode 1 To play your recorded programs press the Mode Button repeatedly until Switching to SD is displayed 2 Then press the Tune Button to shift the function of the Select Button...

Page 21: ...time 2 Press the Select Knob to confirm your preferred sleep period A sleep icon will be displayed on the screen 4 The radio will automatically turn to Standby mode after the setting time has elapsed...

Page 22: ...ll be asked to set the date first turn the Select Knob to adjust years and then press the Select Knob to confirm Then do the same to set the month and day 3 Now you will need to set the time Using the...

Page 23: ...o ON An Alarm Icon will be displayed on the screen Press the Select Knob to confirm 3 You will then be asked to set the Alarm Type You can choose from BEEP DAB and FM Turn the Select Knob to find your...

Page 24: ...Press the Snooze Button repeatedly until you select the Snooze time you would like to set Contrast You can adjust the Replay Radio display contrast that is appropriate for you This can range from 01...

Page 25: ...Conducting a System Reset will reset and delete all of the settings and stored stations It will return the radio to its original factory settings A System Reset will assist you with any errors you hav...

Page 26: ...ord firmly The Buttons on the Unit are not Responding Electrostatic discharge or interference from other electrical equipment Turn the unit off and disconnect the Power Cord Wait for 5 10 seconds then...

Page 27: ...quality and the failure does not amount to a major failure In the unlikely event that your product fails to work normally please contact the GRUNDIG Warranty on 1800 509 394 Australia or 0800 450 259...

Page 28: ...Grundig Replay 28 PO BOX 6287 Silverwater NSW 1811 www grundig net au...

Reviews: