Grundig GCI-K1527V-1 Quick Manual Download Page 30


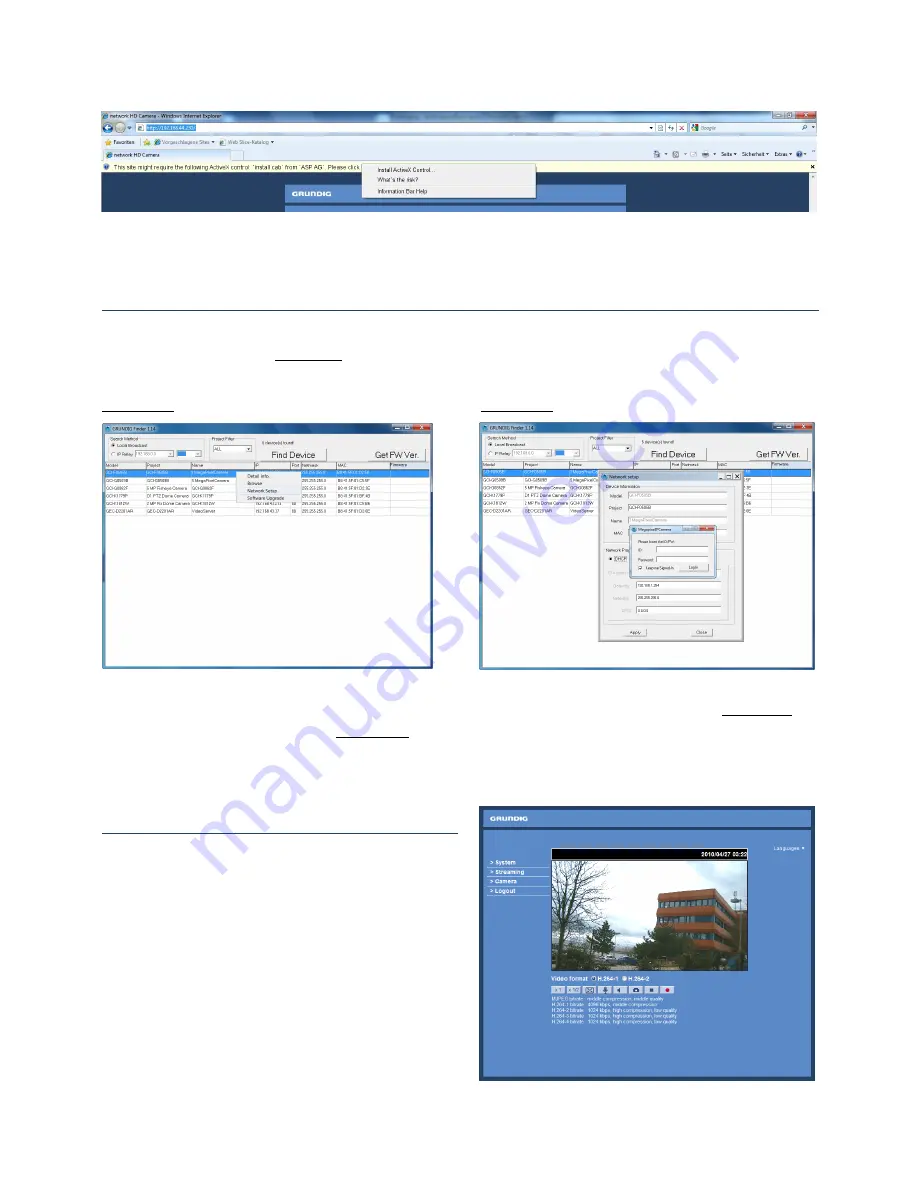
Kliknij prawym przyciskiem myszy na pasku informacyjnym, i naci

ś

nij przycisk <Zainstaluj formant 

ActiveX>. 


W ostrze

ż

enia o zabezpieczeniach, kliknij <Install>, aby rozpocz

ąć

 pobieranie GRUNDIG Viewer. 


Kliknij <Finish> po uko

ń

czonej instalacji GRUNDIG Viewer. 

 
Zmie

ń

 adres IP za pomoc

ą

 programu GRUNDIG Finder                                                                               

Uruchom GRUNDIG Finder i naci

ś

nij przycisk <Find Device>. Wszystkie pod

łą

czone kamery GRUNDIG pojawi

ą


si

ę

 na li

ś

cie poni

ż

ej (patrz 

Obrazek 1

). Kliknij prawym przyciskiem myszy na kamer

ę

 i wybierz <Network 

Setup>. 

Obrazek 1:


Obrazek 2:


Wprowad

ź

 domy

ś

ln

ą

 nazw

ę

  u

ż

ytkownika (

admin

) i has

ł

o (

1234

) w oknie logowania (patrz 

Obrazek 2

). W 

nowym oknie dialogowym (patrz 

Obrazek 2

), gdzie mo

ż

na ustawi

ć

 adres IP kamery w zale

ż

no

ś

ci od 

konfiguracji sieci (DHCP lub statyczne). Kamera uruchomi si

ę

 ponownie z nowym adresem IP po naci

ś

ni

ę

ciu 

<Apply>. 


Podgl

ą

d z poziomu przegl

ą

darki 


Na stronie g

ł

ównej wy

ś

wietlany jest interfejs   

u

ż

ytkownika kamery IP (na zdj

ę

ciu po prawej stronie). 

Nale

ż

y pami

ę

ta

ć

ż

e przyciski funkcyjne mog

ą

 si

ę


ż

ni

ć

 w zale

ż

no

ś

ci od modelu kamery.   


Summary of Contents for GCI-K1527V-1

Page 1: ...GRUNDIG IP Camera GCI K1527V 1 Quick Guide DE EN ES FR IT NL PL RU TR...

Page 2: ...ASP AG Grundig Security 20160607...

Page 3: ...GRUNDIG IP Kamera GCI K1527V 1 Kurzanleitung Deutsch...

Page 4: ...larm Eingang 6 SD Karten Slot Schieben Sie die SD Karten in den Karten Slot um Videos und Schnappsch sse zu speichern Entfernen Sie die SD Karte nicht wenn die Kamera eingeschaltet ist NOTE Es wird ni...

Page 5: ...1 Um eine erste Verbindung zur Kamera mit der Werks IP Adresse 192 168 1 1 herzustellen gehen Sie bitte wie folgt vor Stellen Sie die IP Adresse Ihres PCs so ein dass dieser im gleichen IP Adressraum...

Page 6: ...und dr cken Sie Find Device Alle angeschlossenen GRUNDIG Kameras werden in einer Liste angezeigt siehe Bild 1 Dr cken Sie mit der rechten Maustaste auf die ausgew hlte Kamera und w hlen Sie Network S...

Page 7: ...GRUNDIG IP Camera GCI K1527V 1 Quick Guide English...

Page 8: ...6 SD Card Slot Insert the SD card into the card slot to store videos and snapshots Do not remove the SD card when the camera is powered on NOTE It is not recommended to record with the SD card for 24...

Page 9: ...r Enable Step 1 Start the Internet Explorer Step 2 Select Tools from the main menu of the browser Then Click Internet Options Step 3 Click the Security tab and select Internet Step 4 Down the page pre...

Page 10: ...IG cameras will appear in the list below see Picture 1 Right click on the camera and select Network Setup Picture 1 Picture 2 Enter the default user name admin and password 1234 in the prompt request...

Page 11: ...C mara IP GRUNDIG GCI K1527V 1 Gu a r pida Espa ol...

Page 12: ...R Dcha 6 Alarm Out Coneccion de alarma 7 Alarm Out 8 Alarm In 9 Alarm In 6 SD Card Slot Introduzca la tarjeta SD para grabar videos y snapshots No remueva la tarjeta SD si la camera esta funcionando N...

Page 13: ...para cambiar la configuraci n ActiveX Paso 4 Ajuste el elemento Controles y complementos de ActiveX en Aprobado o Habilitar Paso 1 Inicie el Internet Explorer Paso 2 Seleccione Herramientas en el men...

Page 14: ...Device Encontrar dispositivo Todas las c maras GRUNDIG conectadas le aparecer n en la lista de abajo vea la Imagen 1 Haga clic bot n derecho sobre la c mara y seleccione Network Setup Configurar Red...

Page 15: ...Cam ra IP GRUNDIG GCI K1527V 1 Installation rapide Fran ais...

Page 16: ...larme 9 Entr e Alarme 6 Logement carte SD Ins rer la carte SD dans le logement pour enregistrer les vid os et les captures Ne pas ins rer ou retirer la carte SD lorsque la camera est en service ATTENT...

Page 17: ...Contr le ActiveX et plug ins sur les positions Approuv ou Activ Etape 1 D marrez Internet Explorer Etape 2 S lectionnez Outils dans la barre de menus principale du navigateur Puis cliquez sur Options...

Page 18: ...nt dans la liste ci dessous voir la Figure 1 Cliquez avec le bouton de droite sur une des cam ras et s lectionnez Network Setup Figure 1 Figure 2 Entrez le nom par d faut admin et le mot de passe 1234...

Page 19: ...Telecamera IP GRUNDIG GCI K1527V 1 Guida Rapida Italiano...

Page 20: ...Allarme In 6 SD Card Slot Inserire una SD card nello slot per salvare video e snapshots Non rimuovere la SD card quando la telecamera accesa NOTA Non si raccomanda ri registrar sulla SD card per 24 7...

Page 21: ...Quindi selezionate Opzioni Internet Step 3 Cliccate sul tab Sicurezza e selezionate Internet Step 4 Nel fondo della pagina premete Ripristina livello predefinito quindi OK Chiudete e riaprite il brow...

Page 22: ...telecamera e selezionate Network Setup Immagine 1 Immagine 2 Inserite User Name admin e Password 1234 di default vedi Immagine 2 Comparir una finestra vedi Immagine 2 dove potete modificare l indirizz...

Page 23: ...GRUNDIG IP Camera GCI K1527V 1 Verkorte Handleiding Nederlands...

Page 24: ...rm In 9 Alarm In 6 Sleuf SD kaart Plaats de SD kaart in de gleuf van het kaartslot om video en snapshots op te slaan Haal de kaart niet uit het slot wanneer de camera aan staat OPMERKING Het is niet a...

Page 25: ...niveau en klik op OK om de instelling te bevestigen Sluit het browser scherm en open een nieuw scherm om toegang te krijgen tot de IP Camera Stap 1 Start Internet Explorer Stap 2 Selecteer Extra vanui...

Page 26: ...de Find Device Vind Apparaat knop Alle aangesloten GRUNDIG camera s en apparaten op het netwerk verschijnen in de onderstaande lijst zie Afbeelding 1 Klik met de rechtermuisknop op de camera en select...

Page 27: ...Kamera IP GRUNDIG GCI K1527V 1 Skr cona instrukcja Polski...

Page 28: ...j cie P 6 Alarm wej cie Z cza alarmowe 7 Alarm wej cie 8 Alarm wyj cie 9 Alarm wyj cie 6 Slot kart typu SD W kart SD do gniazda karty w celu przechowywania film w oraz zdj Nie nale y wyjmowa karty SD...

Page 29: ...X i dodatki plug in ustaw elementy do Monituj lub W cz Krok 1 Uruchom Internet Explorer Krok 2 Wybierz Narz dzia z g wnego menu przegl darki Nast pnie kliknij Opcje internetowe Krok 3 Kliknij zak adk...

Page 30: ...e poni ej patrz Obrazek 1 Kliknij prawym przyciskiem myszy na kamer i wybierz Network Setup Obrazek 1 Obrazek 2 Wprowad domy ln nazw u ytkownika admin i has o 1234 w oknie logowania patrz Obrazek 2 W...

Page 31: ...IP GRUNDIG GCI K1527V 1...

Page 32: ...2 BNC 1 GND 2 BNC 3 DC 12V AC 24V 1 AC 24V 1 2 AC 24V 2 3 DC 12V 1 4 DC 12V 2 4 5 1 Audio In L 2 Audio In R 3 GND 4 Audio Out L 5 Audio Out R 6 Alarm Out 7 Alarm Out 8 Alarm In 9 Alarm In 6 SD SD SD S...

Page 33: ...Explorer ActiveX Internet Explorer IP ActiveX 1 Internet Explorer 2 3 ActiveX 4 ActiveX 1 Internet Explorer 2 3 4 OK IP IP DHCP DHCP DHCP IP DHCP 4 IP 192 168 1 1 IP 192 168 1 1 IP PC IP 192 168 1 xx...

Page 34: ...ActiveX IP ActiveX ActiveX ActiveX GRUNDIG Viewer Finish GRUNDIG Viewer GRUNDIG Finder IP GRUNDIG Finder Find Device GRUNDIG 1 Network Setup 1 2 admin 1234 2 2 IP Static IP IP DHCP IP Apply IP IP...

Page 35: ...GRUNDIG IP Kamera GCI K1527V 1 H zl Kurulum K lavuzu T rk e...

Page 36: ...i Alarm Baglantisi 7 Alarm cikisi 8 Alarm giris 9 Alarm giris 6 Micro SD Kart Yuvs Video Kayit ve Snapshot icin SD kartini kart girisine ekle Kamera calisirken SD kartini cikarma Dikkat Micro SD Kart...

Page 37: ...ini Sor yada Etkinle tir olarak ayarlay n Ad m 1 Internet Explorer ba lat n Ad m 2 Taray c ana men s nden Ara lar se in nternet Se enekleri t klay n Ad m 3 G venlik sekmesini t klay n ve Internet se i...

Page 38: ...B t n ba l GRUNDIG kameralar a a da g r len listede g r lecektir bak n z Resim1 Kameran n zerinde sa t klay n ve Network Setup se in Resim 1 Resim 2 stem iste i diyalog penceresinde varsay lan kullan...

Reviews: