background image

- 25 -

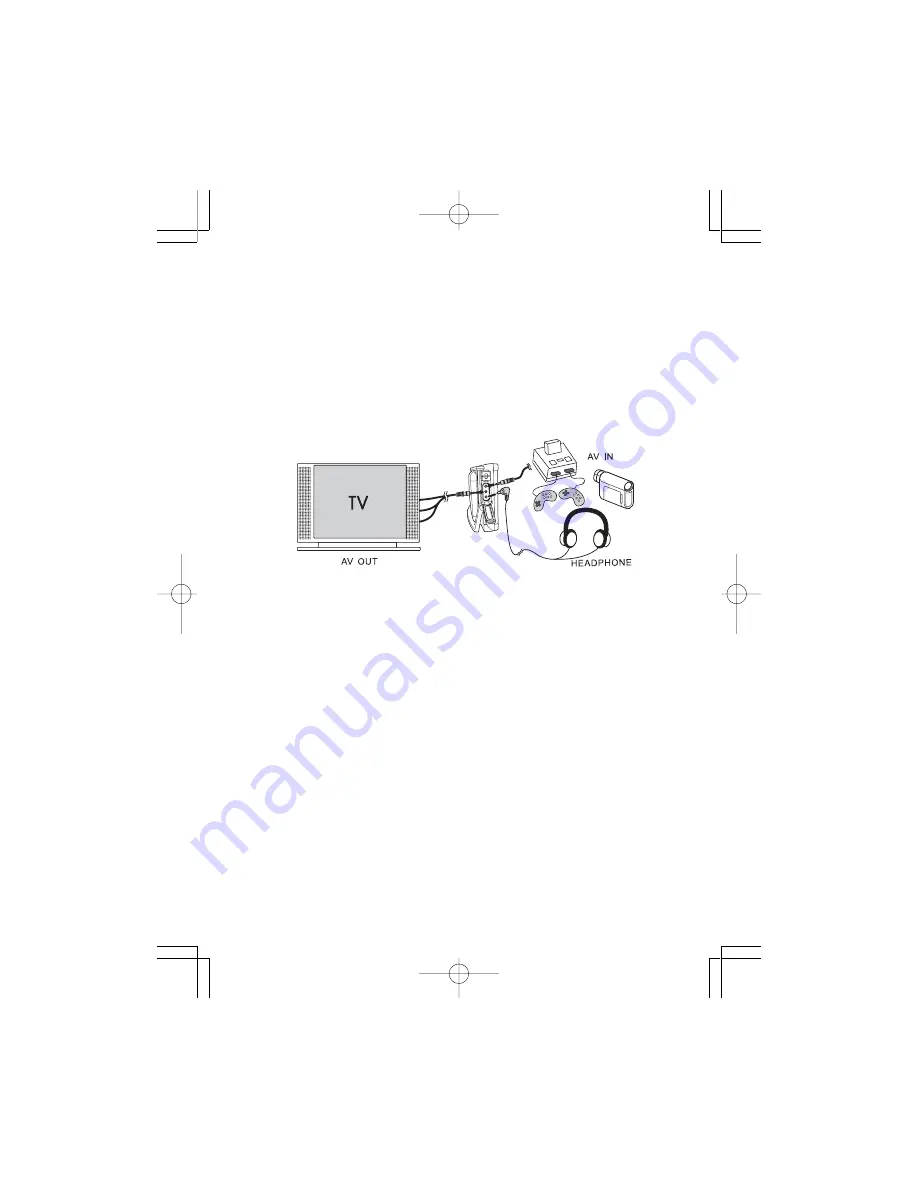
N.  Connecting to a TV or another monitor 

( Refer to Figure 4)

1. You can also connect the DVD player to a TV to enjoy high quality
    stereo sound and picture on another monitor.

a. Position the AV In/Out Switch to “Out” Position.
b. Connect one end of the audio/video cable’s black  (1/8”  plug)
plug into the unit’s  DVD  AV  jack, and connect  the other end to
the AUDIO INPUT  jacks on your TV or Monitor through AV adapter
cable(white = left channel, red = right channel, yellow=video).

Figure 4

Note:

 Optional wired headphone may be used with the unit.

Simply plug in the headset to either Headphone 1 jack or
Headphone 2 jack on the right side of the DVD.

Plugging into Headphone jack 1 disables the internal speakers.

2.  You can enjoy the other audio and video source input from AV

     jack.

    a. Position the AV In/Out Switch to “In” Position.

b. Connect one end of the audio/video cable’s black  (1/8”  plug)
plug into the unit’s  DVD  AV  jack, and connect  the other end to
the AUDIO Output  jacks on your Camcorder or other DVD through
the AV adapter cable(white = left channel, red = right channel,
yellow=video).

Note:

 Please don’t connect other AV signal source with the AV

jack when the unit is in “Out” Mode.

Summary of Contents for DVD-P 7644

Page 1: ...PROTABLE DVD PLAYER DVD P 7644 ENGLISH ...

Page 2: ......

Page 3: ... and Connectors 7 F Loading and Playing a Disc 8 G Setup 9 H Basic Operation 15 I Menu 16 J Display 16 K Playing Audio CDS 20 L Playing MP3 Discs 22 M Playing JPG file 24 N Connecting to a TV or another monitor 25 O Technical Data Specifications 26 P Rechargeable Battery Installation and Use 26 Q Troubleshooting 29 ...

Page 4: ...ion will assist you in installing the system properly to ob tain the best equipment performance Please save this manual for later use B Cautions and Warnings 1 Placement Do not place the set on an unstable cart stand tripod bracket or table to prevent it from falling Keep the unit away from strong magnets heat sources direct sunlight excessive dust If the unit is brought directly from a cold to a ...

Page 5: ...s unplugged from the power source Do not use liquid cleaners or aerosol cleaners Use a cloth lightly dampened with water for cleaning the exte rior of the system only 6 Disc Do not use irregularly shaped discs such as heart or star shaped discs as they may cause the unit to malfunction Do not stick paper tape or glue on the disc Do not expose the disc to direct sunlight or heat sources Do not touc...

Page 6: ...as been given region code 4 DVDs with other regional codes can not be played Notice 1 This Product incorporates copyright protection technology that is protected by method claims of certain U S Patents and other intel lectual property rights owned by Macrovision Corporation and other rights owners Use of this copyright protection technology must be authorized by Macrovision Corporation and is inte...

Page 7: ... 4 C Packaging Contents 1 DVD P7644 7 Water Resistant DVD Portable Player 2 Remote Control 3 1 Lithium battery 3V CR2025 for remote control 4 DC Jack Connector ...

Page 8: ... 5 5 Rechargeable battery 6 Car adapter for power supply in the vehicle 7 Audio Video cable 8 Mains adapter 9 Operating manual ...

Page 9: ...another mains adapter can cause the device to malfunction and may also result in damage to the unit If you do not require the mains adapter pull out the plug from the wall socket a Insert the plug of the mains adapter cable into the input socket DC 9V IN of DC connector on the DVD player b Insert the mains adapter plug into the wall socket 2 Powering the system in a car Plug one end of the cigaret...

Page 10: ...ower On Off Botton 4 Volume Up Down Control 5 Brightness Up Down Control 6 Speaker 7 Play Button 8 Stop Button 9 Next Button 10 Previous Button 11 Remote Control Sensor 12 Picture mode Button 4 3 or 16 9 13 Slide Handle 14 DC Input contacts 15 Backcover clasp 16 Backcover 17 Jack cover 18 Headphone 19 AV OUT 20 AV IN ...

Page 11: ...n 16 Repeat Button 17 SKIP Previous Button 18 SKIP Next Button 19 Play Button Figure 3 20 Pause Button F Loading and Playing a Disc a Press POWER ON OFF on the device to turn on the DVD Player b Open the disc tray by switching OPEN and place a disc into the tray with the label side facing up c Close the tray the unit will automatically load the disc and start playing DVD d Press BRIGHTNESS and VOL...

Page 12: ...ghted Press SETUP again to exit the Setup Menu and the unit will resume it s last playback mode Main Setup Menu Screen 2 Press the ENTER button TV Display is highlighted 3 Press the or button to select the other menus in general setup page 4 Press to enter the sub menu 5 Press the or button to select the sub menu and press the ENTER to confirm your selection 6 Repeat steps 3 5 for other menus ...

Page 13: ...e angle mark icon If an angle option is available Off The screen will not display the Angle Mark NOTE Not all discs contain above features The above features are disc dependent d OSD language English The set up menu will be displayed with English Japanese The set up menu will be displayed with Japanese e Screen Saver On Enables screen saver NOTE The DVD player will enter the Screen Saver mode afte...

Page 14: ... Press the ENTER button Brightness is highlighted 3 Press the or button to select the other menus in video quality setup page 4 Press to enter the sub menu 5 Press the or button to adjust the quantity and press the ENTER to confirm your selection 6 Repeat steps 3 5 for other menus Note Press to return the previous menu a Brightness b Contrast c Hue d Saturation ...

Page 15: ...Password Change Page Input the Old Password or the Default Password the New Password and the Confirmed New Password Press ENTER to confirm the change Password Change Page Screen Display Note The default password is 3308 4 Preference Page 1 In Setup menu Press the or button to select Preference Page and is highlighted Press ENTER to enter the preference page 2 Press the ENTER button Audio is highli...

Page 16: ...TER to confirm your selection 6 Repeat steps 3 5 for other menus Note Press to return the previous menu a Audio b Subtitle c Disc Menu Note Language and subtitle selection is only available for discs that are recorded in the above listed languages If the selected language is not available the player will play and display on the screen the original recorded language contained in the disc ...

Page 17: ...tory default e Select Default using the UP DOWN button then press RIGHT to enter the submenu Press ENTER to make the setting return to the factoryset mode NOTE The parental setting is not affected by the default reset function Loading Factory Setting NOTE The Default Password is 3308 This password is always effective even after you have selected your own password and changed it To avoid the possib...

Page 18: ...track or scene during play back Scan forward at 2 4 8 16 or 32 times speed Scan backward at 2 4 8 16 or 32 times speed Used for Menu Navigation Execute item or confirm setting Select item or setting Display the main menu of the disc Repeat playing title chapter or track Repeat a specific portion from point A to point B of the disc Display information title chapter track time etc Change the viewing...

Page 19: ...ber 1 the total Number of Titles 2 the current Chapter Number 3 the total Number of Chapters 4 and the Playing elapsed Time for the title 5 The heading will disappear automatically after 3 seconds if DISPLAY button is not pressed Title Chapter Number and Time Screen Display b Press DISPLAY constantly to choose the options below cir cularly Title Elapsed The elapsed time of the title Title Remain T...

Page 20: ...l discs contain this feature Angle Screen Display 3 SUBTITLE During disc playback press SUBTITLE to select the subtitle lan guage you desire with the current Subtitle Language Number 1 and the total Number of Subtitle Languages 2 displayed If there are multiple languages press SUBTITLE again to select another subtitle language To turn subtitles OFF press the SUBTITLE but ton until Subtitle Off is ...

Page 21: ...n is not pressed within for 3 seconds Audio Language Screen Display Some DVDs only allow access to this function through the DVD menu 5 ZOOM During playback press ZOOM to enlarge the picture by 2x 3x or 4X with the current zoom multiple 1 Press zoom one time the picture will be enlarged 2X 2 Press zoom a second time the pic ture will be enlarged 3X 3 Press zoom a 3rd time the picture will be enlar...

Page 22: ...arting Point Screen Display b Press A B a second time to set the Ending Point B and the player will repeatedly play the part between Point A and Point B A B Repeat Ending Point Screen Display c Press A B a third time to cancel A B repeat and resume normal playback A B Repeat Cancelled Screen Display ...

Page 23: ...en playing an audio CD press the DISPLAY button constantly on the remote to view time information The options below appear on screen display circularly to show you what information is available using this function CD Display Mode Single Elapsed The current track playing and playing time of that track will display on the screen Single Remain The current track playing and the amount of time left Tit...

Page 24: ...t be displayed Take Single Elapsed display as a example Single Elapsed Screen Display USINGTHEREPEATFEATURE The default mode for the Repeat feature is OFF Pressing REPEAT consecutively changes the repeat options Track repeats the track that is playing All repeats the disc that is playing Off As you toggle through the options the repeat option changes The selected repeat option loops repeatedly unt...

Page 25: ...P3 disc is inserted into the unit the menu screen appears automatically You can use the menu screen to select your desired folders and songs or the system plays the songs in the order they were burned onto the disc 1 Press the or button to choose a folder from the folder list on the left side of the screen 2 Press ENTER to select the highlighted folder The songs available under the folder will be ...

Page 26: ...F Folder Pressing REPEAT consecutively changes the repeat options Single Repeat One repeat playback of a song Repeat Folder repeat playback of a specific folder Folder normal playback As you toggle through the options the repeat mode changes The selected repeat mode loops repeatedly until you turn it off NOTICE icon in front of a file name indicates that this is a folder not an MP3 file MP3 icon i...

Page 27: ... the JPG file press DISPLAY there will be different refresh mode below WIPE TOP WIPE BOTTOM WIPE LEFT WIPE RIGHT DIAGONAL WIPE LEFT TOP DIAGONAL WIPE RIGHT TOP DIAGONAL WIPE LEFT BOTTOM DIAGO NAL WIPE RIGHT BOTTOM EXTEND FROM CENTER H EXTEND FROM CENTER V COMPRESS TO CEN TER H COMPRESS TO CENTER V WINDOW H WINDOW V WIPE FROM EDGE TO CENTER 7 When previewing the file pressing ANGLE SUBTITLE AUDIO N...

Page 28: ...ptional wired headphone may be used with the unit Simply plug in the headset to either Headphone 1 jack or Headphone 2 jack on the right side of the DVD Plugging into Headphone jack 1 disables the internal speakers 2 You can enjoy the other audio and video source input from AV jack a Position the AV In Out Switch to In Position b Connect one end of the audio video cable s black 1 8 plug plug into ...

Page 29: ...ower Consumption 15W TYP Ambient temperature 5 C to 35 C LCD Screen 7 Active Matrix TFT DVD Player Playback standard PAL 50 Hz 625 lines Picture Format 4 3 16 9 Playback System DVD Video MP3 CD Audio CD CD DA CD R Dimensions and weight A DVD Player W x H x L 290 x 180 x 62 mm 1 6 kg P Rechargeable battery Installation and use 1 Ensure the Recharge Battery Li ion is placed properly into the unit 2 ...

Page 30: ...evice Cautions Do not dismantle the rechargeable battery Do not touch the contacts of the rechargeable battery with metal objects Do not expose the battery to direct sunlight or leave it on the car dashboard or other areas where high temperatures may arise danger of explosions Protect the battery and DC jack connector against water fire and heat Only use the mains adapter supplied to change the ba...

Page 31: ...d revolve it until it locks into position The unit will fit snugly to the player Figure 5 Installing the DVD Player Battery Removing the Battery Pack 1 First open the CD cover 2 Press the release button on the both side of battery 3 Pull the battery out of the rear flank Figure 6 Removing the DVD Player Battery ...

Page 32: ...ure is not available at the moment 4 You ve requested a title or chapter number that is out of range Can t advance through a movie The icon appears on screen SOLUTION PROBLEM No sound or distorted sound Picture is distorted The disc might be damaged Try another disc It is normal for some distortion to appear during forward or reverse scan Some discs have sections that prohibit rapid scanning or ti...

Page 33: ...in 10 feet of the sensor Insert a disc with the label side facing up Check the type of disc you put into disc tray This DVD only plays digital video discs audio CDs and MP3s Both the unit and the disc are coded by region If the regional codes don t match the disc can t be played This DVD is coded for Region Number 1discs The disc is dirty Clean it Condensation has formed Allow player to dry out Di...

Page 34: ...Grundig Multimedia B V Atrium Strawinskylaan 3105 NL 1077 ZX Amsterdam http www grundig com 72011 606 1500 ...

Reviews: