Grundig DSR 3735 CI User Manual Download Page 43

ENGLISH

43

INFORMATION ____________________

Troubleshooting

If a fault occurs, first refer to this information before you take the digital
receiver for repair.
If you are unable to rectify the fault using the information given here, contact
your local dealer or service specialist.
Under no circumstances should you attempt to repair the digital receiver
yourself, as this will invalidate the guarantee.
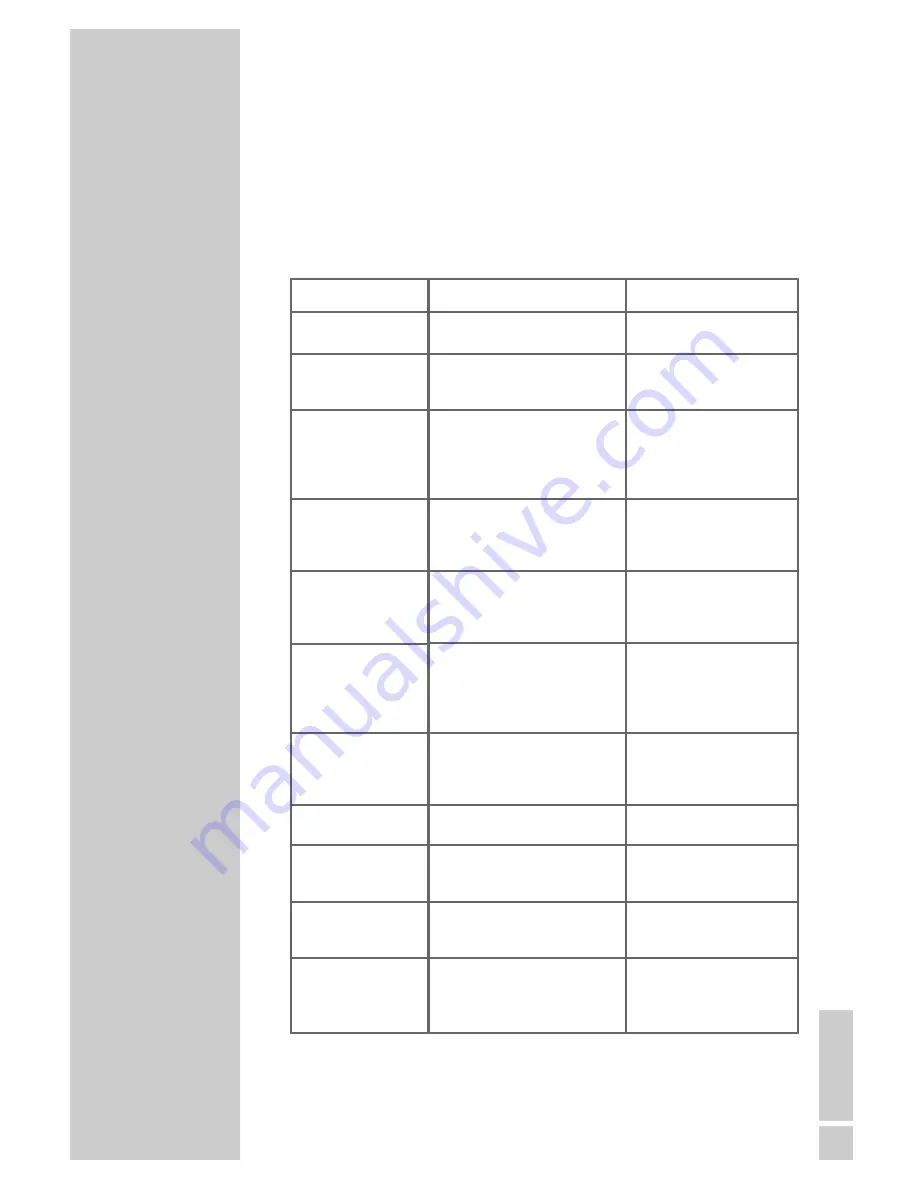
PROBLEM

No function, mode
indicator not lit

Message »Short cir-
cuit or overload at
the antenna input«

No picture

No sound

Picture but no sound

Message 
»Faulty signal«

The remote control
does not work.

The time is not dis-
played correctly

Some stations are not
received from time to
time

Subscribed PAY-TV
stations are not recei-
ved

Interference of picture
from stations with a
frequency of approx.
12480 MHz

POSSIBLE CAUSE

Power supply unit incorrectly
connected

Short circuit on the line

HDMI or SCART cable not pro-
perly connected, incorrect set-
tings in the 
»Video output TV« menu or
»HDMI output«

The sound is muted, the Euro-
AV cable is incorrectly connec-
ted or the receiver volume is set
to low

Station is broadcast in Dolby
Digital, »Automatic«  selection
is »On«, but no digital audio
device is connected.

The satellite antenna is not cor-
rectly installed, the satellite
cable is damaged, incorrect set-
tings in the »Antenna connec-
tion« menu

No batteries are inserted, or
they are low, or the remote con-
trol is not directed at the infra-
red receiver

Deviation from local time

These stations are not broadcast
24 hours a day and are someti-
mes not available

The smart card is not properly
inserted 
It has not yet been activated

The interference may be 
caused by DECT cordless 
telephones near the receiver

REMEDY

Connect power supply unit
correctly

Check the plug, cable 
and LNB

Connect the HDMI or
SCART cable correctly,
make the correct menu set-
tings

Switch on the sound, connect
the Euro-AV cable correctly,
turn up the volume

Install the satellite antenna
correctly, replace the satel-
lite cable, enter the correct
menu settings

Switch the automatic
search to »Off«, 
(see p. 32) or connect a
digital audio device

Insert batteries correctly,
insert new batteries, align
remote control with the
infrared receiver

Correct the difference

No error

Insert the smart card in the
receiver, see instructions on
page 11

Take the DECT telephones
away from the receiver and
the satellite cable

Summary of Contents for DSR 3735 CI

Page 1: ...DIGITAL SATELLITE RECEIVER DSR 3735 CI...

Page 2: ...recorder or video recorder 11 Inserting the common interface module 12 Connecting the power supply unit 12 Inserting batteries in the remote control 13 20 Basic settings 13 The menu 14 Initial setup...

Page 3: ...ccess 36 40 Special settings 36 38 Searching for new stations 38 39 LNB settings 40 Resetting the digital receiver to its original state 40 Updating the digital receiver software 41 44 Information 41...

Page 4: ...nd radio stations have already been programmed for this device You can start a channel search to ensure that any new satellite channels are available on your device How this works and what you need to...

Page 5: ...by the HDCP system High bandwidth Digital Content Protection Special features of your digital satellite receiver The DSR 3735 CI digital receiver can receive and process encrypted and all unencrypted...

Page 6: ...iver remember that furniture is often coated with various types of varnish and plastic which often con tain chemical additives These additives may cause corrosion to the feet of the unit This may leav...

Page 7: ...R Euro AV SCART socket for connecting a video recorder or DVD recorder with Euro AV SCART socket SP DIF Audio outputs optical for PCM Dolby digi tal DTS signals For connecting to a digital multi chann...

Page 8: ...itches from TV mode to teletext mode mix mode and back to TV mode TV G Opens the electronic TV guide TV Switches to TV mode MHP This has no function A B Switches between the two most recently selected...

Page 9: ...the antenna 1 Connect the antenna cable of the satellite antenna to the socket IN of the digital receiver screw connector F connector Connecting the television 1 Plug the supplied HDMI cable into the...

Page 10: ...IO OUT L socket on the digital receiver and the corresponding socket on the hi fi Manufactured under licence from Dolby Laboratories Licensing Corpo ration Dolby Dolby Pro Logic Dolby Digital and the...

Page 11: ...an obtain these from a specialty dealer or the respective broadcasting station 1 Open the cover on the front of the digital receiver 2 Insert the corresponding smart card in the Common Interface modul...

Page 12: ...1 Open the battery compartment by removing the lid 2 When inserting the batteries for example R06 or AA 2 x1 5 V observing the polarity marked in the battery com partment 3 Close the battery compartm...

Page 13: ...een you and the digi tal receiver Press i to open the main menu You can navigate in the menu by pressing P or P and select the desired symbol The selected symbol is highlighted When you press OK to co...

Page 14: ...iguration of the reception system antenna LNB fre quencies multiswitch The settings are described on page 16 Searching for new stations New satellite channels are frequently added or satellite data is...

Page 15: ...ct the Screen Format line and press or to select the screen format for your television 8 Press P or P to select the TV Output Format line and press or to select the video signal for your television 9...

Page 16: ...o select the video signal for your television 9 Press P or P to select the OK button and press OK to confirm the entries The LNB settings menu appears and the sattelite Astra 19 2 East is set under Po...

Page 17: ...or P and press OK to confirm To save this setting select the Yes button with OK 11 Select the OK button with P or P and confirm the entries with OK Notes The preprogrammes stations for the Astra 19 2...

Page 18: ...several satellites or of all satellites are displayed in the channel list Channels all stations which are free to air or encrypted are displayed in the station list Sorting the channels can be ordered...

Page 19: ...star in the station list Note Repeat the procedure for any other stations 6 Press i to conclude the setting Sorting stations in the favourite lists 1 Press i to open the main menu 2 Press P or P to s...

Page 20: ...stations in the station list 4 Press A B to switch to the favourites list 5 Press P or P to select the station to delete 6 Press z to delete the station The station is deleted from the favourites list...

Page 21: ...y time you change station a display appears informing you of the current preset number the name of the station the time the title of the current and subsequent broadcast and the start time Pressing di...

Page 22: ...on the television screen Muting the sound 1 Press d on the remote control to mute the sound 2 Press d on the remote control to switch the sound on again You can hear the sound at the volume previously...

Page 23: ...ide any information at all 2 Press P P or to select the programmes Notes You can switch directly to the morning afternoon or evening programmes using the coloured buttons 3 Press to call up informatio...

Page 24: ...ess TXT to activate mix mode The teletext is superimposed on the television picture 6 To switch off the teletext press TXT again Additional functions Selecting a teletext page directly Most main pages...

Page 25: ...nt for the television If you selected a 4 3 format you can make the setting Pan Scan CCO for wide screen playback without black bars on the top and bottom edges of the screen The picture is cropped on...

Page 26: ...2 Press P or P to select function 3 Press or to select function value Setting the video signal at the SCART TV output You can choose between Video FBAS normal picture quality S Video Y C or RGB high...

Page 27: ...sand press OK to confirm Ending the settings 1 Press i to end the setting Language settings 1 Press i to open the main menu 2 Press P or P to select the Box Settings line and press OK to confirm 3 Sel...

Page 28: ...e desired language Selecting the second subtitle language If the subtitles are not broadcast in the language selected under Subtitle Language the Subtitle Language 2 is used 1 Select the Subtitle Lang...

Page 29: ...fo Banner Duration with P or P 2 Press or to select the display duration Automatic info banner You can determine whether the info banner should be displayed when a new programme starts 1 Select Info B...

Page 30: ...Effect line using P or P 2 Select your preferred background with or Selecting the colours of the OSD You can adjust the colours of the OSD menu 1 Select Colour Scheme with P or P 2 Select the colour...

Page 31: ...ime Zone Adjustment menu option 1 Select the Time Zone GMT line with P or P 2 Press or to select time zone Selecting daylight saving time You can only set daylight saving time if Manual is selected in...

Page 32: ...h P or P 2 Press or to select the desired delay time Specifying the order of stations in the station list The order of stations can be standard from A to Z from Z to A or according to broadcasters or...

Page 33: ...rt and end time as four digits with 1 0 9 Select the cycle with or and press OK to confirm 10 Select OK with P or P and press OK to save timer entries The timer data is saved to the timer list Note Yo...

Page 34: ...nly be opened when the PIN code is entered 1 Select Menu Lock with P or P 2 Press to activate the menu lock or to de activate it Parental control You can set a minimum age for certain programmes here...

Page 35: ...d information available depend on the Common Interface module and the smart card 1 Press i to open the main menu 2 Selected Conditional Access using P or P and press OK to confirm Note Any further opt...

Page 36: ...annels with P or P and press OK to confirm 3 Select Automatic Search with P or P and press OK to confirm 4 Select Satellite with P or P and select the satellites Astra 1 19 2 east or the setting All u...

Page 37: ...nsponder is not pre defined Symbol Rate Enter the five digit symbol rate of the chan nel using 1 0 only required if the transponder is not pre defined Polarisation Select polarisation of the channel H...

Page 38: ...our satel lites at once Under positions A D you choose the corre sponding satellite for the relevant DiSEqC positions You can set the number of sequences for special systems under DiSEqC sequence No L...

Page 39: ...ivate Press P or P to select the Satellite line and press or to select the required satellites Press P or P to select Low Band LOF or High Band LOF and press 1 0 to enter the required fre quencies Sel...

Page 40: ...to open the main menu 2 Select Technical Information with P or P and press OK to confirm 3 Select System Information with P or P and press OK to confirm 4 Select Update Software with OK The digital re...

Page 41: ...y depends on the settings of your receiver unit but also on the channel which is currently active Remember this when aligning your antenna using the signal level display 5 Press i to quit the menu Dis...

Page 42: ...supply 14 V 18 V max 275 mA LNB switching signal 0 22 kHz 0 5 Vss tone burst DiSEqC 1 0 control tone burst A tone burst B OSD display and programming func tions in twelve languages Search automatic m...

Page 43: ...set to low Station is broadcast in Dolby Digital Automatic selection is On but no digital audio device is connected The satellite antenna is not cor rectly installed the satellite cable is damaged inc...

Page 44: ...ehold waste at the end of its service life Take it to a collection point for recycling electrical and electronic devices This is indicated by this symbol on the product in the operating manual and on...

Page 45: ...Grundig Multimedia B V Atrium Strawinskylaan 3105 NL 1077 ZX Amsterdam http www grundig com...

Reviews: