background image

32

USING EXTERNAL DEVICES

_______________

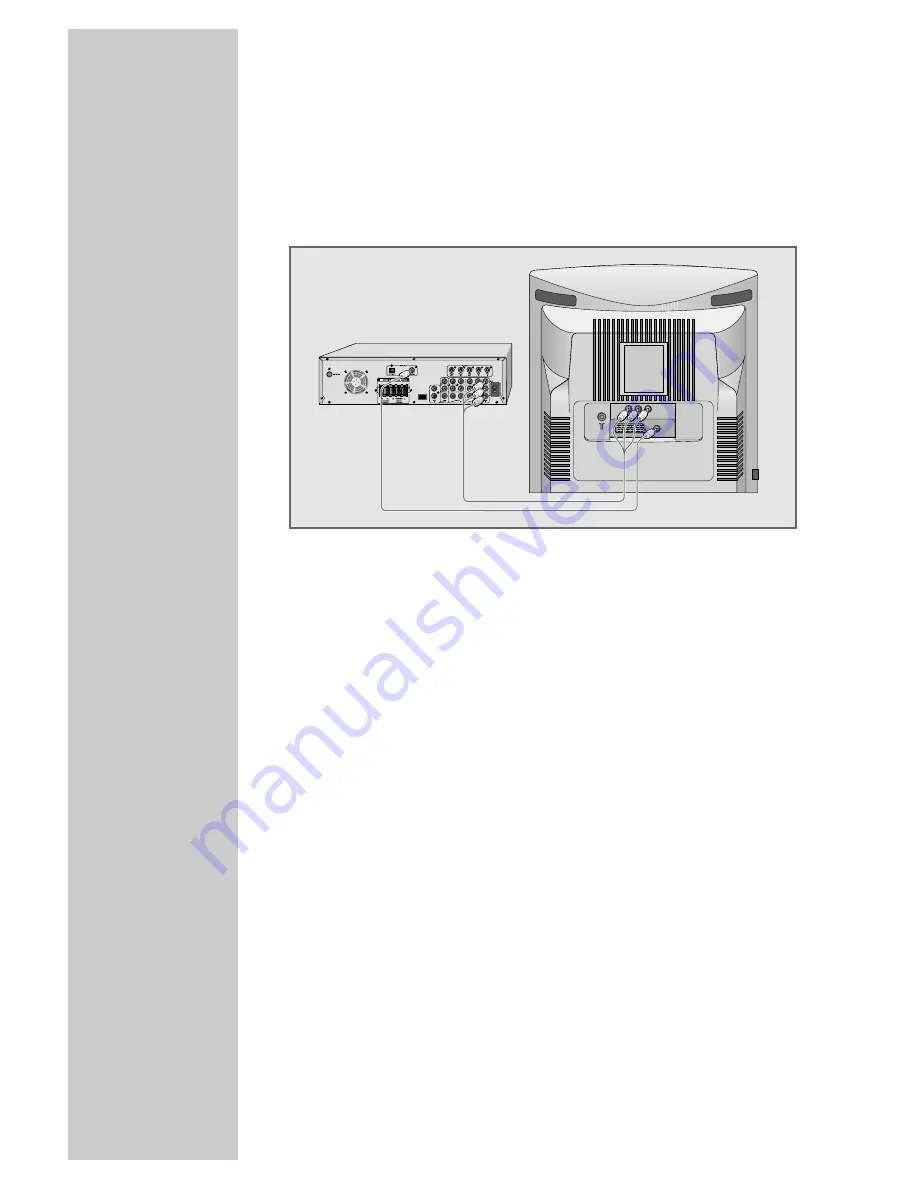
Connecting a multi-channel amplifier or digital
two channel audio system

The digital multi-channel sound of a DVD can best be decoded and
played back with a multi-channel audio/video amplifier (Dolby*
digital decoder or DTS).

1

Plug a standard cinch cable into the cinch socket »

COAXIAL

«

(digital audio signal) on the television and into the correspond-
ing socket on the digital multi-channel amplifier.

2

Plug a standard cinch cable into the cinch sockets »

VIDEO

« 

(picture signal), »

A/L

« (left audio signal) and »

A/R

« (right

audio signal) on the television and into the corresponding 
sockets on the digital multi-channel amplifier.

Note:

Even if you are using a digital connection, you should still make
an analogue audio connection as it is possible, depending on
the disc type, that no signal can be output via the »

COAXIAL

«

socket.

VIDEO A/L

A/R

COAXIAL

AV

WT–A

* Manufactured under licence from Dolby Laboratories Licensing Corporation.

“Dolby”, “Dolby Pro Logic”, “Dolby Digital” and the double-D symbol “

ij

” are

trademarks of the Dolby Laboratories Licensing Corporation. Copyright 1992
Dolby Laboratories, Inc. All rights reserved.

Summary of Contents for DAVIO 14 TVD 37-2502 TEXT

Page 1: ...COLOR TELEVISION DAVIO 14 TVD 37 2502 TEXT DEUTSCH ENGLISH NEDERLANDS ESPA OL PORTUGU S...

Page 2: ...D mode 18 Special DVD features 18 Disc formats 19 21 Preparation 22 23 Using a DVD video CD or audio CD 24 Additional functions during DVD or video CD playback 25 Using an MP3 CD or JPEG CD 25 Additio...

Page 3: ...units or in direct sunlight as this will impair cooling Heat build up can be dangerous and shortens the operating life of the tele vision set For reasons of safety have a specialist remove any dirt de...

Page 4: ...ttery compartment 3 Close the battery compartment Note If the television no longer reacts properly to remote control commands the batteries may be flat Be sure to remove used batteries The manufacture...

Page 5: ...irectly d Sound on off mute i Opens and closes the info menu closes all menus Z Zap function Page hold in teletext mode P P Switch the television on from standby Select channels step by step Move the...

Page 6: ...CR SAT Switches to operating a GRUNDIG videorecorder DVD EXT a GRUNDIG satellite receiver or a GRUNDIG DVD player Keep the appropriate button VCR SAT DVD EXT pressed down Then press the appropriate bu...

Page 7: ...OK Confirms functions DVD Opens the main menu on the DVD unit SETUP TITLE Calls up the DVD title menu during playback 3 Switches to reverse frame search at various speeds during playback 4 Switches t...

Page 8: ...CDs Pause for audio CDs and MP3 CDs activates menu functions s 6 Selects the next title or section during playback Selects various functions in the menus Opens and closes the disc compartment PROG VOL...

Page 9: ...ins The auto matic search may last several minutes depending on the num ber of television channels received After the search the television switches to channel 1 Changing stored channels You can delet...

Page 10: ...els You can mark television channels which should be skipped during selection with P or P A selection with the number keys is also possible 1 In the Program Table menu select the desired channel with...

Page 11: ...ure with P or P and confirm with OK The Picture menu appears 3 Select Brightness Contrast Colour or Sharpness with P or P and adjust them with or 4 Press i to finish the settings SETTINGS ____________...

Page 12: ...witch it on again Displaying time 1 You can display the time by pressing the button only for channels with teletext Changing the picture format The television automatically switches to the 16 9 format...

Page 13: ...to save in the zap memory with 1 0 or P P e g channel 1 BBC 1 and save by pressing Z The display z P1 BBC1 appears in the screen 2 Change channels with 1 0 or P P 3 You can now use Z to switch betwee...

Page 14: ...le a page is being searched for you can switch to the television channel 1 Enter the teletext page number with 1 0 and then press UPDATE As soon as the page is found the teletext page number appears i...

Page 15: ...nter the four digit sub page number with 1 0 The selected sub page is displayed after a short delay Reveal answer Certain teletext pages contain hidden answers or information These can be viewed 1 Pre...

Page 16: ...n 15 minute intervals from 15 to 120 minutes by pressing or 5 Press i to finish the setting Note To delete the switch off time select Sleep Timer again and press or to select Off Automatic volume Tele...

Page 17: ...lock You can block any station The screen goes black 1 Press i to open the info menu The info menu appears 2 Select Setup by pressing P or P and confirm with OK 3 Select Child Lock with P or P 4 Press...

Page 18: ...o the difference in quality of the recording media and the quality of the recording itself it can occasionally happen that a home made DVD or CD cannot be read This does not indicate a malfunction of...

Page 19: ...e disc you want to play in the disc compartment with the label facing upwards 3 Close the disc compartment with The disc tray retracts again and the disc is scanned Notes Playback of a DVD VCD SVCD or...

Page 20: ...leased in different parts of the world at different times all DVD players world wide are given a regional code The regional code for your DVD player is 2 DVDs may also be given a supplementary regiona...

Page 21: ...CM coded regardless of the audio output setting The signals are output with the same data rate as the music source possibilities are 32 kbps 320 kbps ideal 128 kbps MP3 files can be organised into fol...

Page 22: ...time for display on the screen 1 Press GO TO twice to display the info menu You will see information on DVD VCD Disc type Title 01 02 The current title and available titles Chapter 03 18 The current...

Page 23: ...apters this can be seen by Title and Chapter in the info menu 1 Call up the contents of the disc with DVD MENU Disc Menu or TITLE Title Menu If the disc has a title menu it will appear on the screen 2...

Page 24: ...8 for wards or reverse 1 Press 8 during playback 2 Select the slow motion speed by pressing 3 or 4 3 Press 8 to resume playback Freeze frame Pause 1 Press 8 during playback 2 Press 8 to resume normal...

Page 25: ...electing a track in steps SKIP 1 Select the next track by pressing s 6 during playback 2 Select the previous track by pressing 5 a Playback begins with the selected track Additional JPEG CD playback f...

Page 26: ...pears and position 1 is marked 3 Enter the number of the title chapter or track with 1 0 4 Select the next input position with P or P Note Delete all entries by selecting Clear All using P P or and pr...

Page 27: ...y subtitles Audio Language Select the dubbing language Menu Language Select the language of the DVD menus Display Function Switch function displays e g II Pause on off Picture menu TV Format Set the p...

Page 28: ...er the password and press OK to confirm After you enter a ran domly selected numerical code the access level can no longer be changed Access Level Select access level 1 to 8 The lock symbol must be op...

Page 29: ...e connected to this socket If you want to use both a satellite receiver and a decoder the decoder must be connected to the satellite receiver Using a decoder 1 Switch on the television and the decoder...

Page 30: ...information from the video recorder or the set top box on the television set Notes You can connect an external RGB device set top box to the Euro AV1 socket However you will need to use a fully assign...

Page 31: ...sound signal on the television and the corresponding sockets of the cam corder with a cinch cable Using a camcorder VHS Video 8 1 Switch on the camcorder insert a cassette and start playback 2 Select...

Page 32: ...into the cinch sockets VIDEO picture signal A L left audio signal and A R right audio signal on the television and into the corresponding sockets on the digital multi channel amplifier Note Even if y...

Page 33: ...OK The Stored message appears Note To set other television stations repeat steps 3 to 5 6 Press i to finish the setting Fine tuning television channels The television automatically tunes itself to th...

Page 34: ...ple if you move to another town 1 Press i to open the Main Menu 2 Select Setup with P or P and confirm with OK The Setup menu appears 3 Select Program No with P or P and using or enter the channel num...

Page 35: ...are employed or OTHER PROCEDURES are carried out this may lead to dangerous radiation exposure DTS and DTS Digital Out are trademarks of Digital Theater Systems Inc All rights reserved During playback...

Page 36: ...lock has been activated Remedy Is the antenna cable connected Start the station search Adjust the brightness contrast or colour setting Test with another channel Change the position of the devices Aut...

Page 37: ...it is an unauthorised intervention invalidate any claims under the guarantee GRUNDIG will refuse to refund any costs resulting in such cases Any repair costs in such cases even those occurring within...

Page 38: ...be protected by a 5A fuse either in the plug or at the distribution board If this type of plug becomes defective ensure that the fuse is removed before disposal to eliminate potential shock hazard If...

Reviews: