background image

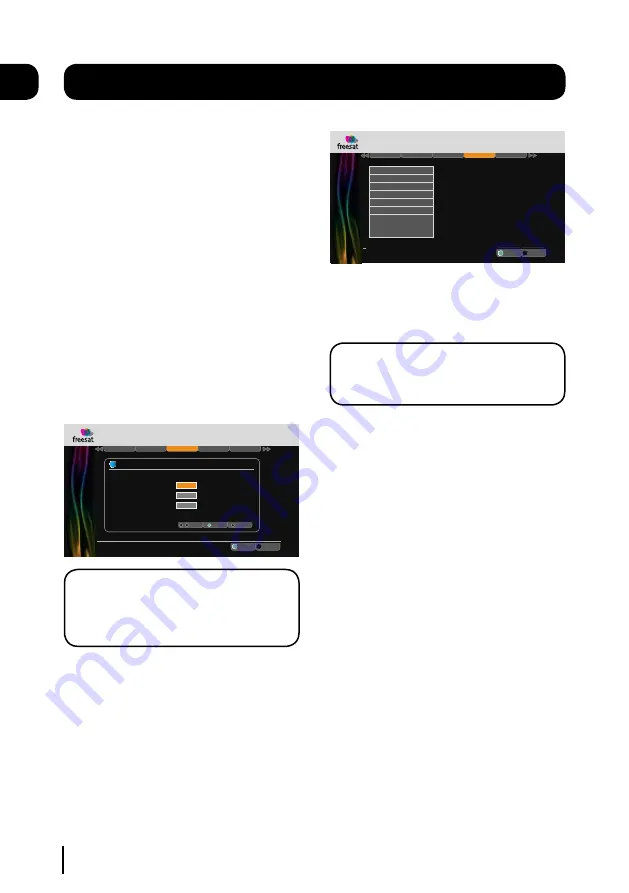
Allow Parental Settings Changes

 - This setting 

chooses if you want to allow access to the 
parental menu without entering a PIN. The 
default setting is that you must enter a PIN.

Allow Hard Disk Drive Format

 - This setting 

chooses if you want to allow the hard disk drive 
to be formatted.

Change Parental PIN

 - This setting allows you to 

change the Parental PIN. 

Hide Adult Genre

 - This setting chooses if you 

want to allow access to channels in the Adult 
genre category. The default setting is that adult 
channels are displayed in the channel list and 
programme guide.

Display & Audio

Language

Parental

F

Other

R

Exit Menu

.

Select

EXIT

OK

This menu is PIN protected.

INFORMATION

PIN Change

Confirm

OK

Exit Menu

EXIT

Enter PIN

9

wxyz

0

_

Enter your existing PIN.

_  _  _  _

Enter your new PIN.

_  _  _  _

Confirm your new PIN.

_  _  _  _

i

Weds 8 Oct  8:22pm

Settings

DON’T FORGET!

 The default Parental PIN is 

0000. If you have changed the default PIN 
and can’t remember it, please contact the 
help line for assistance.

The settings menu

09

Display & Audio

Language

Parental

F

Other

R

Exit Menu

.

Add to Start of Recording

Add to End of Recording

Time Shift Partition

Skip Forwards Time

Skip Backwards Time

Auto Disk Management

Select

Format Hard Disk Drive

Show Available Space As

Default Recording Mode

EXIT

OK

Weds 8 Oct  8:22pm

Settings

Default Recording Mode

 - This setting chooses 

the default recording mode. You can set the 
HD Digital TV Recorder to always record in high 
definition or standard definition.

DON’T FORGET!

 You can only record in high 

definition when the programme is being  
broadcast in high definition.

Add to Start of Recording

 - This changes the 

amount of time that is added before a recording 
starts.

Add to End of Recording

 - This changes the 

amount of time that is added at the end of a 
recording.

Add to Start of Recording

 - This changes the 

amount of time that is added before a recording 
starts.

Time shift Partition

 - This sets the amount of 

time that is used for background recording 
of live TV. The options are 60 minutes or 120 
minutes.

Skip Forwards Time

 - This sets the default skip 

forwards time.

Skip Backwards Time

 - This sets the default skip 

backwards time.

19

Summary of Contents for 320GB Freesat+ HD

Page 1: ...320GB 500GB freesat HD Digital TV Recorder Instruction Manual Welcome to your new freesat HD digital TV recorder Now you can pause rewind and record both HD and SD television and so much more...

Page 2: ...more 1 A digital box lets you access digital channels that are broadcast in the UK It uses a digital signal received through your satellite dish and lets you watch it through your existing television...

Page 3: ...jkl mno 7 8 9 tuv wxyz ghi pqrs 0 SUB AD GUIDE TEXT BACK EXIT WIDE MENU SWAP i H P P V V LIB MUTE _ R TV CH LIST DTV AUDIO Contents Your new HD Digital TV Recorder 2 x AAA batteries HDMI cable Quick s...

Page 4: ...d does not act as a loop through Please note this socket has no function and does not act as a loop through GFSDTR320HD RS232 Factory upgrade connection HDMI High definition output OPTICAL Digital aud...

Page 5: ...Mode Standby Mode Power button is red when in standby mode On Mode Power button is blue when powered on Playback Mode Watching a Recorded Programme Pause Mode Play and Pause button will be lit Playbac...

Page 6: ...r 01 Time shift Mode Pausing Live TV Pause Mode Pause button will flash continuously Playback Mode Play button will be lit and the Pause button will flash continuously Recording Mode Recording Mode Re...

Page 7: ...in menu on screen displays EXIT Closes menu BACK Takes you back to the previous menu P Channel up COLOUR BUTTONS For interactive use and navigating menus CH LIST Opens the channel list menu SUB Turns...

Page 8: ...k panel of your Digital TV Recorder Connect the HDMI cable that came with your Digital TV Recorder between the HDMI socket on the back panel of your Digital TV Recorder and a HDMI socket on your TV Ot...

Page 9: ...your remote control The first time install screen The first time installation screen will appear on screen If the signal strength is above 50 press the OK button on your remote control to continue the...

Page 10: ...M I Hi D tha Dol The Bill Hide and Seek Ray Mears Goes Walkabout R 2 Hrs 2 Hrs OK EXIT AD SUB HD HD HD HD LIB Use the p and q buttons to select different channels If you want to choose a new genre pre...

Page 11: ...additional audio channels available Subtitles Press the SUB button to toggle the subtitles on and off Daily use DON T FORGET Not all programmes have subtitles You can use the information bar to see if...

Page 12: ...s the couples to start a takeaway service so they can reach their local community by offering their restaurant food to go 101 BBC One 102 BBC Two 103 ITV1 Anglia S 104 Channel 4 106 BBC Three 107 BBC...

Page 13: ...ramme name When the Digital TV Recorder starts to record the REC button on the front of the Digital TV Recorder will light up red DON T FORGET You can change channel and watch another programme or rec...

Page 14: ...the world deal with their newly discovered superpowers Hiro and Ando track Daphne to Germany while Tracy Strauss searches for answers about Niki DRAMA Contains scenes of violence Top Gear Heroes Stric...

Page 15: ...choose the programme to be recorded in the guide and press the record button R Press the LIB button and choose the scheduled programme using the p q buttons Press the GREEN button to set series link...

Page 16: ...tly delete the current channel This will open the manual record window This channel has been hidden from the Guide window You can open the channel list window by pressing the CH LIST button on the rem...

Page 17: ...e 108 BBC HD EXIT GUIDE OK R Delete To add additional channels to your favourites list press the tt button and select a new channel Deleting a channel Use the p and q buttons to select a channel that...

Page 18: ...ast in widescreen format which may result in a black border around the programme This setting can be useful to remove or minimise the border Menu Transparency This setting allows you to adjust how see...

Page 19: ...if you want to allow a first time installation DON T FORGET A first time installation will remove all non freesat channels and revert the Parental PIN to 0000 Scheduled recordings and the library cont...

Page 20: ...assistance The settings menu 09 Freesat Display Audio Language Parental Freesat Other R Exit Menu Add to Start of Recording Add to End of Recording Time Shift Partition Skip Forwards Time Skip Backwa...

Page 21: ...u to turn on or off the genre selection page When you press GUIDE when the genre page is turned off the programme guide will be shown straight away The default setting is that the genre page is shown...

Page 22: ...call centre System HDD Control Network USB R Exit Menu Manufacturer Model Number Hardware Version Serial Number Software Version Grundig 01 12345678 V1 1 V1 5 Helpline Number 0871 230 4695 Tuners Netw...

Page 23: ...to view e g contains flashing images DON T FORGET Guidance is usually used for television programmes broadcast after 9pm Guidance settings Display Audio Language Parental Freesat Other R Exit Menu Gui...

Page 24: ...select each option If you want to change the setting press the t or u buttons or key in the setting using the number buttons Press the BLUE button to search for additional channels Once the search is...

Page 25: ...ve to enter my postcode in the first time set up This makes sure that you receive programmes for your local region How do I enter a space when entering the postcode Your Digital TV Recorder will autom...

Page 26: ...channels Free to Air channels are not shown in the TV programme guide Make sure that Show Non Freesat Channels is set to yes Press the CH LIST to see them How can I find out system information about m...

Page 27: ...ecord an entire series Yes you can Set the first programme to record then set the series link option in the library Do I have to set both parts to record if for example the programme I want to record...

Page 28: ...out the installation operation or safety of your equipment Don t continue to operate the equipment if you are ever in doubt about it working normally or if it is damaged in any way Switch it off withd...

Page 29: ...damaged you should remove it and fit the right plug using the wiring diagram below You must throw the plug away safely You could get an electric shock if you use it again The colours of the wires in...

Page 30: ...esat digital channels and radio stations Upscaling of standard definition TV when using the HDMI connection 8 Day Electronic programme guide Live pause and rewind Series and split programme recording...

Page 31: ...e boundaries of the country of purchase The product must be correctly installed and operated in accordance with the instructions contained in this instruction manual The Digital TV Recorder must be us...

Page 32: ...Installation Information TV Radio Postcode Guidance PIN Revision1_20 0709...

Reviews: