004-109
The BenchMate is a heavy duty tool
designed for minimal maintenance. Like
all tools, some basic care will help it last
longer and maintain its mechanical integrity.
Keep acids and other corrosive compounds
off the BenchMate. If contact is made with
this type of material, wipe it clean and apply
a light metal protectant such as WD-40.
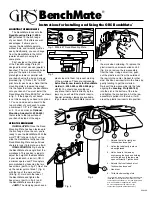
FIG. 6:
Remove the tube assembly
from the mounting collar and unscrew the
large knurled nut to disassemble the jaw
assembly from the tube. Note the condition
of the
Rubber Seal (#004-126)
located on
the jaw assembly. This seal keeps chips
and debris from entering the threaded
area at the bottom of the jaw preventing
premature thread wear. If seal appears
damaged or torn, it should be replaced.
FIG. 7:
Clean the inside of the tube
using a cloth and a wood dowel or
toothbrush handle. Check that all debris
is removed at the bottom of the tube.
FIG. 8:
Using a soft bristle brush, clean
the debris from the threaded area at the
bottom of the Jaw assembly. Take time to
clean the threads inside the knurled nut
as well and check the fit of these 2 pieces
by threading them together. Lightly oil the
clean threads, re-assemble the jaw
into the tube and snug the knurled nut.
Note: When you install the jaw assembly
back into the tube be absolutely certain
that the locating pin near the screw
threads goes back into its mating slot inside
the tube. Failure to do this may result in
damage to your BenchMate
Jaw Assembly.
FIG. 9:
Lightly oil the outside of the
tube near the top when reinserting into
the mounting collar.
Depending on the amount of use,
these maintenance procedures should
be done when you begin to notice more
force is needed to clamp the workpiece.
BenchMate
®
Maintenance
Fig. 6
Fig. 7
Fig. 8
Fig. 9


