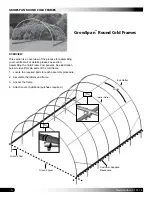
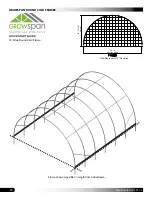
GrowSpan 103103 Manual Download Page 4

GROWSPAN

 ROUND COLD FRAMES

4

Revision date: 01.01.16
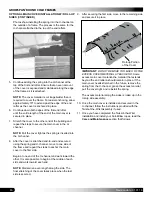
REQUIRED TOOLS

The following list identifies the main tools needed to  

assemble the shelter. Additional tools and supports may be 

needed depending on the structure, location, and  

application.
•  Tape measure or measuring device
•  Variable speed drill and impact driver (cordless with 

extra batteries works best) 

•  Wrenches or ratchet and socket set (recommended)
•  Ropes long enough to reach over the frame (if optional 

cover was purchased)

•  Hammers and gloves
•  Metal file
•  Duct tape (supplied by customer)
•  Box cutter or utility knife
•  Ladders, work platforms, and other machinery for lifting  

designed to work safely at the height of the frame

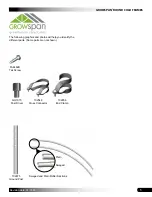
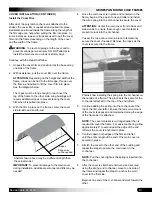
UNPACK AND IDENTIFY PARTS

The following steps will ensure that you have all the  

necessary parts before you begin to assemble the shelter 

frame.
1.  Unpack the contents of the shipment and place where  

you can easily inventory the parts. Refer to the Bill of  

Materials/Spec Sheets.

2.  Verify that all parts listed on the Bill of Materials/Spec  

Sheets are present. If anything is missing or you have  

questions, consult the Pictorial Parts Guide and all  

diagrams for clarification, or contact Customer Service.


NOTE:

 At this time, you do not need to open the plastic  


bags containing smaller parts such as fasteners or  


washers (if equipped).

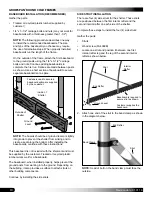
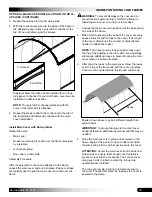
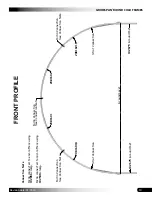
SPECIAL NOTE: Baseboards for Frame

These instructions describe installing a baseboard 

(recommended) at ground level along each side of the 

frame. The baseboard runs from the front to the back of the 

frame. 

This baseboard is 

not included

 with the shipment and must 

be supplied by the customer. Treated or recycled plastic 

lumber can be used for a baseboard.

The baseboard, when installed properly, helps prevent the 

ground posts from sinking into the ground when anchored. 

Depending on the building, it also provides a surface to 

attach struts or other building components. 

Consult these instructions, or contact Customer Service for 

additional information regarding baseboards.

Summary of Contents for 103103

Page 1: ...16 STK DIMENSIONS 103103 20 W x 10 H x 24 L 103104 20 W x 10 H x 48 L 103105 20 W x 10 H x 96 L 2016 GrowSpan All Rights Reserved Reproduction is prohibited without permission GrowSpan Round Cold Fra...

Page 2: ...tant step before you begin to assemble the structure The following suggestions and precautions will help you determine whether your selected location is the best location Never erect the structure und...

Page 3: ...lowing definitions before you begin to assemble your shelter Conduit An assembly of pipes used to secure the main cover and end panels if equipped Purlins and some strut assemblies also consist of con...

Page 4: ...ly inventory the parts Refer to the Bill of Materials Spec Sheets 2 Verify that all parts listed on the Bill of Materials Spec Sheets are present If anything is missing or you have questions consult t...

Page 5: ...16 The following graphics and photos will help you identify the different parts Some parts are not shown 102675 Ground Post FA4482B Tek Screw Swaged Plain Swaged and Plain Rafter Sections 102548 Cros...

Page 6: ...overview of the process for assembling your cold frame For details please see section Assembling the Cold Frame Components See illustration below to identify main parts of the cold frame 1 Locate the...

Page 7: ...ts must be equal for the building to be square 7 Check all dimensions and adjust if needed before driving the remaining posts to the required height 8 After all four corner posts are accurately instal...

Page 8: ...s until the rafter is attached to the ground posts This allows holes in the drilled pipes to be aligned with those in the ground posts Install the screws so they will not touch the cover once it is in...

Page 9: ...er clamp positions and repeat Steps 4 through 6 to install the purlin pipes in those locations 8 Continue adding rafters and purlin pipes until the frame is assembled Secure all purlin splices using T...

Page 10: ...rd is not included with the shipment and must be supplied by the customer Treated or recycled plastic lumber works well for a baseboard The baseboard when installed properly helps prevent the ground p...

Page 11: ...amps that may contact the cover ANCHOR THE ASSEMBLED FRAME At this point anchor the frame Consult the MUST READ document for anchoring information and suggestions Please call customer service at 1 800...

Page 12: ...skip this procedure and continue with the OPTIONAL MAIN COVER INSTALLATION WITH ROLL UP SIDES procedure 1 Using Tek screws attach a section of the poly latch U channel 102179 to the top of the first e...

Page 13: ...re the cover ATTENTION Center the main cover front to back and side to side to ensure that enough cover material is present to lock into the U channel If used the rope can remain in place to temporari...

Page 14: ...depends on the roll up assembly NOTE Attach U channel to baseboard or to the ground posts if no roll up sides are desired 2 Attach the poly latch U channel flush with the ends of the ribbon board usi...

Page 15: ...r and to prevent serious personal injury DO NOT attempt to install the main cover on windy or stormy days 1 Unpack the main cover and position it at the base along one side of the frame 2 Make small h...

Page 16: ...nd and secured using the spring and U channel move to one side of the frame and repeat the steps to anchor the main cover to the first side Begin at one end of the U channel and work toward the other...

Page 17: ...r material if equipped to verify that it is in good repair Do not climb or stand on the cold frame at anytime Remove debris and objects that can accumulate on the cold frame Use tools that will not da...

Page 18: ...ROUND COLD FRAMES 18 Revision date 01 01 16 QUICK START GUIDE 20 Wide Round Cold Frame Shelter Width 20 0 10 7 13 16 Height Grid Represents 12 Squares FRONT Frame shown may differ in length from actu...

Page 19: ...ound Post 102675 Ground Post Purlin Connection See Connection Note Purlin Connection See Connection Note Purlin Connection See Connection Note Strut Connection Strut Connection Connection Note Purlin...

Page 20: ...ROUND COLD FRAMES 20 Revision date 01 01 16 SIDE PROFILE 103103 131S075 131S075 131S075 131S0735 24 0 Shelter Length 48 Rafter Spacing center to center Customer Supplied Baseboards Purlin Assembly on...

Page 21: ...ES 21 Revision date 01 01 16 SIDE PROFILE 103104 48 0 Shelter Length 48 Rafter Spacing 131S075 131S075 131S075 131S075 131S075 131S075 131P0735 131S075 center to center Customer Supplied Baseboards Pu...

Page 22: ...OWSPAN ROUND COLD FRAMES 22 Revision date 01 01 16 SIDE PROFILE 103105 15 131S075 1 131P0735 96 0 Shelter Length center to center Customer Supplied Baseboards Purlin Assembly 48 on center Rafter Spaci...

Page 23: ...OWSPAN ROUND COLD FRAMES 23 Revision date 01 01 16 CONNECTIONS Purlin Mid Rafter Connection View 2 Purlin End Rafter Connection View1 Rafter Strut Connection View 3 Rafter Ground Post Connection View...

Page 24: ...n Rafter Purlin Cross Connector View 1 Purlin End Rafter Connection Connection Connection Connection Purlin End Clamp Rafter Purlin Tek Screws 1 through clamp into purlin 1 through clamp into rafter V...

Page 25: ...GROWSPAN ROUND COLD FRAMES 25 Revision date 01 01 16 Space below is reserved for customer notes...

Reviews: