background image


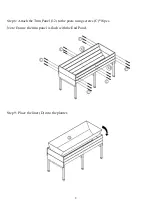
Step 8: Attach the Trim Panel (12) to the posts using screws (C)*18pcs. 

Note: Ensure the trim panel is flush with the End Panel. 


Step 9: Place the liner (D) into the planter.  


Summary of Contents for 1273579

Page 1: ... Wooden Planter with Liner 70 8in L x 36 49in H x 30 31in W x 15 8in D Distributed by TRACTOR SUPPLY COMPANY 5401 VIRGINIA WAY BRENTWOOD TN 37027 For customer support call 1 888 376 9601 www TractorSupply com MADE IN CHINA ...

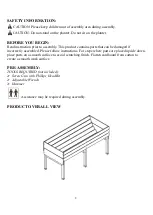
Page 2: ...contains parts that can be damaged if incorrectly assembled Please follow instructions For steps where parts are placed upside down place parts on a smooth surface to avoid scratching finish Flatten cardboard from carton to create a smooth work surface PRE ASSEMBLY TOOLS REQUIRED not included Screw Gun with Phillips Head Bit Adjustable Wrench Hammer Assistance may be required during assembly PRODU...

Page 3: ...3 PARTS LIST Part Image Description Quantity 1 End Post 2pcs 2 End Post 2pcs 3 Middle Post 1pc 4 Middle Post 1pc 5 Middle Connector 1pc 6 End Connector 2pcs 7 Support 2pcs ...

Page 4: ...4 8 Floor Panel 1pc 9 Upper End Panel 2pcs 10 Lower End Panel 2pcs 11 Walls 2pcs 12 Trim Panel 2pcs A Bolt 75mm 8pcs B Screw 35mm 34 1pcs C Screw 25mm 30 1pcs D Liner 1pc ...

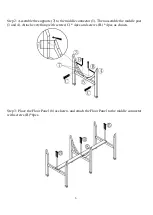
Page 5: ...Y INSTRUCTION Use the parts list to identify and organize each parts Step 1 Attach the End Post 1 and the End Post 2 to the End Connector 6 with screws C 4pcs as shown Repeat this step to create 2 sets of posts ...

Page 6: ...o the middle connector 5 Then assemble the middle post 3 and 4 Attach everything with screws C 4pcs and screws B 4pcs as shown Step 3 Place the Floor Panel 8 as shown and attach the Floor Panel to the middle connector with screws B 6pcs ...

Page 7: ... posts with Bolt A 8pcs Note ensure the ends of the wall are flush with the side of the posts Note insert all bolts before tightening any some adjustments may be needed to ensure proper alignment Step5 Secure the walls with screws B 6pcs ...

Page 8: ...8 Step 6 Attach the Upper End Panel 9 as shown with screws B 8pcs Step 7 Attach the Lower End Panel 10 as shown with screws B 10pcs ...

Page 9: ...9 Step 8 Attach the Trim Panel 12 to the posts using screws C 18pcs Note Ensure the trim panel is flush with the End Panel Step 9 Place the liner D into the planter ...

Reviews: