background image

-36-

G0633/G0634 Jointer/Planer Combo Machine            

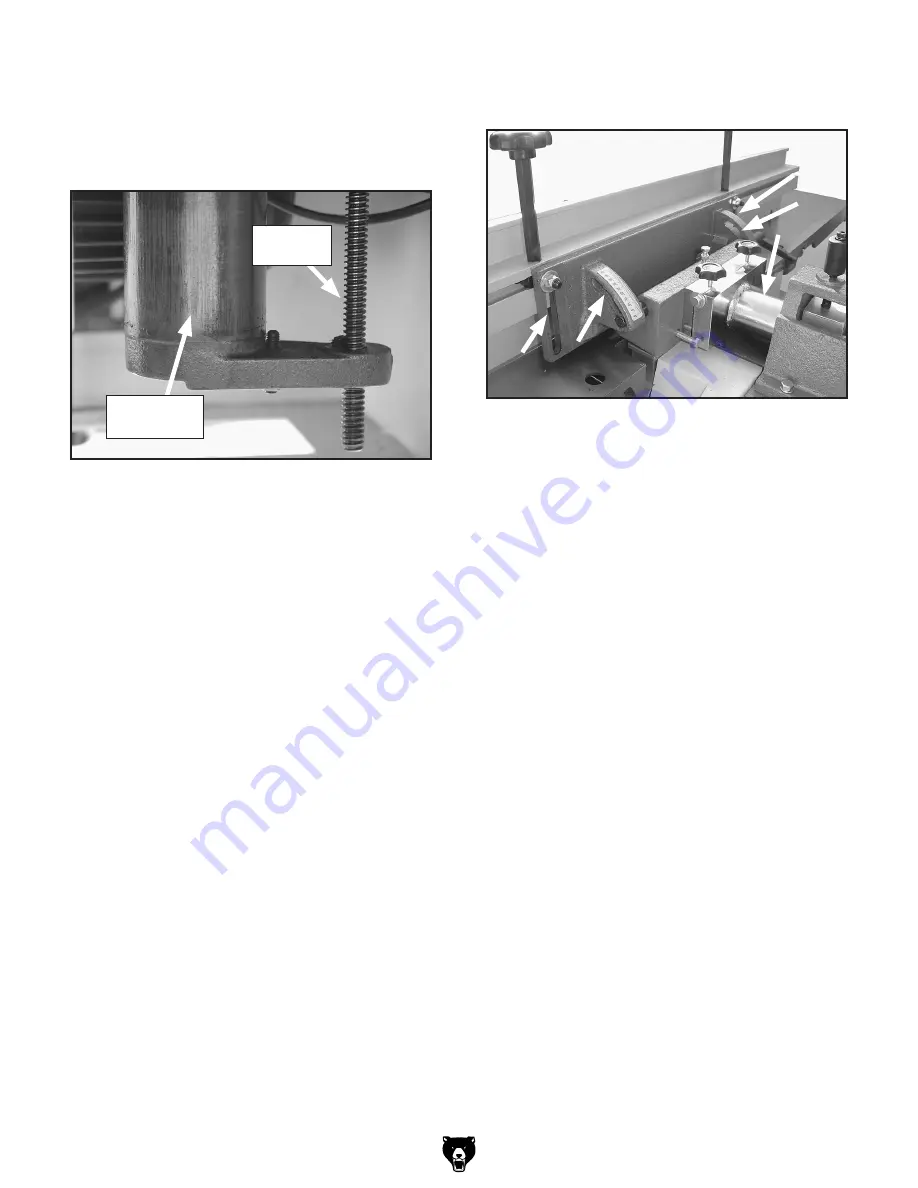
Lead  Screw: 

The  lead  screw  should  be  lubri-

cated  with  multi-purpose  grease  once  a  month. 
See 

Figure 50 

and

 Parts Beakdown

, P0633411, 

Page 61


for location. Remove the left side access 

panel for ingress.

Figure 51

. Fence lubrication locations.

Planer  Column

:  Clean  with  solvent,  wipe  dry, 

and  relubricate  with  multi-purpose  grease  when 
needed. 

Worm Gear: 

Inspect every six months and lubri-

cate  with  multi-purpose  grease  when  needed 
(see 

Parts  Breakdown

,  P0633409).  Remove 

the worm gear box (see P0633407, 

Page 61

)


to 

inspect. 

Figure 50

. Planer column and lead screw.

Planer 

Column

Lead 

Screw

Fence: 

Lubricate with multi-purpose grease when 

needed in the locations shown in 

Figure 51

.

Summary of Contents for G0633

Page 1: ...MACHINE OWNER S MANUAL COPYRIGHT APRIL 2007 BY GRIZZLY INDUSTRIAL INC REVISED AUGUST 2007 BL WARNING NO PORTION OF THIS MANUAL MAY BE REPRODUCED IN ANY SHAPE OR FORM WITHOUT THE WRITTEN APPROVAL OF GR...

Page 2: ......

Page 3: ...on and Requirements 26 Squaring Stock 27 Surface Planing 28 Edge Jointing 29 Bevel Cutting 30 Basic Planer Operation 31 SECTION 5 ACCESSORIES 32 SECTION 6 MAINTENANCE 34 Schedule 34 Cleaning 34 V Belt...

Page 4: ...with no obligation on the part of Grizzly For your convenience we always keep current Grizzly manuals available on our website at www grizzly com Any updates to your machine will be reflected in thes...

Page 5: ...G0633 G0634 Jointer Planer Combo Machine 3...

Page 6: ...4 G0633 G0634 Jointer Planer Combo Machine...

Page 7: ...G0633 G0634 Jointer Planer Combo Machine 5...

Page 8: ...6 G0633 G0634 Jointer Planer Combo Machine...

Page 9: ...Knob I Infeed Table Lock Knob J Infeed Handgrip K Infeed Table L Jointer Dust Port M Planer Table Identification N Infeed Table Lock Lever O Jointer Depth Scale P Magnetic Switch Q Emergency Off Butto...

Page 10: ...8 G0633 G0634 Jointer Planer Combo Machine...

Page 11: ...G0633 G0634 Jointer Planer Combo Machine 9...

Page 12: ...ICKBACK ZONE The kickback zone is the path directly through the end of the infeed table Never stand or allow others to stand in this area during operation 6 MAXIMUM CUTTING DEPTH The maxi mum cutting...

Page 13: ...ane natural wood stock with this planer DO NOT plane MDF plywood laminates or other synthetic products 6 GRAIN DIRECTION Planing across the grain is hard on the planer and may cause the workpiece to k...

Page 14: ...t with one of higher amperage without consulting a quali ed electri cian to ensure compliance with wiring codes If you are unsure about the wiring codes in your area or you plan to connect your machin...

Page 15: ...escription Qty Safety Glasses for each person 1 Power Lifting Equipment 1 Lifting Straps 800 lb Capacity Optional 1 Dust Collection System 1 4 Dust Hose length as needed 1 4 Hose Clamp 1 Shop Rags for...

Page 16: ...machine or examine the packaging materials carefully Occasionally we pre install certain components for shipping purposes Common Components Figure 3 3 Qty A Jointer Planer Assembly Not shown 1 B Push...

Page 17: ...G0633 G0634 Jointer Planer Combo Machine 15 Hardware Recognition Chart...

Page 18: ...perfor mance from your machine clean all moving parts or sliding contact surfaces Avoid chlo rine based solvents such as brake parts cleaner that may damage painted surfaces Always follow the manufac...

Page 19: ...to the machine using the three lifting holes shown in Figures 9 10 with a forklift hoist or boom crane If you choose this alternative you must punch out the lifting strap holes this will perma nently...

Page 20: ...rd fully covers the cutterhead Figure 13 Installing cutterhead guard Groove Bracket Figure 11 Cutterhead knife at top dead center Setting Outfeed Table Height 4 Raise or lower the outfeed table until...

Page 21: ...rating of the dust collector To determine the CFM at the dust port you must consider these variables 1 CFM rating of the dust col lector 2 hose type and length between the dust collector and the mach...

Page 22: ...NCY OFF button safety feature is not working correctly This safety feature must work properly before proceeding with regular operations Call Tech Support for help 9 Press the ON button then immediatel...

Page 23: ...using is normal during the life of the machine and does not indicate premature belt failure is in progress For your convenience the adjustments listed below have been performed at the factory and no f...

Page 24: ...books trade maga zines or get formal training before begin ning any projects Regardless of the con tent in this section Grizzly Industrial will not be held liable for accidents caused by lack of trai...

Page 25: ...ng the fence stops Fence Movement The fence lock keeps the fence in position Figure 20 To move the fence loosen the lock and turn the fence adjustment knob to move it as needed Figure 20 Fence lock lo...

Page 26: ...uick Release Knobs Basic Planer Controls This section covers the basic controls used during routine planer operations See Page 22 for a description of START STOP EMERGENCY OFF buttons Table Height Han...

Page 27: ...up Planer Dust Port 8 Connect the dust hose to the planer dust port 9 Flip the change lever Figure 22 up To change the machine for jointer opera tions 1 Lower the planer table to below the 4 mark on t...

Page 28: ...tion and Requirements Figure 29 Correct and incorrect grain alignment to cutterhead planer Remove foreign objects from the stock Make sure that any stock you process with the jointer planer is clean a...

Page 29: ...e concave edge of the workpiece is jointed flat with a jointer 4 Rip Cut on a Table Saw The jointed edge of the workpiece is placed against a table saw fence and the opposite edge cut off Squaring Sto...

Page 30: ...e and feed the workpiece over the cutterhead Note If your leading hand with push block gets within 4 of the cutterhead lift it up and over the cutterhead and place the push block on the portion of the...

Page 31: ...de is face down on the surface of the infeed table 6 Start the jointer 7 Press the workpiece against the table and fence with firm pressure Use your trailing hand to guide the workpiece through the cu...

Page 32: ...de is face down on the surface of the infeed table 6 Start the jointer 7 With a push block in your leading hand press the workpiece against the table and fence with firm pressure and feed the workpiec...

Page 33: ...the workpiece through the planer in the opposite direction as when jointing Make sure not to stand directly in front or behind the workpiece to avoid kick back injury Basic Planer Operation If the cu...

Page 34: ...minutes to any size just add or remove sections to fit your needs Requires two Power Twist V belts to replace the stock V belts on your Model G0633 G0634 Figure 40 H9816 Power Twist V Belt Figure 39 R...

Page 35: ...every shop If you already have a pair buy extras for visitors or employees You can t be too careful when it comes to shop safety G7984 H1298 H1300 H2347 H0736 H7319 Carbide Inserts 10 Pack These index...

Page 36: ...ure from wood dust does not remain on bare metal surfaces Treat all unpainted cast iron and steel with a non staining lubricant after cleaning We recommend products like SLIPIT G96 Gun Treatment or Bo...

Page 37: ...belt tension Figure 48 Checking V belt tension Adjustment Nuts Since all bearings are sealed and permanently lubricated simply leave them alone until they need to be replaced DO NOT lubricate them Pro...

Page 38: ...Fence lubrication locations Planer Column Clean with solvent wipe dry and relubricate with multi purpose grease when needed Worm Gear Inspect every six months and lubri cate with multi purpose grease...

Page 39: ...ir circulation through the motor restricted 4 Motor overloaded during operation 5 Thermal protection circuit breaker amper age is set too low or motor is at fault 6 Short circuit in motor or loose con...

Page 40: ...dry if moisture is too high 2 Rotate replace the knives or inserts Page 43 or 45 Long lines or ridges that run along the length of the board 1 Nicked or chipped knives or inserts s 1 Replace or offse...

Page 41: ...s with slight resis tance between the ruler and cutterhead and no gaps appear go to Step 5 Figure 52 Straightedge positions for verifying if outfeed table is parallel with cutterhead If the feeler gau...

Page 42: ...orrect outfeed table parallelism 1 Loosen the lock nuts on both stop bolts shown in Figure 54 at the front of the table If a knife or insert touches the straightedge turn the cutterhead so the knives...

Page 43: ...ce the straightedge halfway across the infeed table and halfway over the outfeed table and adjust the infeed table even with the outfeed table as shown in Figure 55 3 Place the straightedge in one of...

Page 44: ...egs of the gauge sit firmly on the cutterhead and the middle pad just touches the knife then that knife is set correctly Repeat this inspection with the other knives If the gauge does not sit firmly o...

Page 45: ...ty straightedge is held flat against the outfeed table and the knife heights are set to the bottom of the straightedge as shown in Figure 59 Because the knife projec tion height from the cutterhead is...

Page 46: ...is will give you unrestricted access to the cutterhead 3 Remove the motor access panel to expose the motor pulley 4 Rotate the motor pulley to give you good access to one of the cutterhead knives Jack...

Page 47: ...ide insert 1 DISCONNECT THE JOINTER PLANER FROM THE POWER SOURCE 2 Remove any sawdust from the head of the carbide insert Torx screw 3 Remove the Torx screw and carbide insert 4 Clean all dust and dir...

Page 48: ...Alignment Figure 67 Fence and V belt cover removed 2 Place a 2 C clamp on each pulley so the adjustment shaft faces out place a straight edge on the clamps as shown in Figure 68 and visually check pul...

Page 49: ...sembly Figure 69 Pulleys properly aligned V belts are parallel and coplaner The fence stops simplify the task of adjusting the fence to 45 and 90 Tools Needed Qty 45 Square 1 90 Square 1 Sliding Bevel...

Page 50: ...e on the side of the lock lever that does not lock 4 Loosen the lock nut on the special bolt under the table as shown in Figure 72 Adjusting Table Lock Levers 5 Adjust the bolt height a few turns lowe...

Page 51: ...table gib nut under the rear of the table Figure 73 2 Using an 8mm hex wrench tighten the gib setscrew a small amount then check the table by moving it up and down Adjust the set screw as needed unti...

Page 52: ...rhead table side to side positioning Therefore the max imum allowable tolerance for the front to back parallelism is not more than 0 020 Table Parallelism Inspection The easiest way to determine if yo...

Page 53: ...g ten sion will vary depending on the type of wood you plane This is usually determined from trial and error Generally speaking less spring tension is more forgiving on workpieces Therefore if you pri...

Page 54: ...a safety feature The anti kick back fingers hang from a rod suspended across the cutterhead casting The anti kickback fingers should be inspected regularly Check the fingers Figure 79 to ensure that t...

Page 55: ...Planer Combo Machine 53 Electrical Components Figure 80 G0633 G0634 magnetic switch Figure 82 Junction box and start capacitor Figure 83 Run capacitor Figure 84 Jointer table limit switch Figure 81 E...

Page 56: ...54 G0633 G0634 Jointer Planer Combo Machine Wiring Diagram...

Page 57: ...G0633 G0634 Jointer Planer Combo Machine 55 Stand Assembly Parts Breakdown...

Page 58: ...3029 2 MAG SWITCH BACK COVER 9 P0633009 MOTOR BRACKET 29 3 P0633029 3 CONTACTOR 10 P0633010 PLANER SCALE 29 4 P0633029 4 THERMAL RELAY 11 P0633011 RIVET 29 5 P0633029 5 ON BUTTON 12 P0633012 REINFORCE...

Page 59: ...B 127 P0633127 PLASTIC PLUG 108 P0633108 GUIDE SCREW 128 PSB45 CAP SCREW 5 16 18 X 3 8 109 PN01 HEX NUT 1 2 20 129 P0633129 HANDLE 110 P0633110 INFEED HANDGRIP 130 P0633130 SPECIAL SCREW 1 2 111 P0633...

Page 60: ...58 G0633 G0634 Jointer Planer Combo Machine Cutterhead Motor Breakdown...

Page 61: ...6 P0633206 OUTFEED ROLLER 230 3 P0633230 3 MOTOR FAN 207 P0633207 INFEED ROLLER 230 4 P0633230 4 CAPACITOR COVER 208 P0633208 COVER 230 5 P0633230 5 START CAPACITOR 400MFD 125VAC 209 P0633209 ALIGNMEN...

Page 62: ...307 P62042RS BALL BEARING 6204 2RS 327 PN05 HEX NUT 1 4 20 308 P0633308 TENSION SPRING 328 PSB70 CAP SCREW 5 16 18 X 2 309 P6082RS BALL BEARING 608 2RS 329 P0633329 FLAT WASHER 5 16 310 P0633310 ROLL...

Page 63: ...REW 5 16 18 X 1 4 408 1 P0633408 1 SELF LUBRICATION BUSHING 428 P0633428 FLAT WASHER 408 2 P0633408 2 SELF LUBRICATION BUSHING 429 PLW04 LOCK WASHER 3 8 409 P0633409 GEAR 430 PB16 HEX BOLT 3 8 16 X 1...

Page 64: ...18 X 1 501 3 P0633501 3 LIMIT SWITCH BRACKET 510 PB09 HEX BOLT 5 16 18 X 1 2 502 P0633502 COMPRESSION SPRING 511 PN02 HEX NUT 5 16 18 503 P0633503 EXTENSION SPRING 512 PSB101 CAP SCREW 10 24 X 1 1 4 5...

Page 65: ...G0633 G0634 Jointer Planer Combo Machine 63 Fence Guard Breakdown List...

Page 66: ...0 612 PLN01 LOCK KNOB 3 8 16 639 PB97 HEX BOLT 1 4 20 X 3 1 4 613 P0633613 PINION SHAFT 640 PSS11 SET SCREW 1 4 20 X 1 4 614 P0633614 FENCE SUPPORT 641 P0633641 KNOB SCREW 1 4 615 P0633615 PLASTIC PRO...

Page 67: ...F PART DESCRIPTION REF PART DESCRIPTION 38 G8588 GRIZZLY NAMEPLATE SMALL 805 P0633805 DISCONNECT POWER LABEL 800 PLABEL 12 READ MANUAL 2 X 3 5 16 806 P0633806 CHANGING OPERATIONS WARNING LABEL 801 PLA...

Page 68: ...zly shall be tried in the State of Washington County of Whatcom We shall in no event be liable for death injuries to persons or property or for incidental contingent special or consequential damages a...

Page 69: ......

Page 70: ......

Page 71: ......

Page 72: ......

Reviews: