


G0513X/G0514X/G0514X3 Extreme Series Bandsaw
-45-
SECTION 6: MAINTENANCE
Always disconnect power
to the machine before
performing maintenance.
Failure to do this may
result in serious person-
al injury.
Sealed and pre-lubricated ball bearings require
no lubrication for the life of the bearings. All bear-
ings are standard sizes, and replacements can
be purchased from our parts department or a
bearing supply store.
For adjustment controls, an occasional “shot” of
light oil is just about all that is necessary. Wipe off
any sawdust with a clean cloth, towel, or dry paint
brush, and spray on the lubricant. Do not get oil
on the pulleys or V-belt because it could cause
belt deterioration and slipping.
Lubrication
Cleaning your bandsaw is relatively easy. Vacuum
excess wood chips and sawdust, and wipe off the
remaining dust with a dry cloth. If any resin has
built up, use a resin dissolving cleaner to remove
it. Treat all unpainted cast iron and steel with a
non-staining lubricant after cleaning.
Cleaning
Protect the unpainted cast iron surfaces on the
table by wiping the table clean after every use—
this ensures moisture from wood dust does not
remain on bare metal surfaces.
Keep tables rust-free with regular applications of
products like G96
®
Gun Treatment, SLIPIT
®
, or
Boeshield
®
T-9 (see
SECTION 5: ACCESSORIES
on
Page 43
for more details).
Unpainted Cast Iron
For optimum performance from your machine,
follow this maintenance schedule and refer to any
specific instructions given in this section.
Daily Check:
•
Loose mounting bolts.
•
Damaged saw blade.
•
Worn or damaged wires.
•
Any other unsafe condition.
Monthly Check:
•
V-belt tension, damage, or wear.
•
Clean/vacuum dust buildup from inside cabi-
net and off motor.
Schedule
The bandsaw is equipped with a lower wheel
brush. The brush should be checked daily and
cleaned when it becomes dirty. There is an adjust-
ment bracket that allows the brush to be adjusted
for bristle wear. Refer to
Adjusting Wheel Brush
on
Page 50
for adjustment details.
Wheel Brush
Summary of Contents for EXTREME G0513X
Page 8: ...8 G0514X2 G0514X3 Manual Insert G0514X2 G0514X3 Main Parts...
Page 9: ...G0514X2 G0514X3 Manual Insert 9 G0514X2 G0514X3 Fence Guides Parts...
Page 13: ...G0514X2 G0514X3 Manual Insert 13...
Page 14: ...14 G0514X2 G0514X3 Manual Insert...
Page 15: ...G0514X2 G0514X3 Manual Insert 15...
Page 16: ...16 G0514X2 G0514X3 Manual Insert...
Page 18: ......
Page 36: ...18 G0513X G0514X G0514X3 Extreme Series Bandsaw Hardware Recognition Chart...
Page 72: ...54 G0513X G0514X G0514X3 Extreme Series Bandsaw G0513X Wiring Diagram G0513X Wiring Diagram...
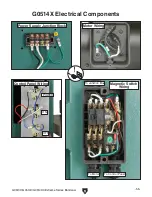
Page 74: ...56 G0513X G0514X G0514X3 Extreme Series Bandsaw G0514X Wiring Diagram...
Page 76: ...58 G0513X G0514X G0514X3 Extreme Series Bandsaw G0514X3 Wiring Diagram G0514X3 Wiring Diagram...
Page 77: ...G0513X G0514X G0514X3 Extreme Series Bandsaw 59 G0513X Main Parts...
Page 78: ...60 G0513X G0514X G0514X3 Extreme Series Bandsaw G0513X Fence Guide Parts...
Page 82: ...64 G0513X G0514X G0514X3 Extreme Series Bandsaw G0514X G0514X3 Main Parts...
Page 83: ...G0513X G0514X G0514X3 Extreme Series Bandsaw 65 G0514X G0514X3 Fence Guide Parts...
Page 89: ......
Page 90: ......
Page 91: ......
Page 92: ......