background image

AL5160 GoboLED 7-Pro - Rev. 1.10

page 3 of 20

Preliminary operations

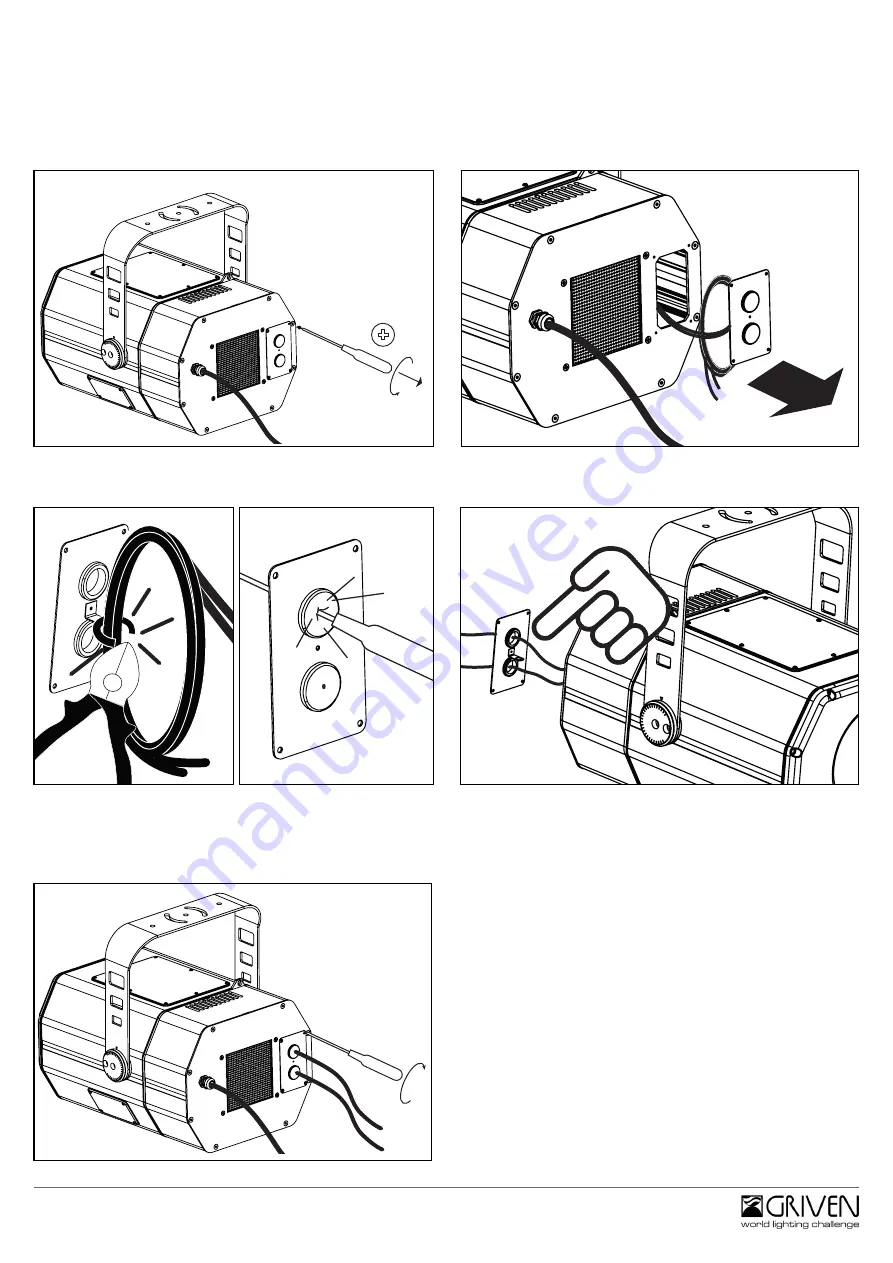
-In order to connect the unit to a DMX controller, pull out the input and output DMX cables from the back  of the fixture. Follow 

the below reported instructions.

-Per utilizzare il proiettore in modalità DMX, è necessario portare fuori dal proiettore i cavi DMX input e output situati all’interno 

della copertura posteriore. Seguite queste semplici istruzioni per eseguire l’operazione.

-Undo the 4 screws of the metal cover.

-Svitare le 4 viti che tengono in posizione lo sportello.

-Remove the cover and pull the cables out.

-rimuovere lo sportello ed i cavi ad esso legati.

-Cut the plastic band, unroll the cables and pierce the two 

rubber seals with a screwdriver.

-Tagliare la fascetta, svolgere i cavi e forare i gommini con un 

cacciavite.

-Run the cables through the holes.

-Far passare i cavi attraverso i fori praticati nei gommini.

-Close the metal cover .

-Fissare nuovamente lo sportello al proiettore.

Summary of Contents for GoboLED 7-Pro

Page 1: ...IP IP66 Ambient temp Temperatura ambientale 30 C to 50 C 40 F to122 F Power supply Alimentazione 100 240 VAC 50 60Hz Inrush current Corrente di spunto cold start 70A 1010 s Power Potenza massima 230...

Page 2: ...and connectors unconnected or unprotected for long periods Non lasciare mai per lungo tempo agli agenti atmosferici cavi e connettori non collegati o non protetti Disconnect power before installing o...

Page 3: ...eriore Seguite queste semplici istruzioni per eseguire l operazione Undo the 4 screws of the metal cover Svitare le 4 viti che tengono in posizione lo sportello Remove the cover and pull the cables ou...

Page 4: ...o essere eseguite utilizzando il kit di connessione in dotazione al proiettore Seguite le istruzioni fornite nel kit WARNING fixing and connecting operations must mandatorily be carried out by qualifi...

Page 5: ...mode scroll down the menu Edit mode decrease the selected value Using the control panel MENU button functions ENTER button functions UP button functions DOWN button functions Undo the four screws as s...

Page 6: ...SLOW NO EFFECT SLOW FAST NO EFFECT FAST SLOW NO EFFECT FAST FAST NO EFFECT X YY TIME 001 999 sec scene time tempo di scena DELETE X YY DELETE yes no Deleting of one scene Cancellazione di una scena X...

Page 7: ...Fixture n eg CHxxx WARNING Use a DMX repeater on each 32nd fixture of the daisy chain or in case the total DMX cable lenght exceeds 300m 1000 ft Install a data terminator 120 on the DMX out cable of t...

Page 8: ...1 80 Pulse up 7 fast 81 90 Led Off 91 100 Pulse down 1 slow 101 110 Pulse down 2 111 120 Pulse down 3 121 130 Pulse down 4 131 140 Pulse down 5 141 150 Pulse down 6 151 160 Pulse down 7 fast 161 170 L...

Page 9: ...1 31 45 Gobo 2 46 60 Gobo 3 61 75 Gobo 4 76 90 Gobo 5 91 105 Gobo 6 106 120 Gobo 7 121 180 Proportional clockwise rotation of the wheel 181 190 Open 191 250 Proportional counterclockwise rotation of...

Page 10: ...r position 10 PRISM WHEEL SELECTION 0 51 Open 52 102 Prism 1 103 153 Prism 2 154 204 Prism 3 205 255 Open 11 PRISM ROTATION 0 15 No effect 16 130 Proportional clockwise control of the rotation 131 140...

Page 11: ...lacing the fixture in a proper position RE L E A S E T O A I M 0 10 20 30 30 40 40 5 0 5 0 6 0 6 0 7 0 7 0 80 80 90 10 20 0 10 2 0 3 0 3 0 4 0 4 0 10 2 0 size 5 ISO Allen key 260 max excursion RE L E...

Page 12: ...AL5160 GoboLED 7 Pro Rev 1 10 page 12 of 20 Fixing 45 45 M8 ISO...

Page 13: ...hio quindi rimuoverlo By using a Phillips screwdriver undo the screw as shown in the picture above Con un cacciavite a stella svitare la vite sopra indicata Rotate 90 the safety clamp Ruotare di 90 il...

Page 14: ...che la flangia dell obietti vo sia all interno dell incavo mostrato in figura Rotate and close the safety clamp Ruotare e chiudere il ferma obiettivo By using a Phillips scredriver tighten the screw C...

Page 15: ...terno dell apparecchiatura Follow this instructions below to replace gobos on the rotating gobo wheel Per sostituire i gobos seguire le seguenti istruzioni size 2 5 ISO Allen key Undo the six screws t...

Page 16: ...sulla ruota Put the new gobo in its slot ensuring that its flat side goes under the spring beneath the cog wheel Per installare il nuovo gobo semplice mente reinserirlo avendo cura di inserire la part...

Page 17: ...to remove the cover Svitare le sei viti che fissano il coperchio quindi rimuoverlo Lift the cover to access the inside of the fixture Sollevare il coperchio per accedere all interno del proiettore Unt...

Page 18: ...crews by using the tool provided Orientate la ruota a mano come indicato sopra e allentate le due viti utilizzando lo strumento fornito Push down the wheel until the heads of the two screws reach the...

Page 19: ...in place the crosspiece and close the cover by cross tightening the six screws Al termine dell operazione riposizionare la traversina e chiudere il coperchio e serrare le sei viti con metodo incrociat...

Page 20: ...AL5160 GoboLED 7 Pro Rev 1 10 page 20 of 20...

Reviews: