Grillstream GCH30MG Manual Download Page 29


GCH30MG

Page 29

22

21

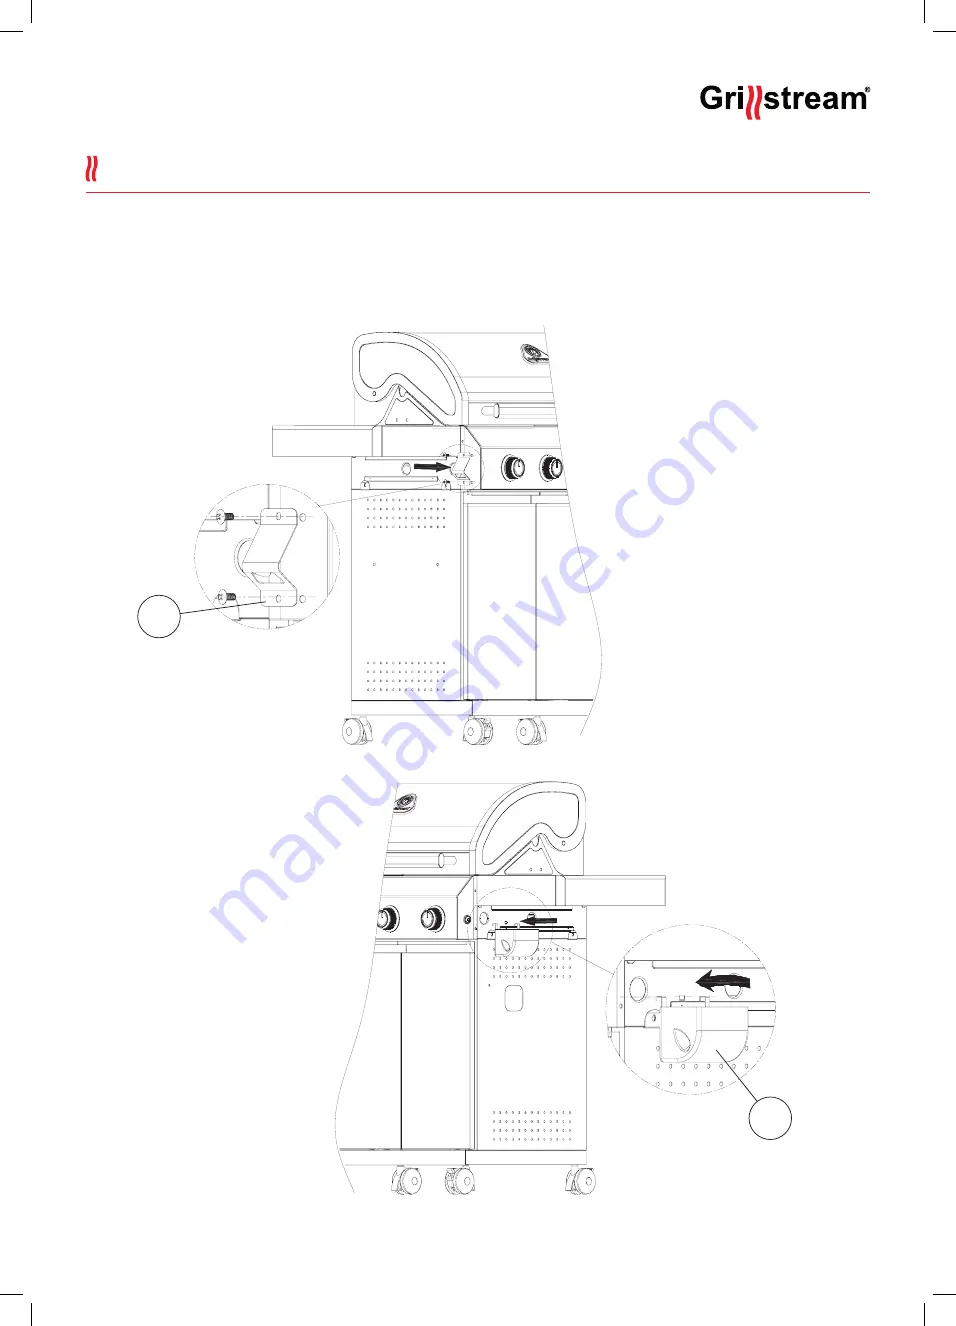
Attach Bottle Opener (22) to side of Control Panel using bolts supplied.

Hook Grillstream Fat Cup (21) over holes in Side Panel (8). This should be located directly below 

the spout of Fat Channel (20) to catch fat and meat juices channelled from the Grillstream system.

STEP 18

Summary of Contents for GCH30MG

Page 1: ...Monoxide which has no odour Never use a barbecue in enclosed spaces such as a tent home building vehicle or garage This product takes approximately 35 MINUTES to assemble with 2 PEOPLE The fittings pack contains SMALL ITEMS which should be KEPT AWAY FROM YOUNG CHILDREN Read this leaflet in full before commencing assembly Please check the pack contents before attempting to assemble this product A f...

Page 2: ...er safety Page 4 What is Propane Page 4 Are all gas bottle gases the same Page 4 How is it different from natural gas Page 4 Lighting your BBQ Page 5 Using your BBQ Page 5 Hybrid System Page 6 Maintenance of your BBQ Page 7 Troubleshooting Page 8 Exploded Diagram Page 9 Parts list for GCH20MG Page 10 Fittings list Page 11 Assembly instructions Page 12 30 Leak Test Page 31 Contents ...

Page 3: ...the BBQ GRILLSTREAM BARBECUES LEISUREGROW PRODUCTS LTD Product name Outdoor gas Grill Model Number K113CC3 Product Identification Number 2575CU0359CP1429 Gas Category I3 28 30 37 o I3B P 30 o I3B P 37 o I3B P 50 o Gas and Supply Pressure Butane G30 Propane G31 Butane Butane Butane 28 30 mbar 37 mbar 29 mbar 37 mbar 50 mbar Country of Destination I3 28 30 37 BE CH CY CZ ES FR GB GR IE IT LT LU LV P...

Page 4: ...st handling gas cylinders Never store gas cylinder indoors Store away from direct heat in a well ventilated area The gas cylinder is position on a flat surface Always keep the gas cylinder in an upright position Close cylinder valve when BBQ is not in use and if available use a sealing plug to prevent possible leaks Do not subject gas cylinder to excessive heat Do not tamper with any fitting attac...

Page 5: ... does not light immediately turn the gas control knob to the off position and wait five minutes for any accumulated gas to clear out of the BBQ before repeating procedure FIRST TIME USE OF BBQ Before using the BBQ for the first time it should be first wiped with a mild soap and water solution to remove any dust Make sure your BBQ is on a solid level surface Dry cooking surface and apply a light co...

Page 6: ...n off the burners completely and close your Barbecue Hood STEP 4 To avoid burning your food it is always recommended that you wait for the charcoal to become coated by a layer of white ash before commencing cooking This is usually around 20 30 minutes after first lighting the charcoal but this can vary depending on weather conditions and placement of the Barbecue If you have followed the above ins...

Page 7: ...Grills Rinse off with clean water and dry before returning to BBQ CLEANING THE FLAME TAMERS Periodically wash in a warm soapy solution Use a wire brush to remove stubborn burnt on cooking residue if necessary Dry thoroughly before re installing to the BBQ body CLEANING THE BBQ BODY The body of the BBQ should be cleaned regularly dependant on the use and type of food cooked Use warm soapy solution ...

Page 8: ...providing maximum ventilation and spraying with a fine water spray IF THERE IS A FIRE If there is a fire at the appliance If there is a fire at the appliance turn the gas off at the cylinder Smother the flames with a wet cloth If there is a fire at the cylinder or you cannot get to the valve to turn it off call the fire brigade direct a garden hose to the middle of the cylinder to keep it cool how...

Page 9: ...GCH30MG Page 9 24 25 16 17 15 12 21 11 9 8 6 10 5 13 14 22 23 26 18 19 7 20 1 4 2 3 ...

Page 10: ... 18 Hybrid Flame Tamer 2 6 Cabinet Base Panel 1 19 Standard Flame Tamer 1 7 Cabinet Side Panel Left 1 20 Fat Channel 1 8 Cabinet Side Panel Right 1 21 Grilstream Fat Cup 1 9 Cabinet Rear Panel 1 22 Bottle Opener 1 10 Corner Support Bracket 2 23 Grill Lifter 2 11 Front Support Bar 1 24 Warming Rack 1 12 Side Shelf 2 25 Reversible Griddle Plate 1 13 Cabinet Door 2 26 Grillstream Grill 190mm 4 ...

Page 11: ...of the grill x 4 x 12 4 x 12 x 2 x 44 Lift hood remove unpackage all items except burners burner assembly Proceed to step 1 Cross Head Screwdriver Philips Caution Although we take every effort to ensure that the assembly process is as easy as possible it is inherent with fabricated steel parts that corners and edges can cause cuts if improperly handled during assembly procedures Be careful while h...

Page 12: ...GCH30MG Page 12 Push each of the Castors 5 into indicated holes in underside of Cabinet Base Panel 6 until you hear a click STEP 1 5 6 ...

Page 13: ...GCH30MG Page 13 Part unscrew the bolts indicated from Cabinet Base Panel 6 slot the Cabinet Side Panels 7 8 into place and retighten bolts STEP 2 7 8 3 2 1 ...

Page 14: ... bolts B into Cabinet Side Panels 7 8 Slot Cabinet Rear Panel 9 into place and secure to Cabinet Base Panel 6 with Bolts B Now fully tighten bolts into Cabinet Side Panels 7 8 STEP 3 Part B QTY 4 M6x12 Bolt 7 8 9 x 4 x 12 x 44 x 12 x 2 x 44 ...

Page 15: ...GCH30MG Page 15 Part unscrew bolts indicated from Cabinet Side Panels 7 8 and Cabinet Base Panel 6 Slot Cabinet Corner Braces 10 in place and retighten bolts STEP 4 10 1 2 3 4 ...

Page 16: ...GCH30MG Page 16 4 x Insert Front Support Bar 11 ensuring magnet is positioned towards bottom of support bar and secure with Bolts A STEP 5 Part A QTY 4 M4x12 Bolt x 4 x 12 x 44 x 12 x 44 11 ...

Page 17: ...GCH30MG Page 17 Carefully lower cooking frame onto cabinet ensuring fixing lugs are on the outside and that no wires or hoses are trapped between cooking frame and cabinet STEP 6 ...

Page 18: ...GCH30MG Page 18 4 x B Secure cooking frame to side panels 7 8 using Bolts B STEP 7 Part B QTY 4 M6x12 Bolt x 44 x 12 ...

Page 19: ...GCH30MG Page 19 Part unscrew bolts indicated slot Side Shelf 12 in place and re tighten bolts to secure STEP 8 12 2 3 1 ...

Page 20: ...elf 12 in place from inside the cooking frame using Bolts B and Washers D Note Washers D are domed and bottom of dome should be facing the cooking frame STEP 9 Part B QTY 2 M6x12 Bolt Part D QTY 2 x 4 x 12 2 x 2 x 44 Washer x 4 x 12 x 44 x 12 x 2 x 44 ...

Page 21: ...GCH30MG Page 21 Part unscrew bolts indicated slot Side Shelf 12 in place and retighten bolts to secure STEP 10 12 2 3 1 ...

Page 22: ...e Side Shelf 12 in place from inside the cooking frame using Bolts B and Washers D Note Washers D are domed and bottom of dome should be facing the cooking frame STEP 11 Part B QTY 2 M6x12 Bolt Part D QTY 2 x 4 x 12 x 44 x 12 Washer x 44 x 12 ...

Page 23: ...GCH30MG Page 23 1 x A Attach Gas Connection Bracket to Side Panel 8 using Bolt A STEP 12 Part A QTY 1 M4x12 Bolt x 44 ...

Page 24: ...GCH30MG Page 24 2 x C Insert Door Spindles C into Cabinet Base Panel 6 STEP 13 Part C QTY 2 12 x 2 x 44 Door Spindle C ...

Page 25: ...binet Doors 13 in place first slide the hole on bottom of door over Door Spindle C depress spring loaded catch on underside of Cooking Frame and position top of door until spring loaded catch slides into top hole STEP 14 13 13 ...

Page 26: ...acket 16 to underside of Grease Tray 15 using Bolts A Place Grease Cup 17 inside Grease Cup Bracket 16 and then slide underneath Cooking Frame ensuring it is level and on top of runners STEP 15 17 Part A QTY 2 M4x12 Bolt x 44 16 15 2 3 1 ...

Page 27: ...sert 4 x AA Batteries not supplied into Battery Pack 14 Connect Battery Box to LED Light Wire Peel off plastic backing from sticky pad on the rear of the Battery Box and affix to inside of Side Panel 8 STEP 16 2 3 1 4 26 ...

Page 28: ...ame Tamer 19 on locating shelves Flame Tamers should sit directly above Tube Burners Place Grillstream Grills 26 and Griddle 25 into Cooking Frame Leg tabs from bottom Grillstream Grills and Griddle should rest on lip at back of Cooking Frame Top Grillstream Grills should sit directly on top of the bottom Grill Install Warming Rack 24 in place as shown with wire legs slotting through holes in side...

Page 29: ...22 to side of Control Panel using bolts supplied Hook Grillstream Fat Cup 21 over holes in Side Panel 8 This should be located directly below the spout of Fat Channel 20 to catch fat and meat juices channelled from the Grillstream system STEP 18 ...

Page 30: ...MG Page 30 STEP 19 Your Grillstream barbecue is now fully assembled and you are ready to connect the Gas Cylinder see page 3 for more information Please ensure you perform the gas leak check before operating ...

Page 31: ...a soap solution of one part liquid detergent and one part water The presence of bubbles indicates a leak Tighten or repair as necessary Under no circumstances should a naked flame be used to check for leaks If a gas odour is present and no leaks can be found do not use the BBQ Turn the gas off at the source disconnect the hose and immediately contact your BBQ dealer or place of purchase for assist...

Page 32: ... INSTRUCTIONS FOR FUTURE REFERENCE Grillstream Barbecues Part of the LeisureGrow Group Dewmead Farm New Inn Road Hinxworth Hertfordshire SG7 5HG United Kingdom Tel 44 0 1462 744500 E mail consumerservice leisuregrow com ...

Reviews: