Grill Zone SRGG41207 User Manual Download Page 30

30

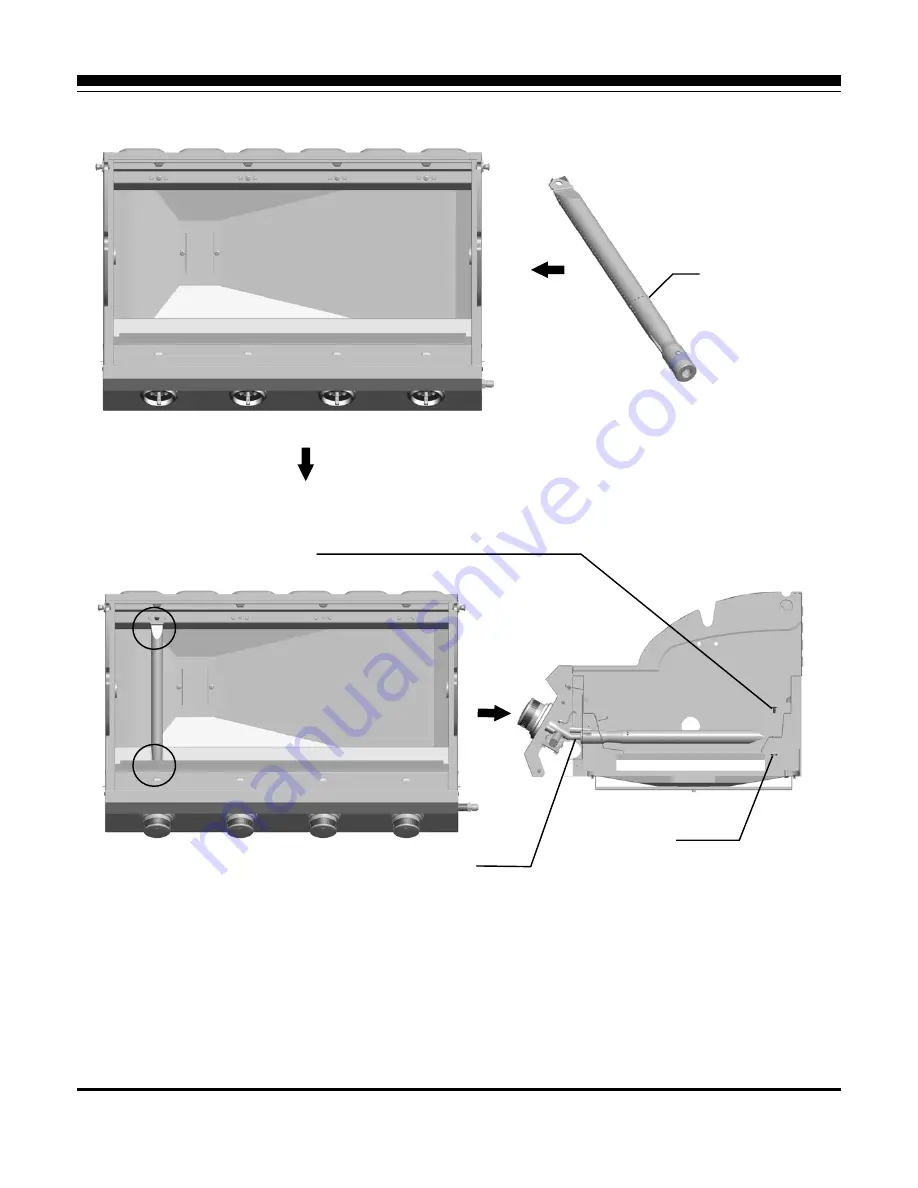
HOW TO REPLACE MAIN BURNER

Ignition hole

(upwards)

in burner image

Ma

3. Line up burner and burner supporter and secure 
    both parts by using M5x10 bolts and M5 nuts.

Nozzle

M5 nut

1

.

 Line up burner and nozzle. 

2. Assembly ignition hole of the burner downwards.

Summary of Contents for SRGG41207

Page 1: ...ence Installer Leave this manual with consumer PLEASE CONTACT 1 866 814 0585 FOR ASSISTANCE DO NOT RETURN TO PLACE OF PURCHASE OFFICE HOURS 9AM TO 5PM EST TM MODEL NO SRGG41207 TV NO 143758 64 000 BTU...

Page 2: ...ntinues keep away from the appliance and immediately call your gas supplier or your fire department WARNING 1 Do not store or use gasoline or other flammable liquids OR vapors in the vicinity of this...

Page 3: ...eak Testing Installer Final Check Read this User Manual carefully and completely before using your grill to reduce the risk of fire burn hazard or other injury SECTION FOUR Operating Instructions Ligh...

Page 4: ...ry dangerous condition which can cause a fire to occur behind and beneath the valve panel thereby damaging the grill and making it unsafe to operate Inspect the grill twice a year GAS INSTALLATION COD...

Page 5: ...it is evident there is excessive abrasion or wear or the hose is cut it must be replaced prior to the grill being put into operation The replacement pressure regulator and hose assembly shall be that...

Page 6: ...HE CART NEVER ALLOW CHILDREN TO CRAWL INSIDE OF THE CART Never let clothing pot holders or other flammable materials come in contact with or too close to any grate burner or hot surface Fabric may ign...

Page 7: ...ts to corrode Do not use the grill for cooking excessively fatty meats or products which promote flare ups Do not operate the grill under construction Use only in well ventilated areas Do not use in b...

Page 8: ...rill only in a well ventilated area Never locate the grill in a building garage breezeway shed or other such enclosed areas During heavy use the grill will produce a lot of smoke Lock the wheels after...

Page 9: ...9 EXPLODED VIEW 1 2 3 4 5 6 7 8 9 10 11 12 13 14 15 16 17 18 19 20 21 22 23 24 25 26 27 31 29 32 37 30 28 36 34 33 35...

Page 10: ...linder fixing hook 37 Connection bar Grease cup hanger 2pcs 1pc 1pc 1 Lid 2 Warming rack 3 Cooking grid 4 Flame tamer 5 Main burner 6 Grease tray 7 Left side shelf 8 Side shelf handle bezel 9 Side she...

Page 11: ...ear right pole 22 secure them with 2pcs R pins STEP 2 Attach 1pc pp washer 2pcs D10 washers 2pcs M10 nuts 2pcs R pins 2pcs wheels 19 and 2pcs wheel caps 18 to the axle 20 and secure them in turn as sh...

Page 12: ...t pole 14 secure them with 4pcs M5 x 12 wing bolts STEP 3 23 21 13 15 14 22 M5 X 12 wing bolt 4pcs M5 X 12 Wing bolts 4pcs Pre installed bolts 4 pcs Pre installed bolts 4 pcs Insert the 4pcs pre insta...

Page 13: ...s down to position 1 Insert the 2pcs pre installed bolts on bottom panel 35 into the 2 key holes on front left pole 15 and front right pole 21 2 Insert the 2pcs pre installed bolts on bottom panel 35...

Page 14: ...ft pole 15 and front right pole 21 slide down and then place another 2pcs pre installed bolts on condiment shelf 16 to position as shown Insert the cylinder fixing hook 36 into 2 holes on bottom panel...

Page 15: ...onnection bar 37 into the holes on front left pole 15 and bottom panel 35 STEP 10 Place the grill body 30 onto the assembled cart secure it with 4pcs D5 washersand 4pcs M5x12 wing bolts M5 X 12 wing b...

Page 16: ...panel of left side shelf 7 to main control panel with 2pcs M5 x 12 bolts CC Finally tighten all the 6pcs bolts 3 Repeat the same procedure to install right side shelf 24 7 24 CC M5 x 16 bolts 4pcs pr...

Page 17: ...d screw to tighten with two wrenches WARNING KEEP FLEXING OF THE METAL HOSE MINIMAL TO PREVENT FUTURE LEAKS PERFORMA LEAK TEST WITH A SOAPY SOLUTION BEFORE USING PLEASE REFER TO LEAK TESTING SECTION O...

Page 18: ...Ignition pin Ignition wire 26 25 27 Insert the end of ignition wire to the ignition pin 26 on the right side burner bowl 25 Note manually adjust the gap between the ignition pin and the flame orifice...

Page 19: ...x grease tray 6 onto the grill body 30 with 2pcs M5 x 12 bolts install grease cup 34 into grease cup hanger 33 and then hang them onto the bottom of grease tray STEP 15 Place 4pcs flame tamers 4 2pcs...

Page 20: ...n it off 2 Connect the hose and regulator assembly to the gas cylinder Turn the requlator clockwise to make sure it s securely tightened Shut off gas supply by rotating valve of gas cylinder clockwise...

Page 21: ...ylinder must include a collar to protect the cylinder valve Other cylinder may be acceptable for use with the appliance provided they are compatible with the appliance retention means Main Manifold op...

Page 22: ...sed outdoors only at least 3 feet from the back and 2 feet from side of any combustible surface Your gas grill should not be used under overhead combustible construction Do not obstruct the flow of ve...

Page 23: ...ng in fire and or explosion When your gas grill is not in use the gas must be turned off at the supply cylinders Storage of an outdoor cooking gas appliance indoors is permissible only if the cylinder...

Page 24: ...upply tighten any leaking fittings turn gas on and recheck Should the gas continue to leak from any or all of the fittings turn off the gas supply and contact our customer service at 1 866 814 0585 On...

Page 25: ...t burning the outside Foods cooked for a long time or foods basted with a sugary marinade may need a lower heat setting near the end of the cooking time TO BIGIN 1 Make sure the grill has been leak te...

Page 26: ...ist call our customer service line If the flame is yellow it indicates insufficient air If the flame is noisy and tends to lift away from the burner it indicates too much air TO MATCH LIGHT THE GRILL...

Page 27: ...mpt to light the grill if odor of gas is present Call for customer service 1 866 814 0585 LIGHTING INSTRUCTIONS Keep a spray bottle of soapy water near the gas supply valve and check the connections b...

Page 28: ...ositions NOTE If the side burner igniter is not functioning see the following section for match lighting MATCH LIGHTING THE SIDE BURNER 1 Open the lid to the side burner before lighting 2 Turn the bur...

Page 29: ...may break off and clog the port Please note if insects or other obstructions are blocking the flow of gas through the burner see the TROUBLE SHOOTING section of this manual GREASE TRAY CLEANING The gr...

Page 30: ...ER Ignition hole upwards in burner image Ma 3 Line up burner and burner supporter and secure both parts by using M5x10 bolts and M5 nuts Nozzle M5 nut 1 Line up burner and nozzle 2 Assembly ignition h...

Page 31: ...rner to ignite wait 5 seconds ignite Repeat for additional burners Check all gas connections for leaks with bubble test If leaks are found replace the part or tighten the fitting Grill takes a long ti...

Page 32: ...damage affecting the operation of the gas grill Warranty Provisions This warranty is non transferable and does not cover failures due to misuse or improper installation or maintenance This warranty is...

Reviews: