


Page 16
SKU 65162
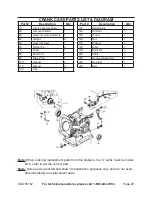
For technical questions, please call 1-800-444-3353.
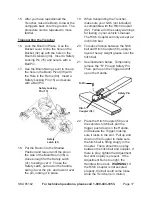
While the end of the boom is being
2.
supported; remove the Pin (29), align
the cylinder with the appropriate hole,
insert the Pin (29), and secure it with
the Hair Pin Clip (31).
With the Engine running, sit in the
3.
Operator Seat (73) and pull the Boom
Lever control backward to raise the
Main Boom (36).
Pull back on the Boom Extension
4.
handle control to raise the Boom
Extension (34).
Push forward on the Bucket handle
5.
control to open the Bucket Assembly.
(32).
Push forward on the Boom handle
6.
to lower the Boom until the Bucket
reaches the ground.
Pull back on the Bucket Lever control
7.
until the Bucket scoops up the dirt.
Pull back on both the Boom and
8.
Boom Extension control levers to
raise the load.
Press in, or push out, the Boom
9.
Swing control levers to move the
Bucket left or right. Note: The Boom’s
travel is 60 degrees left and 60
degrees right.
Press in on the Bucket control handle
10.
to dump the load.
Moving the trencher
One method for moving the trencher
11.
around the work area is by using the
Boom to push the Trencher across
the ground.
12.
WARNING: This technique
can be difficult to control and
should only be attempted by an
experienced operator. The stability
of the Trencher is dependent on the
stability of the ground; if you choose
to move the Trencher in this way, do
so at your own risk. Do not use the
Trencher near ditches or drop-offs.
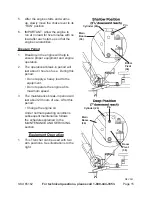
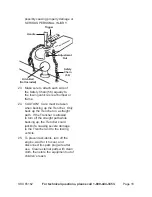
Swing the Bucket inward so that the
13.
front of the bucket, not the scoop, is
facing downward. Press the Bucket
down onto a solid piece of ground
and press down hard enough to raise
the front legs off the ground.
Carefully operate the controls to
14.
move the boom and slowly roll
yourself in the desired direction. Be
certain that the Tires and the new
resting places for the Legs all remain
on solid, stable ground.
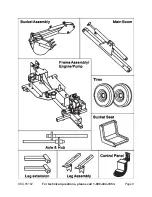
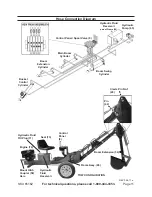
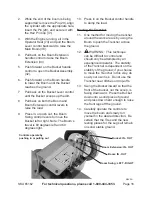
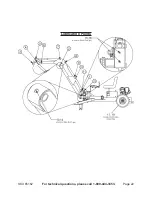
controls operate by
pushing in or pulling out
Bucket: in - out
Boom extension: in - out
Boom: in - out
Boom Swing: LeFt - rigHt
REV 09i