


14
15
W A R N I N G
Disconnect air compressor from power source and bleed off all air pressure before attempting
any maintenance or repair.
SHUTDOWN AND STORAGE:
MAINTENANCE
1. Turn the switch to the OFF position
2. Turn the pressure regulator knob fully counterclockwise to close airflow from air outlet port.
Check the outlet pressure gauge to ensure that it reads 0 PSI.
3. Remove the air hose and any air accessories.
4. Drain moisture from the air tank by slowly opening the air tank drain valve by turning counter
clockwise. Tilt tank to remove all moisture. Once all the moisture has drained out, close the
fitting securely.
5. Allow the compressor to cool down.
6. Wipe the air compressor clean and store it in a clean, dry, and non-freezing location.
WHEN PERFORMING ANY MAINTENANCE OR SERVICE:
1. The air compressor must be turned off.
2. Open tank drain to bleed off all air pressure before attempting any maintenance or repair.
3. Allow compressor to fully cool before attempting any maintenance or repair.
Check the air compressor frequently for any visible problems and follow maintenance
procedures each time the compressor is used.
MAINTENANCE CHECKLIST:
Daily:
• Drain accumulated liquid from tank.
• Check for unusual noise and/or vibrations.
• Check that all fasteners are secure.
• Wipe compressor clean.
Monthly:
• Check for air leaks.
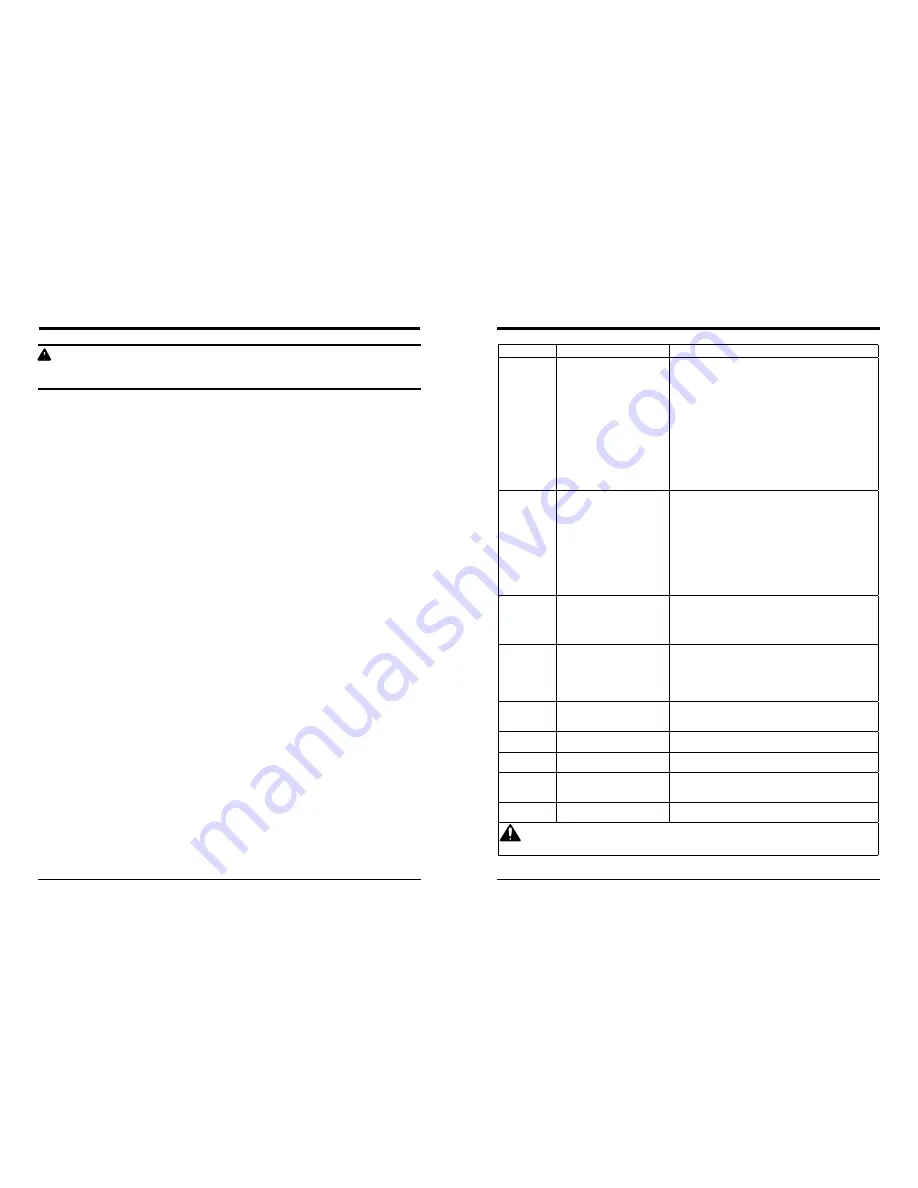
TROUbLESHOOTING
PROBLEM POSSIBLE CAUSES
LIKELY SOLUTIONS
C o m p r e s s o r
does not start or
restart
1. Tank(s) already pressurized.
2. Power cord not plugged in
properly.
3. No power at outlet.
4. Thermal overload switch
tripped.
5. building power supply circuit
tripped or blown fuse.
6. Cord wire size is too small
or cord is too long to properly
power compressor.
7. Compressor needs service.
1. No problem. Compressor will start when needed.
2. Check that cord is plugged in securely.
3. Reset circuit breaker, or have outlet serviced by a qualified
technician.
4. Turn off Compressor and wait for it to cool down.
Press reset button. Resume operation.
5. Reset circuit or replace fuse. Check for low voltage
conditions. It may be necessary to disconnect other electrical
appliances from the circuit or move the compressor to its
own circuit.
6. Use larger diameter or shorter extension cord or eliminate
extension cord. See Recommended Wire Gauge for
Extension Cords in Safety section.
7. Have unit inspected by a qualified technician.
Compressor not
building enough
air pressure
1. Air filters need cleaning/
replacing.
2. Check Valve needs service.
3. Compressor not large enough
for job.
4. Loose fittings.
5. Hose or hose connections too
narrow.
6. High altitude reducing air
output.
1. Check inlet and outlet filters. Clean and/or replace as
needed.
2. Have technician clean or replace, as needed.
3. Check if accessory CFM is met by Compressor. If
Compressor cannot supply enough air flow (CFM), you need
a larger Compressor.
4. Reduce air pressure, then check all fittings with a
soap solution for air leaks and tighten as needed. Do not
overtighten.
5. Replace with wider hose and/or hose connections.
6. Higher altitudes require compressors with greater output.
Overheating
1. Unusually dusty environment.
2. Cord is too small of a
gauge or too long to handle
compressor.
3. Unit not on level surface.
1. Move unit to cleaner environment.
2. Increase cord size or use shorter length extension cord, or
eliminate extension cord. See Recommended Wire Gauge
for Extension Cords in Safety section.
3. Reposition unit on a level surface.
Compressor
starts and stops
excessively
1. Loose fittings.
2. Compressor not large enough
for job.
1. Reduce air pressure, then check all fittings with a
soap solution for air leaks and tighten as needed. Do not
overtighten.
2. Check if accessory CFM is met by Compressor. If
Compressor doesn’t reach accessory CFM, you need a
larger Compressor.
Excessive noise
Loose fittings.
Reduce air pressure, then check all fittings with a soap
solution for air leaks and tighten as needed. Do not
overtighten.
Moisture in
discharge air
Too much moisture in air.
Install inline air filter/dryer, and/or relocate to less humid
environment.
Safety Valve
“pops”
Safety valve needs service.
Pull on test ring of safety valve. If it still pops, replace.
Air leaks from
pump or fittings
Loose fittings.
Reduce air pressure, then check all fittings with a soap
solution for air leaks and tighten as needed. Do not
overtighten.
Air leaks from
tank
Defective or rusted tank.
Have tank replaced by a qualified technician.
Drain moisture from tank daily to prevent future corrosion.
Follow all safety precautions whenever diagnosing or servicing the compressor. Disconnect
power supply before service.
Summary of Contents for 4101502
Page 10: ...18 19 parts list parts list...


