background image

8.5

INSTALL THE BATTERY PACK


WARNING

If the battery pack or charger is damaged, replace the
battery pack or the charger.

Stop the machine and wait until the motor stops before
you install or remove the battery pack.

Read and understand the instructions in the battery and
charger manual.

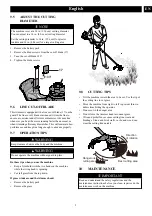
1. Align the lift ribs on the battery pack with the grooves in

the battery compartment.

2. Push the battery pack into the battery compartment until

the battery pack locks into place.

3. When you hear a click, the battery pack is installed.

1

8.6

REMOVE THE BATTERY PACK

1. Push and hold the battery release button (1).
2. Remove the battery pack from the machine.

9

OPERATION


IMPORTANT

Before you operate the machine, read and understand the
safety regulations and the operation instructions.


WARNING

Be careful when you operate the machine.

9.1

CONTROLS

9.2

START THE MACHINE

1. Push the lock-out button (3) and pull the trigger (4).

3

4

5

2. Push the speed switch (5) to the desired operating speed.

Push the speed switch to position 1 for low speed or
position 2 for high speed.

9.3

STOP THE MACHINE

1. Release the trigger to stop the machine.

9.4

ADJUST THE LENGTH OF THE

CUTTING LINE

While you operate the machine, the cutting line gets worn
shorter. You can adjust the length of the cutting line.

1. Hit the trimmer head against the ground while you

operate the machine.

2. Line is automatically released and the cut-off blade cuts

the excess length.

8

English

EN

Summary of Contents for ST60L02

Page 1: ...STC404 ST60L02 www greenworkstools com EN OPERATOR MANUAL FR MANUEL DE L UTILISATEUR STRING TRIMMER COUPE HERBE ES MANUAL DEL OPERADOR CORTABORDES ...

Page 2: ......

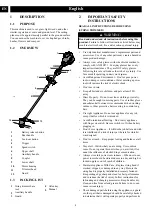
Page 3: ...k 8 8 6 Remove the battery pack 8 9 Operation 8 9 1 Controls 8 9 2 Start the machine 8 9 3 Stop the machine 8 9 4 Adjust the length of the cutting line 8 9 5 Adjust the cutting diameter 9 9 6 Line cut off blade 9 9 7 Operation tips 9 9 8 Cutting tips 9 10 Maintenance 9 10 1 General information 10 10 2 Clean the machine 10 10 3 Replace excess line 10 10 4 Install the cutting line 10 11 Transportati...

Page 4: ...shock Don t use in rain Keep all bystanders children and pets at least 50 ft away Dress Properly Do not wear loose clothing or jewelry They can be caught in moving parts Use of rubber gloves and substantial footwear is recommended when working outdoors Wear protective hair covering to contain long hair Use right Appliance Do not use appliance for any job except that for which it is intended Avoid ...

Page 5: ...or mutilate the batteries Released electrolyte is corrosive and may cause damage to the eyes or skin It may be toxic if swallowed Follow all charging instructions and do not charge the battery pack or appliance outside of the temperature range specified in the instructions Charging improperly or at temperatures outside of the specified range may damage the battery and increase the risk of fire Hav...

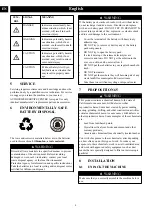
Page 6: ... a new battery pack DO NOT TRY TO REPAIR IT To prevent injury and risk of fire explosion or electric shock and to avoid damage to the environment Cover the terminals of the battery with heavy duty adhesive tape DO NOT try to remove or destroy any of the battery pack components DO NOT try to open the battery pack If a leak develops the released electrolytes are corrosive and toxic DO NOT get the so...

Page 7: ... 2 Put the guard onto the trimmer head 3 Align the screw holes on the guard with the screw holes on the trimmer head 4 Tighten the screws 8 3 ASSEMBLE THE SHAFT 1 Push in the release button on the lower shaft 9 2 Align the release button with the positioning hole and slide the two shafts together Release button Positioning hole 8 6 3 Turn the lower shaft until the button locks into the positioning...

Page 8: ...tery pack from the machine 9 OPERATION IMPORTANT Before you operate the machine read and understand the safety regulations and the operation instructions WARNING Be careful when you operate the machine 9 1 CONTROLS 9 2 START THE MACHINE 1 Push the lock out button 3 and pull the trigger 4 3 4 5 2 Push the speed switch 5 to the desired operating speed Push the speed switch to position 1 for low spee...

Page 9: ...RNING Keep clearance between the body and the machine WARNING Do not operate the machine without guard in place Do these tips when you use the machine Keep a firm hold with the two hands on the machine while the string head is spinning Cut tall grass from the top down If grass winds around the trimmer head Remove the battery pack Remove the grass 9 8 CUTTING TIPS Tilt the machine toward the area t...

Page 10: ... clean the plastic parts or handles Keep the trimmer head free of grass leaves or excessive grease Keep the air vents clean and free of debris to avoid overheating and damage to the motor or the battery Do not spray water onto the motor and electrical components 10 3 REPLACE EXCESS LINE 1 Push the tabs 18 on the sides of the trimmer head at the same time 18 2 Pull and remove the spool cover 19 3 R...

Page 11: ...annot come near the machine Keep the machine away from corrosive agents such as garden chemicals and de icing salts Secure the machine during transportion to prevent damage or injury Clean and examine the machine for any damage 12 TECHNICAL DATA Type Cordless battery powered Motor 60V No load speed 6000 5000 10 RPM Cutting line diameter 0 095 0 080 2 4 mm 2 0 mm Cutting path diameter 14 in 16 in 3...

Page 12: ...perated and or maintained in accordance with the owner s manual or 3 Normal wear except as noted below 4 Routine maintenance items such as lubricants blade sharpening 5 Normal deterioration of the exterior finish due to use or exposure HELPLINE Warranty service is available by calling our toll free helpline at 1 855 345 3934 TRANSPORTATION CHARGES Transportation charges for the movement of any pow...

Page 13: ...ted from the tool Install the battery pack again The battery pack is depleted Charge the battery pack The line does not ad vance Lines are welded to themselves Lubricate with silicone spray Not enough line on spool Install more line Lines are worn too short Advance the cutting line Lines are tangled on spool 1 Remove the lines from the spool 2 Wind the lines Problem Possible Cause Solution The lin...

Page 14: ...ription 1 R0201173 00 1 Auxiliary Handle Assembly 2 R0200747 00 1 Trimmer Head Assembly 1 1 R0201826 00 1 Bolt 3 R0201830 00 1 Hex Screw 1 2 R0201827 00 1 Auxiliary handle 4 R0200749 00 1 Guard Assembly 1 3 R0201828 00 1 Bracket 5 R0201770 00 1 Allen key 1 4 R0201829 00 1 Knob 14 English EN ...

Page 15: ...e bloc batterie 20 8 6 Retirer le bloc batterie 20 9 Utilisation 20 9 1 Commandes 20 9 2 Démarrer la machine 20 9 3 Arrêter la machine 21 9 4 Réglez la longueur de la ligne de coupe 21 9 5 Réglez le diamètre de coupe 21 9 6 Lame de coupe de la ligne 21 9 7 Conseils sur l utilisation 21 9 8 Conseils de coupe 22 10 Entretien 22 10 1 Informations générales 22 10 2 Nettoyez la machine 22 10 3 Remplace...

Page 16: ...nt PAS des lunettes de sécurité Le respect de cette règle réduira le risque de blessures aux yeux Utilisez un masque facial si vous travaillez dans des endroits poussiéreux Évitez les endroits dangereux n exposez pas les outils électriques à des conditions humides ou mouillées L eau qui pénètre dans un outil électrique augmente le risque de choc électrique N utilisez pas sous la pluie Tenez tous l...

Page 17: ...t avec les yeux consultez également un médecin Le liquide s échappant des batteries peut causer des irritations ou des brûlures N utilisez pas un bloc batterie ou un appareil endommagé ou modifié Les batteries endommagées ou modifiées peuvent présenter un fonctionnement imprévisible et provoquer un incendie une explosion ou un risque de blessure N exposez pas un bloc batterie ou un appareil à un f...

Page 18: ...res identiques du fabricant 6 ÉLIMINATION DES BATTERIES SANS DANGER POUR L ENVIRONNEMENT Les matières toxiques et corrosives ci dessous se trouvent dans les batteries utilisées dans cette machine Lithium ion une substance toxique AVERTISSEMENT Éliminez toutes les substances toxiques d une manière spécifiée afin de prévenir la contamination de l environnement Avant de jeter une batterie au lithium ...

Page 19: ...ATION 8 1 DÉBALLER LA MACHINE AVERTISSEMENT Assurez vous d assembler correctement la machine avant de l utiliser AVERTISSEMENT Si les pièces de la machine sont endommagées ne l utilisez pas Si vous n avez pas toutes les pièces n utilisez pas la machine Si les pièces sont endommagées ou manquantes communiquez avec le centre de service 1 Ouvrez l emballage 2 Lisez la documentation contenue dans la b...

Page 20: ...el du bloc batterie et du chargeur 1 Alignez les languettes du bloc batterie avec les rainures du compartiment de batterie 2 Poussez le bloc batterie dans le compartiment de batterie jusqu à ce qu il soit bien encliqueté 3 Vous devriez entendre un clic lorsque le bloc batterie sera inséré correctement 1 8 6 RETIRER LE BLOC BATTERIE 1 Poussez et maintenez enfoncé le bouton de déblocage de la batter...

Page 21: ...ace de coupe 1 Retirez le bloc batterie 2 Retirez les vis de la lame de la lame de coupe 17 3 Tournez la lame de coupe de 180 4 Serrez les vis de la lame r 17 9 6 LAME DE COUPE DE LA LIGNE Ce coupe herbe est équipé d une lame de coupe 17 sur la garde protectrice La lame de coupe de la ligne coupe en continu la ligne pour assurer un diamètre de coupe constant et efficace Avancez la ligne chaque foi...

Page 22: ...tilisez uniquement les pièces de rechange et les accessoires du fabricant initial 10 1 INFORMATIONS GÉNÉRALES IMPORTANT Seul votre concessionnaire ou un centre de service agréé peut effectuer l entretien qui n est pas indiqué dans ce manuel Avant les opérations d entretien Arrêtez la machine Retirez le bloc batterie Laissez le moteur se refroidir Entreposez la machine dans un endroit frais et sec ...

Page 23: ...gne de coupe à la fois 1 Retirez la ligne de coupe restante sur la bobine 2 Alignez les fentes de la bobine avec les fentes de la tête de coupe Couvercle de bobine Tête d avance par coups Fentes 3 Passez l extrémité de la ligne de coupe à travers le trou Poussez la ligne de coupe jusqu à ce qu elle sorte par le trou opposé Trou 4 Tirez la ligne de coupe jusqu à ce qu il y ait une longueur égale de...

Page 24: ...e fonctionnement du chargeur 39 F 4 C 104 F 40 C Plage de température d en treposage de la batterie 32 F 0 C 113 F 45 C Plage de température de dé chargement de la batterie 32 F 0 C 113 F 45 C 13 GARANTIE LIMITÉE M E I L L E U R D A N S SA CATÉGORIE M EJ O R E N C L A S E BEST IN CLASS GARANTIE OUTIL BATTERIE GARANTÍA PARA HERRAMIENTAS Y BATERÍAS Greenworks garantit par la présente ce produit à l ...

Page 25: ...uyez sur le bouton de verrouillage et mainte nez le enfoncé 2 Appuyez sur la gâch ette pour démarrer la ma chine Problème Cause possible Solution La machine s arrête lorsque vous couper l herbe La garde protec trice n est pas atta chée à la machine Retirez la batterie et in stallez la garde protec trice à la machine Une ligne de coupe lourde est utilisée Utilisez uniquement avec la ligne de coupe ...

Page 26: ... ligne évitez les pierres les murs et autres objets durs 2 Avancez régulièrement la ligne de coupe pour conserver toute la largeur de coupe L herbe s enroule autour de la tête de coupe et du boîtier du moteur Coupez l herbe haute au niveau du sol 1 Coupez l herbe haute du haut vers le bas 2 N enlevez pas plus de 8 à chaque passage pour éviter l enroulement La ligne ne coupe pas bien La lame de cou...

Page 27: ...00 1 Ensemble de poignée auxili aire 2 R0200747 00 1 Ensemble de la tête de coupe 1 1 R0201826 00 1 Boulon 3 R0201830 00 1 Vis hexagonale 1 2 R0201827 00 1 Poignée auxiliaire 4 R0200749 00 1 Ensemble de la garde protec trice 1 3 R0201828 00 1 Support 5 R0201770 00 1 Clé Allen 1 4 R0201829 00 1 Bouton 27 Français FR ...

Page 28: ...a batería 33 9 Funcionamiento 33 9 1 Controles 33 9 2 Puesta en marcha de la máquina 33 9 3 Detención de la máquina 34 9 4 Ajuste de la longitud del hilo de corte 34 9 5 Ajuste del diámetro de corte 34 9 6 Cuchilla de corte de hilo 34 9 7 Consejos de funcionamiento 34 9 8 Consejos de corte 35 10 Mantenimiento 35 10 1 Información general 35 10 2 Limpieza de la máquina 35 10 3 Sustitución del exceso...

Page 29: ...ajo con polvo Evite los entornos peligrosos No exponga las herramientas eléctricas a condiciones de humedad Si penetra agua en una herramienta eléctrica aumentará el riesgo de descarga eléctrica No utilice bajo la lluvia Mantenga a todos los transeúntes niños y mascotas al menos a 15 m Lleve indumentaria adecuada No lleve ropa o joyas sueltas Pueden quedar atrapadas en las piezas móviles Se recomi...

Page 30: ...ión o un riesgo de lesiones No exponga una batería o un aparato al fuego ni a temperaturas excesivas La exposición al fuego o a una temperatura superior a 265 F 130 C puede provocar una explosión No deseche las baterías en el fuego Las celdas pueden explotar Compruebe los códigos locales para conocer las posibles instrucciones especiales de eliminación No abra ni desguace las baterías El electroli...

Page 31: ...ENTE Los materiales tóxicos y corrosivos que figuran a continuación se encuentran en las baterías utilizadas en esta máquina Ion de litio un material tóxico AVISO Deseche todos los materiales tóxicos de una manera especificada para evitar la contaminación del medio ambiente Antes de desechar una batería de ion de litio dañada o agotada contacte con la agencia local de eliminación de residuos o con...

Page 32: ...E DE LA MÁQUINA AVISO Asegúrese de montar correctamente la máquina antes del uso AVISO Si las piezas de la máquina presentan daños no utilice la máquina Si no tiene todas las piezas no utilice la máquina Si faltan piezas o hay piezas dañadas contacte con el centro de servicio 1 Abra el embalaje 2 Lea la documentación que se proporciona en la caja 3 Retire todas las piezas sin montar de la caja 4 R...

Page 33: ... de la batería y el cargador 1 Alinee las nervaduras de elevación de la batería con las ranuras del compartimento de la batería 2 Introduzca la batería en el compartimento de la batería hasta que encaje en su posición 3 Cuando escuche un clic la batería está instalada 1 8 6 RETIRADA DE LA BATERÍA 1 Pulse y mantenga pulsado el botón de desbloqueo de la batería 1 2 Retire la batería de la máquina Pr...

Page 34: ...s extensa 1 Retire la batería 2 Retire los tornillos de la cuchilla de la cuchilla de corte 17 3 Gire la cuchilla de corte 180 4 Apriete los tornillos de la cuchilla r 17 9 6 CUCHILLA DE CORTE DE HILO Este cortabordes está equipado con una cuchilla de corte de hilo 17 en la protección La cuchilla de corte de hilo recorta continuamente el hilo para garantizar un diámetro de corte uniforme y eficaz ...

Page 35: ...instaladas IMPORTANTE Utilice únicamente las piezas de repuesto y los accesorios del fabricante original 10 1 INFORMACIÓN GENERAL IMPORTANTE Únicamente un distribuidor o un centro de servicio autorizado puede realizar las tareas de mantenimiento que no se indican en este manual Antes de las operaciones de mantenimiento Detenga la máquina Retire la batería Deje que se enfríe el motor Almacene la má...

Page 36: ... hilo de corte cada vez 1 Retire el hilo de corte restante del carrete 2 Alinee las ranuras de la tapa del carrete con las ranuras del cabezal de corte Cubierta de carrete Cabezal de sacudida Ranuras 3 Introduzca el hilo de corte por el orificio Introduzca el hilo de corte hasta que salga por el orificio contrario Orificio 4 Tire del hilo de corte hasta que haya una cantidad igual de hilo de corte...

Page 37: ...de almacenamiento de la batería 32 F 0 C 113 F 45 C Intervalo de temperatura de descarga de la batería 32 F 0 C 113 F 45 C 13 GARANTÍA LIMITADA M E I L L E U R D A N S SA CATÉGORIE M EJ O R E N C L A S E BEST IN CLASS GARANTIE OUTIL BATTERIE GARANTÍA PARA HERRAMIENTAS Y BATERÍAS Por la presente Greenworks garantiza este producto al comprador original con el comprobante de compra durante un periodo...

Page 38: ...a a la má quina Retire la batería y fije la protección a la máquina Se utiliza un hilo de corte pesado Utilice únicamente con el hilo de corte de nylon de 0 095 0 080 2 4 mm 2 0 mm de diámetro La hierba se enrol la alrededor del eje del motor o del ca bezal de corte 1 Detenga la máquina 2 Retire la batería 3 Retire la hierba del eje del motor y del cabezal de corte El motor se ha so brecargado 1 R...

Page 39: ...or del cabezal de corte y de la carcasa del motor Corte la hierba alta al nivel del suelo 1 Corte la hierba alta de arriba a abajo 2 No quite más de 8 20 cm en cada pasada para evitar que se enrolle El hilo no corta bien La cuchilla de corte se ha desafi lado Afile la cuchilla de corte con una lima o sustitúya la Las vibra ciones au mentan no tablemente El hilo está gasta do en un lado y no se ha ...

Page 40: ...3 00 1 Conjunto de asa auxiliar 2 R0200747 00 1 Conjunto de cabezal de corte 1 1 R0201826 00 1 Perno 3 R0201830 00 1 Tornillo hexagonal 1 2 R0201827 00 1 Asa auxiliar 4 R0200749 00 1 Conjunto de garde protectrice 1 3 R0201828 00 1 Abrazadera inferior 5 R0201770 00 1 Llave allen 1 4 R0201829 00 1 Mando 40 Español ES ...

Reviews: