background image

15

Energy-Recovery Ventilation 

System Service Manual

DPOUSPM

1

Wall

The appearance of the controller 

should be subject to entity.

2

Underplate of wire controller

3

Screw M4X10

4

Controller panel

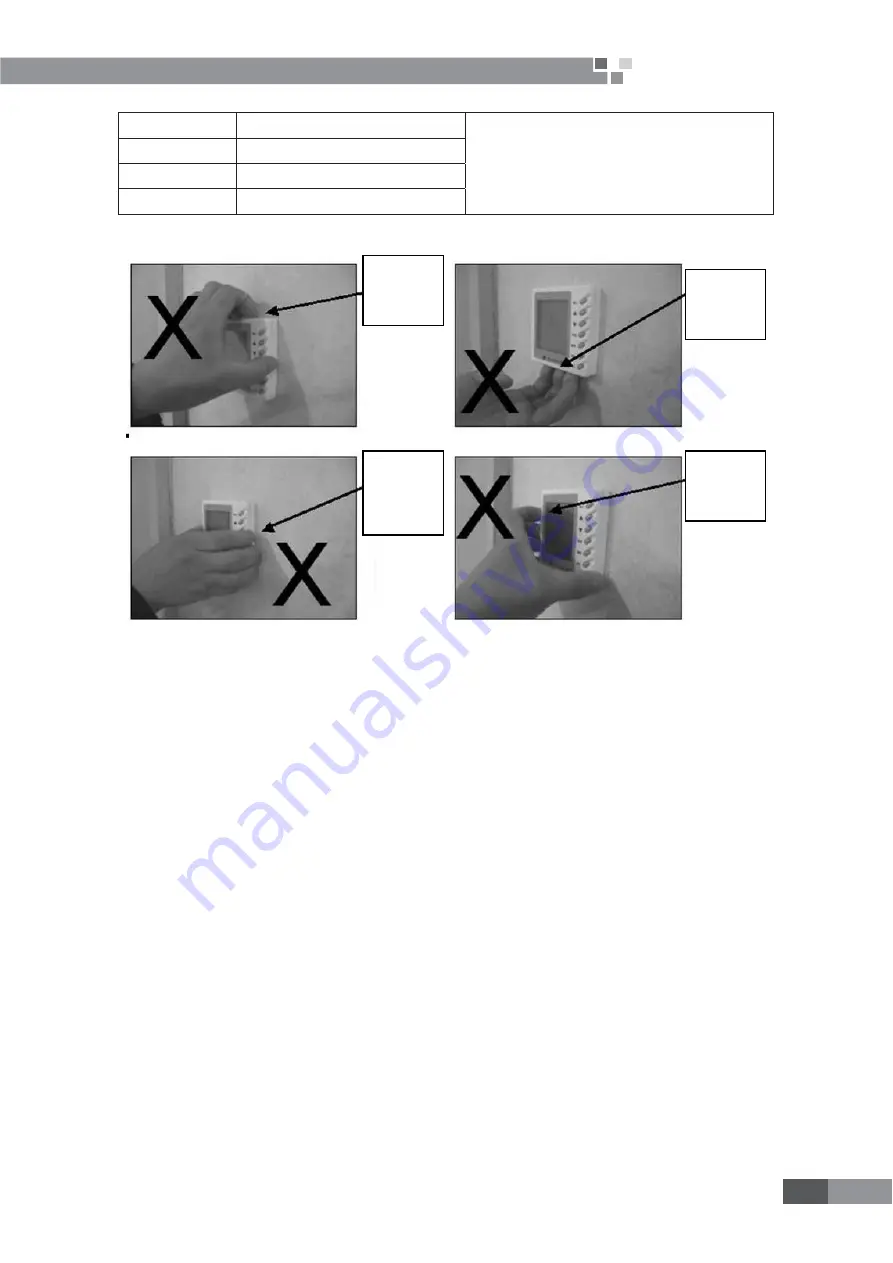
We must not tear down the panel in these wrong ways as:

From

above

From

below

From

right

From

left

When you want to check the panel ,you need use a screwdriver to tear down it like this:

Summary of Contents for FHBQ-D10-K

Page 1: ...Energy Recovery Ventilation System Service Manual GC201110 I en Energ Ve en Ve e ice e e e M en e ...

Page 2: ...ATION FLOWCHART 7 2 MAIN LOGIC 8 3 WIRED REMOTE CONTROLLER 9 INSTALLATION 18 1 DIMENSION DATA 18 2 INSTALLATION SITE 19 3 UNIT INSTALL 19 4 CAUTIONS FOR INSTALLATION 20 5 ELECTRIC WIRING WORK 21 MAINTENANCE 24 1 TROUBLE TABLE 24 2 FLOW CHART OF TROUBLE SHOOTING 25 3 WIRING DIADRAM 26 4 DISASSEMBLY AND ASSEMBLY PROCEDURE OF MAIN PARTS 28 5 EXPLODED VIEWS AND PART LIST 30 ...

Page 3: ...1 Energy Recovery Ventilation System Service Manual PRODUCT QSPEVDU ...

Page 4: ...m3 h 30 3000 m3 h 6 The phase of power supply K single phase M three phase 3 FEATURES 3 1 Description Our living environments are more and more affected by modern civilization As the application of air FRQGLWLRQLQJ V VWHP DQG YDULRXV FRPSRVLWH PDWHULDOV SRSXODUL DWLRQ RI RI FH HTXLSPHQWV DQG GHYHORSPHQW RI closeness of constructions and for the purpose of energy saving and reduction of cost which ...

Page 5: ... D5 K FHBQ D8 K FHBQ D10 K Code EH01100010 EH01100020 EH01100030 EH01100040 LU ÀRZ 9ROXPH H M L m3 h 360 260 210 500 380 300 800 600 480 1000 750 600 External Statics Pressure H M L Pa 100 80 60 100 80 60 110 85 65 110 85 65 Temperature H FKDQJH HI FLHQF H M L 71 73 75 68 70 72 70 72 74 75 77 79 Enthalpy exchange HI FLHQF Heating H M L 65 67 68 62 64 65 63 65 67 66 68 70 Enthalpy exchange HI FLHQF...

Page 6: ...452 1210X1215X452 1340X1550X572 Package Dimension WX D X H mm 1550X1540X470 1550X1540X470 1710X1610X700 Net Weight kg 100 100 240 URVV ZHLJKW kg 115 115 280 RDGLQJ TXDQWLW 3 15 15 9 3 37 37 24 40 HQ 44 44 24 Standard wired remote controller Z5N15 Z5N15 N A Note 1 The models of 220v power supply type has 3types of fan speed and the models of 380V have one fan speed 2 7KH WHPSHUDWXUH H FKDQJH HI FLH...

Page 7: ... 220V 50Hz 0 76A 2 2 47A 1 71A FHBQ D5 K 0 76A 2 2 47A 1 71A FHBQ D8 K 1 0A 2 3 25A 2 25A FHBQ D10 K 1 0A 2 3 25A 2 25A FHBQ D15 M 380V 3N 50Hz 1 4A 2 4 55A 3 15A FHBQ D20 M 1 4A 2 4 55A 3 15A FHBQ D30 M 4 2A 2 13 65A 9 45A Notes 1 RLA Rated load amperes 2 LRA Locked rotor amperes 3 FLA Full load current 5 PIPING DIAGRAM Fresh air Outdoor Air discharge Heat exchanger Indoor Air supply Room air ...

Page 8: ...6 Energy Recovery Ventilation System Service Manual CONTROL DPOUSPM ...

Page 9: ... Exchange mode Auto mode N Y Y Y Y N N Y N Y N Bengin L0 Error Energy saving function on Energy saving on Timer on Timer function on Cleaning Humidifying function on Stop or move according to the opposite humidity Humidity sensor error display L 1 Remind until the time setting come Air valve interface with electricity Air valve checked OK ...

Page 10: ...sient season 7KH V VWHP ZLOO RSHUDWH DV VXFK UHTXHVW By Pass air valve closes the air discharge fan and air supply fan will operate according to setting fan speed 3 The system will operate according to the primary mode before the system was off 2 2 By Pass mode 1 Under By pass mode air valve is open 2 7KH V VWHP ZLOO RSHUDWH DV VXFK UHTXHVW If the air valve is close the air discharge fan and air s...

Page 11: ...tting humidity display 11 Setting humidity increase button 4 Ambient humidity display 12 Setting humidity decrease button 5 Air exchange mode half half air exchange discharge and supply 13 Fan speed button 6 Fan speed display high mid low 14 Reset Switch button 7 Mode auto by pass heat exchange 15 Timer button 8 Error status display 16 On Off button 1 Turn On Off the Unit 1 Press ON OFF button to ...

Page 12: ...ischarge and air supply with each press of FAN button the fan speed with switch between high speed and low peed Fig 4 Low High Fig 4 3 Humidity Adjustment Fig 5 If there is humidifying function in the unit press humidify button Ÿ Used to increase setting humidity ź 8VHG WR GHFUHDVH VHWWLQJ KXPLGLW Once press of this button the temperature will increase or decrease by 5 Fig 5 1RWH RFN IXQFWLRQ 3UHV...

Page 13: ...etting Energy saving startup setting Energy saving stop setting and Clear time setting Fig 6 5 Running Mode Setting Fig 7 1 Each press of this button the operation mode will change as follow 2 Under Auto mode the letter of Auto will light so the system will operate according to temperature and temperature difference between room and outdoors 3 Under By pass mode the letter of By Pass will light so...

Page 14: ...nge of Timer on off is 0 5 24hr 5 The setting range of Energy Saving On is 2 5hr and the default is 2hr 6 7KH VHWWLQJ UDQJH RI QHUJ 6DYLQJ 2II LV KU DQG WKH GHIDXOW LV KU 1RWH SUHVV 1 DQG ź DW WKH same time for 5s only after energy saving timer setting the energy saving function can operate 7 The setting range of Timer Clear is 1250hr 2500hr and 00000 The default is 1250hr Fig 8 7 Ambient Temp Dis...

Page 15: ...e pressure is needed air discharge mode can be adopted Half half air exchange is for normal station 10 Energy Saving Mode Display 3UHVV 1 DQG ź DW WKH VDPH WLPH IRU V WR VZLWFK EHWZHHQ HQHUJ VDYLQJ RQ RII I XQGHU HQHUJ VDYLQJ on state Energy Saving will be displayed Refer to Fig 2 for details If the unit needn t operate for a long time HQHUJ VDYLQJ PRGH FDQ EH DGRSWHG WR PHHW WKH GHPDQGV RI ERWK I...

Page 16: ...d corresponding grooves should be set in the wall If in hidden 1 ʿ PVC pipe can be used 3 Whether mounted visibly or in hidden drill two holes keep level in the wall as the distance 60mm between the two holes in underplate of wired controller and then inset stopper into the holes through which the ZLUHG FRQWUROOHU FDQ EH HG QVHUW FRPPXQLFDWLRQ ZLUH LQ WKH FRQWURO ERDUG W ODVW FODVS WKH FRQWUROOHU ...

Page 17: ...e controller should be subject to entity 2 Underplate of wire controller 3 Screw M4X10 4 Controller panel We must not tear down the panel in these wrong ways as From above From below From right From left When you want to check the panel you need use a screwdriver to tear down it like this ...

Page 18: ...wdriver ķ ĸ Ĺ ĺ Ļ Display board and Bottom panel are separate absolutely Clip button Circumrotate the screwdriver clockwise or anticlockwise the same to the other side Pull the display board to make the clip break off ļ Insert this position with a screwdriver ...

Page 19: ...17 Energy Recovery Ventilation System Service Manual INSTALLATION ...

Page 20: ... 197 FHBQ D8 K 1016 960 832 884 380 165 90 150 230 155 372 246 FHBQ D10 K 1016 960 832 884 380 165 90 150 230 155 372 246 FHBQ D15 M 1215 1159 1210 1262 452 200 100 190 277 178 737 297 FHBQ D20 M 1215 1159 1210 1262 452 200 100 190 277 178 737 297 W L W2 B2 B1 B W1 fresh air inlet room air inlet room air outlet L1 electric box H H1 A2 A A3 A1 flange dimention fresh air outlet Uint mm Model L L1 W ...

Page 21: ...als and the ones inside the room should also be installed with them if temperature and humidity in the ceiling is high The ducts outside the room should be kept inclined 1 50 1 30 to avoid water into room Q RUGHU WR FOHDQ DQG PDLQWDLQ WKH OWHU DQG KHDW H FKDQJHU FRUH LQ WKH V VWHP GR NHHS VHUYLFH VSDFH DV VKRZQ LQ WKH J 3 UNIT INSTALL Air discharge duct Room air inlet Fresh air outlet Indoor air s...

Page 22: ...EUDFNHW IRU WKDW IDU IURP ZDOO RU SROH 7KH YHUWLFDO SLSH RXWVLGH WKH URRP RU RQ WKH URRI VKRXOG EH HG ZLWK derrick or dragline 3 The hanger s rod should be flat and its screw thread should be full and smooth Either threaded connection or welding is suitable for joint of hangers If the former one is adopted connecting thread of either end should be longer than diameter of hanger moreover anti loosi...

Page 23: ...orms by professionals 7 Air switch and leakage switch which can cut off the general power supply should be installed 8 The air switch should integrate the functions of magnetic release and hot release to protect it for short circuit or overload 7KH HOG ZLULQJ VKRXOG EH VXEMHFW WR FLUFXLW GLDJUDP DWWDFKH G RQ WKH XQLW Ƈ Earthing Requirements 1 Reliable earthing measure must be adopted The yellow gr...

Page 24: ...f air switch A Min sectional area of earthing wire mm2 Min sectional area of power cord mm2 FHBQ D3 5 K 220V 50Hz 6 1 0 1 0 FHBQ D5 K 220V 50Hz 6 1 0 1 0 FHBQ D8 K 220V 50Hz 6 1 0 1 0 FHBQ D10 K 220V 50Hz 6 1 0 1 0 FHBQ D15 M 380V 3N 50Hz 6 1 0 1 0 FHBQ D20 M 380V 3N 50Hz 6 1 0 1 0 FHBQ D30 M 380V 3N 50Hz 6 1 0 1 0 Note D 7KH SRZHU FRUG RI WKH XQLW PXVW EH FRSSHU FRUHG FDEOH DQG ZRUNLQJ WHPS FDQ Q...

Page 25: ...23 Energy Recovery Ventilation System Service Manual MAINTENANCE ...

Page 26: ...let inlet is obviously decreased after a period of time Too much dust gathers on the DLU OWHU 5H WKH FROOHFWLQJ SODFH RI DLU YHQW 2 Noise occurs at air vent Installation of air vent is loose 5H WKH FROOHFWLQJ SODFH RI DLU YHQW 3 The system can not be started No power supply or power cord is incorrectly connected Terminals of main board transformer are loose Communication fault E6 LU YDOYH DQG UHOD...

Page 27: ...e unit on Maintain or change the wired temote controller Check the connction of the wires Refer to the Operarting Instruction Manual Error Code dispalyed The transfirmer is normal The main borad can supply power Change the transformer Change the main borad Wired remote controller display normally Motor connection is normal Change the motor or the capacitance ...

Page 28: ...ed control to access a center control to the air valves 3 The part with broken line is optional for user Remote Control Wired controller POWER PE L N Humidity sensor United control Humidifier AC Contactor Coil 2 Model FHBQ D15 M FHBQ D20 M Humidity sensor United control Note 1 When need humidifier connect 1 and 2 terminal 220V ˈ1A to the contactor coil of the humidifier Meanwhile connect the humid...

Page 29: ...e N Note 1 Press ON or Exchange L is connected with L1 disconnected with L2 2 Press OFF or Exhaust L is connected with L2 disconnected with L1 3 The broken line part is connected by user N YE WH WH WH WH 15 YE 1RD Blower Motor Fan Motor Exhaust OFF Controlling switch back side ON ...

Page 30: ...b Assy 0DNH WKH DLU ÀRZ Heat Exchange core The important Sub Assy that make the fresh air and room air exchange energy 4 1 Main parts introduce Main parts dismantle and install Name Service door s teardown Fig show Discharge the two bolts on the right of the Service door and then take down the buckle Bolt Name Electric Box s teardown Fig show ...

Page 31: ... DQG WKH OWHU The core should be washed by cleaner or other special dust catcher HTXLSPHQWV H FHSW ZDWHU Heat Exchange core Filter Name Motor Sub Assy s teardown Fig show 1 Opening the top cover Take out the core and the OWHU EHIRUHKDQG Air path foam Motor Sub Assy 5HPRYH WKH EROW DV WKH J VKRZ DQG WDNH RXW WKH LQJ ERDUG DVV 3 Take out the air path foam LVHQWZLQH WKH QXW WKDW XVHG WR WKH fan and p...

Page 32: ...Door Holder 1 02208901 6 Base Plate Assy 1 01288901 7 Retaining Plate Assy 2 01848903 8 Rubber Sheet 2 76718901 9 Foam Assy 3 1 12319813 10 Electric Box Assy 1 01396159 11 Sub assy of Right Side Plate 1 01311115 12 ÀDQJH 6XE DVV 4 01491142 13 Foam Assy 1 2 12319811 14 sponge Side of Bottom Plate 1 12208920 15 By pass assy 1 07138901 16 Filter Sub assy 2 11128901 17 heat exchanger assy 2 00908901 1...

Page 33: ...ate Assy 2 01848903 8 Rubber Sheet 2 76718901 9 Foam Assy 3 1 12319813 10 Electric Box Assy 1 01396159 11 Sub assy of Right Side Plate 1 01311115 12 ÀDQJH 6XE DVV 4 01491142 13 Foam Assy 1 2 12319811 14 sponge Side of Bottom Plate 1 12208920 15 By pass assy 1 07138901 16 Filter Sub assy 2 11128901 17 heat exchanger assy 2 00908901 18 Foam Assy 2 1 12319812 19 Motor Sub Assy 2 15408901 20 Cover Pla...

Page 34: ...te Assy 2 01841108 8 Rubber Sheet 2 76718901 9 Foam Assy 3 1 12311101 10 Electric Box Assy 1 01396160 11 Sub assy of Right Side Plate 1 01311125 12 ÀDQJH 6XE DVV 4 01491139 13 Foam Assy 1 2 12311103 14 sponge Side of Bottom Plate 1 12201141 15 By pass assy 1 04631124 16 Filter Sub assy 2 1112800101 17 heat exchanger assy 2 00901101 18 Foam Assy 2 1 12311102 19 Motor Sub Assy 2 15401109 20 Cover Pl...

Page 35: ...ate Assy 2 01841108 8 Rubber Sheet 2 76718901 9 Foam Assy 3 1 12311101 10 Electric Box Assy 1 01396160 11 Sub assy of Right Side Plate 1 01311125 12 ÀDQJH 6XE DVV 4 01491139 13 Foam Assy 1 2 12311103 14 sponge Side of Bottom Plate 1 12201141 15 By pass assy 1 04631124 16 Filter Sub assy 2 1112800101 17 heat exchanger assy 2 00901101 18 Foam Assy 2 1 12311102 19 Motor Sub Assy 2 15401109 20 Cover P...

Page 36: ...7 Retaining Plate Assy 2 01841108 8 Rubber Sheet 2 76718901 9 Foam Assy 3 1 12311101 10 Electric Box Assy 1 01396160 11 Sub assy of Right Side Plate 1 01311125 12 ÀDQJH 6XE DVV 4 01491139 13 Foam Assy 1 2 12311103 14 sponge Side of Bottom Plate 1 12201141 15 By pass assy 1 04631124 16 Filter Sub assy 2 1112800101 17 heat exchanger assy 2 00901101 18 Foam Assy 2 1 12311102 19 Motor Sub Assy 2 15401...

Page 37: ...7 Retaining Plate Assy 2 01841108 8 Rubber Sheet 2 76718901 9 Foam Assy 3 1 12311101 10 Electric Box Assy 1 01396160 11 Sub assy of Right Side Plate 1 01311125 12 ÀDQJH 6XE DVV 4 01491139 13 Foam Assy 1 2 12311103 14 sponge Side of Bottom Plate 1 12201141 15 By pass assy 1 04631124 16 Filter Sub assy 2 1112800101 17 heat exchanger assy 2 00901101 18 Foam Assy 2 1 12311102 19 Motor Sub Assy 2 15401...

Page 38: ...36 Energy Recovery Ventilation System Service Manual Model FHBQ D30 M Exploded View ...

Page 39: ...ber gasket 8 76018401 9 Hanger longeron Sub assy 2 01871224 10 Acentric motor 2 15706001 11 Air inlet outlet assy 4 01491143 12 Side plate air outlet 2 01318918 13 Clapboard assy 1 1 01248901 14 Back side plate assy 1 01318909 15 Top cover plate 1 1 01268906 16 Top cover plate 2 1 01268907 17 Middle clapboard assy 1 1 01248909 18 Clapboard assy 2 1 01248905 19 Connection plate top cover 1 01341105...

Reviews: