


8
pushrods to the outer holes of the control horns. Position
the control horns over the hardwood plates in the ailerons
(if you cannot see them, hold the aileron at a shallow angle
in good lighting or use a small pin to puncture the covering)
being sure the pushrods are lined up with the enlarged holes
in the aileron servo arms.
❏
7. Use a felt-tip pen to mark the location of the control
horn mounting holes onto both ailerons.
Drill 5/64" [2mm] holes at the marks you made. Thread 2-56
x 1/2" [13mm] machine screws into each hole and secure the
control horns into place with the control horn back plates.
❏
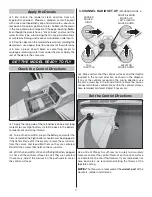
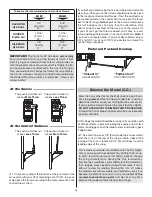
8. With the ailerons in the neutral position (use tape or
small clamps to hold them in place), mark the pushrod wires
where they cross the enlarged holes in the servo arms.
Servo Arm
1/16" [1.6 mm]
Pushrod Wire
FasLink
❏
9. Make a 90 degree bend at the mark on each pushrod
and cut off the excess pushrod 1/4" [6mm] beyond the bends.
Attach the pushrods to the servo arms using nylon FasLinks.
Thread the clevises in or out on the pushrods as necessary
to center the ailerons with the servo arms still perpendicular
to the servo cases. (Never center the servo with the power
on.) When satisfi ed, slide silicone clevis retainers onto the
ends of the clevises to secure them.