background image

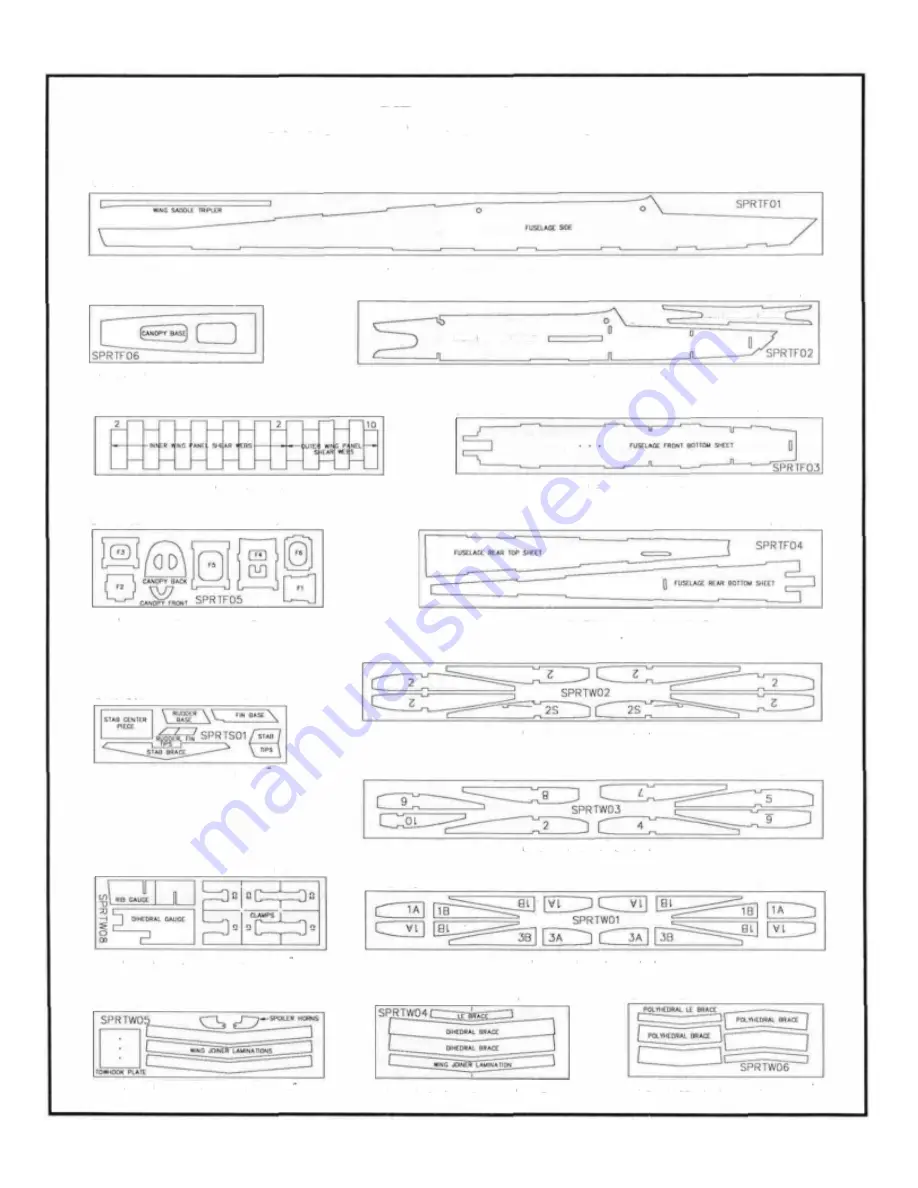
DIE PATTERNS

Do not punch out die-cut parts until ready to use!

SPRTFO1

2 PER KIT

SPRTF06

1 PER KIT

BALSA 3/32" X 3-1/4" X 38-1/2"

SPRTF02

2 PER KIT

REAR  FUSELAGE DOUBLER

FRONT  FUSELAGE  DOUBLER

BALSA 1/8" X 3" X 9-7/8"

SPRTW07

BALSA  3/32" X 3-1/4" X 24"

2 PER KIT

SPRTF03

I PER KIT

BALSA 1/16" X 3"  X 15"

SPRTF05 

1 PER KIT

PLY 1/8" X 4" X 11-7/8"

SPRTS01

1 PER KIT

BALSA 3/16"  x 3" x 9-7/8

SPRTW08

I PER  K I T

PLY 1/8" X 3-7/8" X 11-7/8

SPRTW05

1 PER KIT

PLY 1/16" X 3-3/8" X 11-7/8

PLY 1/8"  X 3"  X 19"

SPRTF04

I PER KIT

BALSA 3/32" X 4" X 21"

SPRTW02

2 PER KIT

BALSA 1/16" X 3" X 23-7/8"

SPRTW03

2 PER KIT

BALSA 1/16" X 3" X 23-7/8"

SPRTW01

I PER KIT

SPRTW04 

1 PER KIT

BALSA 1/8" X 3" X 23-7/8"

SPRTW06 I 

PER 

KIT

PLY 1/8" X 3-3/4 X 10-1/2"

PLY 1/32" X 3-1/4" X 9-3/4'

4

Summary of Contents for Spirit GPMA0530

Page 1: ...operly install all R C components and to test the model and fly it only with experienced competent help in accordance with all safety standards and common sense as set down in the Academy of Model Aeronautics Safety Code It is suggested that you join the AMA to become properly insured before you attempt to fly this model IF YOU ARE JUST START ING R C MODELING CONSULT YOUR LOCAL HOBBY SHOP OR WRITE...

Page 2: ... and Checks 30 PRE FLIGHT 31 Charge the Batteries 31 Find a Safe Place to Fly 31 Range Check Your Radio 31 InstalltheWings 31 AMA Safety Code 31 General 31 Radio Control 31 FLYING 32 Trim Flights 32 Your First Hi Start Launch 32 First Flights 33 THERMAL FLYING 33 Facts About Thermals 33 Thermal Soaring 34 Pointers for Contest Flying 35 SLOPE SOARING 35 Flying 35 SlopeLandings 36 POWERED LAUNCHING ...

Page 3: ...ed and knowledgeable R C pilot at this time Note We as the kit manufacturer can provide you with a top quality kit and great instructions but ultimately the quality and fly ability of your finished model depends on how you build it there fore we cannot in any way guarantee the perform ance of your completed model and no representa tions are expressed or implied as to the performance or safety of y...

Page 4: ...I PER KIT BALSA 1 16 X 3 X 15 SPRTF05 1 PER KIT PLY 1 8 X 4 X 11 7 8 SPRTS01 1 PER KIT BALSA 3 16 x 3 x 9 7 8 SPRTW08 I PER KIT PLY 1 8 X 3 7 8 X 11 7 8 SPRTW05 1 PER KIT PLY 1 16 X 3 3 8 X 11 7 8 PLY 1 8 X 3 X 19 SPRTF04 I PER KIT BALSA 3 32 X 4 X 21 SPRTW02 2 PER KIT BALSA 1 16 X 3 X 23 7 8 SPRTW03 2 PER KIT BALSA 1 16 X 3 X 23 7 8 SPRTW01 I PER KIT SPRTW04 1 PER KIT BALSA 1 8 X 3 X 23 7 8 SPRTW...

Page 5: ...t of the spoiler pans can be installed when you are ready GET READY TO BUILD NOTE It will be helpful to build on a piece of Celotex or other semi soft and flat surface into which you may easily stick pins to firmly hold down the parts while building and to avoid warps 1 Unroll the plan sheet Re roll the plan inside out and let it uncurl while you read through this instruction book This will help t...

Page 6: ... Fin Tip Rudder Tip Fin Base and Rudder Base from SPRTS01 Sand the edges ifnecessary and pin them in place on the plan and glue the parts together using thin CA glue NOTE Do not glue the fin to the rudder D 3 From the 1 8 x 3 16 x 30 sticks SPRTS03 cut the diagonal ribs to fit between the rudder and fin frame work and glue them in place NOTE It is not necessary to get these ribs in the exact posit...

Page 7: ...e of the sailplane D 2 Cut the 1 8 x 3 16 ribs to length and glue them in place D 3 Pin or tape the elevator SPRTS04 in place behind the stab and use yourrazor saw to cutthe ends offto match the stab BUILD THE STABILIZER AND ELEVATOR You ll need the following parts SPRTS02 3 16 x 3 8 x 30 Balsa Sticks SPRTS03 1 8 x 3 16 x 30 Balsa Sticks SPRTS01 3 16 Die Cut Tail Parts SPRTS04 Tapered Elevator D 4...

Page 8: ...ks over to the stab CAUTION You must use extremecarewhen cutting hinge slots with a hobby knife to avoid cutting yourself If the balsa part breaks while you are pushing on the knife the blade could go into your hand before you know it A good precaution is to wear leather gloves while performing the follow ing steps A Beginbycarefullycuttingaveryshallowslitat the hinge location This first cut is to...

Page 9: ... to your flat work surface and cover the wing drawing with waxed paper NOTE If your work space is limited you may cut the wing drawings apart from the rest of the plans D 2 The Shaped Wing Leading Edges SPRTW10 are fastened together by thin strips of balsa Separate them by carefully cutting between the LE S Sand away the excess balsa that remains along the edges after cutting them apart using a sa...

Page 10: ...od Inner Spar SPRTW13 into the notches in the ribs by carefully pushing the spar completely down into the notches Make sure the lop spar is lined up lengthwise with the bottom spar Remove the spar and glue it in place by applying thick CA to the notches before the spar is put back in place DD 11 Position a Pre shaped Leading Edge SPRTW10 in place over the plans NOTE These leading 10 DD 12 Locate t...

Page 11: ...e edge thatyou cutwith the razor saw should be near the end ofthe spars and it should be placed so that it slants in at the top towards the middle ofthe wing Use the C1 clamps to hold the braces in place and test fit the wingjoiner lamination into the box formed This box will be referred to as the joiner box The wing joiner lamina tion is used to make sure the spars remain the correct distance apa...

Page 12: ...RTW03 die cut sheets Glue the ribs in place with a thick CA at the spar joint and a drop of thin CA at the trailing edge joint Use the rib gauge to keep the ribs perpendicular DD 4 Trial fit the top 1 8 x 5 16 x 15 1 8 Basswood Outer Spar in place by carefully pressing the spar into the notches until it is flush with the top of the ribs Remove the spar and apply thick CA to the notches Replace the...

Page 13: ... and the thickest web goes between ribs W4 W5 NOTE TAPER OF WEBS W9 WIO W8 W9 W7 W8 W6 W7 W5 W6 W4 W5 DD 9 Glue the webs into their respective places using thick CA The thinnest end of each web goes towards the tip of the panel The C 2 clamps can be used to help hold the webs in place while the glue cures DD 10 Cut and sand the trailing edge spars and leading edge flush with rib W10 Also cut these...

Page 14: ...on the plans to make sure you are not sanding any sweep forward or backward tilt into the wing DD 2 With the inner panel flat on the work surface DD 3 Test fit the inner and outer panels together over the plan to make sure the leading edges spars and trailing edges all meet up nicely when the tip panel is blocked up the required2 5 8 atthebottom ofribW10 Use the lower notch of the dihedral guage a...

Page 15: ... wing joiner to remove any glue globs and test fit it in the wing joiner box Some sanding may be required to get a nice smooth but not loosefit IF YOU ARE BUILDING A ONE PIECE WING SKIP AHEAD TO STEP 4 IF YOU ARE BUILDING THE TWO PIECE WING SKIP AHEAD TO STEP 15 D 1 Punch out three of the 1 16 andoneofthe1 8 Ply wood Wing Joiner Laminations SPRTW05 SPRTW04 andfindthealuminumjoiner Lightlysandtheed...

Page 16: ... Slide one of the sheets in place in front of the dihedral brace trim it to fit and glue it to the LE and the dihedral brace with thick CA D 10 Glue another piece to the rear of the dihedral brace then cut a third piece to fit behind the second and glue it in place IF YOU ARE BUILDING A ONE PIECE WING THAT WILL BE ATTACHED WITH RUBBER BANDS DISREGARD STEPS 11 12 13 and 14 and instead just glue all...

Page 17: ... be a big help when trying to hold the sheeting down evenly D 15 Set the 1 16 x 3 x 24 Balsa Leading Edge Sheeting SPRTW17 in place on the inner panel The outer end ofthe sheeting should coverrib W3A Cutoffthe excess sheeting even with rib W1A Sand the top L E of the ribs if necessary to allow the sheeting to be flush with the L E D 16 With the 1 16 sheeting in place against the leading edge apply...

Page 18: ...heribs Cuta 1 8 wide 1 8 deep notch in the middle ofthe 3 16 x 1 4 x 1 piece of balsa and glue it to the bottom of the 3 16 x 1 4 x 6 9 32 piece trapping the end of the spoiler tube in the notch as shown in the photo D 20 Glue the 1 16 x 1 8 x 6 9 32 piece ofbalsa to the back edge of the sheeting between the W2 ribs as shown on the plans and in the photo D 21 Glue the 3 16 x 1 4 x 6 9 32 piece of ...

Page 19: ... firstnear the spars andcuta second piece to fitbetween the firstpiece and the trailing edge Glue these in place and if you built a two piece wing sand the sheeting flush with the W1A and W1B ribs at the wing root D 29 If you built a two piece wing trial fit the two wing halves togetherusingtheplywoodwingjoiner Sandtheroot of each panel if necessary to achieve a nice close joint between the two wi...

Page 20: ...SPRTF07 to fit between the notch for former F5 and the rear doubler and glue it in place making sure it is lined up flush with the lop edge of the fuselage side excluding the tabs Cut another 1 8 sq balsa stringer to fit along the bottom between the rear doubler and the notch for former F5 and glue it in place Make sure it is lined up flush with the bottom edge of the fuselage side excluding the t...

Page 21: ...ake yourtime applying the thin CA and be sure to get the bottom and the sides pressed together nicely Thick CA can then be added to these joints to add strength D 7 Pull the front fuselage sides together and trial fit the 1 8 Plywood Former F1 in place Apply thick CA to the front fuselage bottom and the formers install F1 and pull the fuselage sides together A few rubber bands can be used to help ...

Page 22: ... 1 32 to allow for sanding to final shape D 11 Drill three 9 64 1 8 is light but will work holes in the 1 8 plywood bottom for the towhook There should be three indentations to show you where to drill Gently Tap the three 4 40 Blind Nuts NUTS001 into the holes from the IF YOU ARE NOT BUILDING A BOLT ON WING SKIP AHEAD TO ASSEMBLE THE CANOPY 22 D 12 Cut two pieces of 1 4 birch plywood not included ...

Page 23: ...nopy Front SPRTF05 in place in the Formed ABS Cockpit SPRTF12 Sand them if necessary for a good fit and then glue them in place with thick CA D 2 Sand the bottom edges of the canopy front and back flush with the bottom of the cockpit Be careful not to sand through the cockpit A small flat file works well for the front former D 3 Check the fit of the 1 8 Balsa Canopy Base SPRTF06 in the cockpit San...

Page 24: ...ks well for trimming the canopy Temporarily mount the wing in place on the fuselage VERY CAREFULLY trim the back of the canopy A LITTLE AT A TIME to fit over the wing Take your time and use the outlines on the plans and the wing for guides D 9 Test fit the canopy onto the fuselage You can sand the edges ofthe canopy slightly or you can sand the fuselage nose block ifneeded to get it to fitproperly...

Page 25: ...korsmallnailthroughribW10into the wing tip that keeps rising 2 Perform this test several times until the wing bal ances or the same wing tip does not drop every time and then glue the tacks or nails in place with a drop of thin CA FINAL SANDING Check over the entire structure carefully inspecting for any poorly glued joints gaps and dings Apply additional glue and or balsa filler as necessary then...

Page 26: ...ow speedsbut itcuts down on the wing efficiency at normal speeds The SPIRIT S wing is designed to fly well at slow speeds without any washout and therefore we recommend you check to make sure the wings are flat using the following procedure D 1 Set the wing so an inner panel is resting on a flat surface Any warp twist will show up by causing a comer of the panel to rise off of the work surface D 2...

Page 27: ... a paper towel dampened with rubbing alcohol to remove any oil D 4 Cut thepushrods from the 1 4 Square Balsa Sticks SPRTF09 The elevator pushrod should be 17 3 4 long and the rudder pushrod should be 15 1 4 long D 3 Position the stabilizer on the fuselage and measure to get it centered and properly aligned Glue the stabilizer to the fuselage with either thick CA or epoxy Check its alignment with t...

Page 28: ...y do cut or sand them until they will operate freely Turn off the receiver first and then the transmitter D 5 Screw a Nylon Clevis NYLON17 onto the threaded portion ofeach pushrod Slide the pushrods into the fuselage The rudderpushrod exits the top ofthe fuselagejust in front and to the left of the fin The elevator pushrod exits the hole in the rear of the fuselage Snap the nylon clevises into the...

Page 29: ...d end of its swing and wrap one spoiler string around the screw in the horn With the spoilers taped or held closed apply a drop of thick CA to glue the string to itselfand form a small loop Remove that string and perform the same steps to the other string The two strings should be the same length be careful not to glue the two strings together and the spoilers should open and close together Small ...

Page 30: ...the bottom of the fuselage by threading a 4 40 Nut NUTS002 and a 4 Washer WSHR005 all the way onto thetowhookandscrewingthetowhookintothefrontholefor the first flights With the towhook threaded almost all the way into the blind nut make sure the towhook is facing straight back and tighten the 4 40 nut to secure it After the first flights the towhook can be moved back to the centerhole for most fly...

Page 31: ...eler to check to see that you have the radio installed correctly and that all the control surfaces do what they are supposed to GENERAL 1 I will not fly my model aircraft in competition or in the presence of spectators until it has been proven to be airworthy by having been previously successfully flight tested 2 I will not fly my model aircraft higher than approxi mately400feetwithin3milesofanair...

Page 32: ...ly rather than moving the transmitter sticks abruptly TRIM FLIGHTS YOUR FIRST HI START LAUNCH It is a good idea to do a couple of trim flights before each flying session to make sure the plane is still in trim and the radio is working properly The model will survive a hard landing from 5 feet much better than it will one from several hundred feet The first few trim flights should be done over a gr...

Page 33: ...in Whenyouarecomfortablewithflyingdirectly intothe wind startlettingtheplanegobehindyou downwind alittle beforeyoustartbackupwind Continue this until you can fly directly towards you from downwind without getting disori ented At this point you can start to establish a landing pattern and bring the sailplane in for a landing from down wind This enables the plane to be flown as slowly ground speed a...

Page 34: ...e would like the plane to go When you are thermal soaring try to fly as smoothly and straightas possible Trim the plane to fly in a straight line and only touch the controls when you have to Watch the sailplane carefully and it will tell you what it is encountering When the sailplane flys directly into a thermal it will eitherstartrisingorstopsinking Eithercaseis reason enough to start circling es...

Page 35: ... This will allow you to ride thermals downwind while knowing when you have to head back to make your landing safely Learn from the wind Keep track ofwhich way the wind is blowing If the wind suddenly shifts there is some thermal action fairly close to you The air is probably being either sucked up into a thermal or falling outofsome sink In either case it is often a good idea to fly in the directi...

Page 36: ...re it was SLOPE LANDINGS Landings can be very tricky on some slopes On gentle slopes you can often fly very close to the top ofthe slope and slide into the top of the slope without encountering any turbulent air On steeper slopes you may have to be a little more aggressive to get the plane out of the lift In any case it is a good idea to talk to the local flyers to plan your landing before you lau...

Page 37: ...TW06 1 1 32 Plywood Polyhedral Braces SPRTW08 1 1 8 Plywood Clamps and Gauges SUB PACK LONG STICKS fSPRTA04 SPRTF07 4 1 8 Square x 24 Balsa Stringer PART QTY DESCRIPTION SUB PACK LONG STICKS Cont SPRTF08 2 3 16 x 24 Balsa Triangle SPRTF09 2 1 4 Square x 18 Balsa Pushrod SPRTS02 3 3 16 x 3 8 x 30 Balsa Tail Frame SPRTS03 2 1 8 x 3 16 x 30 Balsa SPRTW13 4 1 8 x 5 16 x 23 1 2 Bass wood Inner Spar SPR...

Page 38: ...ACTICE RECORD Use this chart to record your contestpractice flying and watch your flying improve Flight Time Min Sec Landing Distance Date Distance from Spot Target Time Minutes Flight Time Min Sec Landing Distance Distance from Spot 38 ...

Page 39: ...ACTICE RECORD Use this chart to record your contest practice flying and watch your flying improve Flight Time Landing Distance Date Target Time Flight Time Min Sec Distance from Spot Minutes Min Sec LandingDistance Distance from Spot 39 ...

Page 40: ...40 2 VIEW DRAWING Use this drawing to plan your trim scheme ...

Reviews: