


7
BUILDING INSTRUCTIONS
Preparations
❏
1. If you have not done so already, remove the major parts
of the kit from the box and inspect for damage. If any parts
are damaged or missing, contact Product Support at the
address or telephone number listed in the “Kit Inspection”
section on page 5.
❏
2. Carefully remove the tape and separate all the control
surfaces. Use a covering iron with a covering sock on high
heat to tighten the covering if necessary. Apply pressure over
sheeted areas to thoroughly bond the covering to the wood.
ASSEMBLE THE WING
❏
1. Attach a 12" [305mm] servo extension to each aileron
servo. Secure the connections using tape, heat shrink tubing
(not included) or special clips designed for that purpose.
❏
2. Locate the strings taped inside the aileron servo bays
and tie the ends of the strings to the servo extensions. Use
the string to pull the servo leads through the wing ribs.
❏
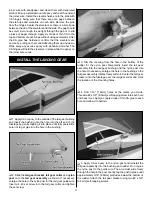
3. Position the servos in the aileron servo bays in the
orientation shown. Drill 1/16" [1.6mm] holes through the servo
mounting tabs. Thread a servo mounting screw (included with
the servos) into each hole and back it out. Apply a drop of
thin CA to each hole to harden the wood. When the glue has
dried, install the servos using the included black fi berglass
plates and the screws included with the servos. Do not use
the rubber grommets or eyelets included with the servos
because the fl ex allowed by the grommets will reduce the
precision of the control surfaces.