GREAT PLANES FW-190 Focke Wulf Instruction Manual Download Page 17

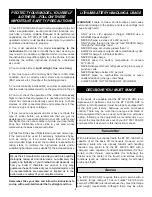
To initiate a landing approach, lower the throttle while on the
downwind leg. Allow the nose of the model to pitch
downward to gradually bleed off altitude. Continue to lose
altitude, but maintain airspeed by keeping the nose down as
you turn onto the crosswind leg. Make your final turn toward
the landing area (into the wind) keeping the nose down to
maintain airspeed and control. Level the attitude when the
model reaches an altitude of about 10 feet, modulating the
throttle as necessary to maintain your glide path and
airspeed. If you are going to overshoot, smoothly advance
the throttle (always ready on the right rudder to counteract
torque) and climb out to make another attempt. When you’re
ready to make your landing and the model is a foot or so off
the deck, cut your throttle and smoothly increase up elevator
until it gently touches down on its belly. Make sure that you
cut your power completely before touchdown, or gearbox
damage may result.

One final note about flying your model: Have a goal or flight
plan in mind for every flight. This can be learning a new
maneuver(s), improving a maneuver(s) you already know, or
learning how the model behaves in certain conditions (such
as on high or low rates). This is not necessarily to improve
your skills (though it is never a bad idea!), but more
importantly so you do not surprise yourself by impulsively
attempting a maneuver and suddenly finding that you’ve run
out of time, altitude or airspeed. Every maneuver should be
deliberate, not impulsive. For example, if you’re going to do
a loop, check your altitude, mind the wind direction
(anticipating rudder corrections that will be required to
maintain heading), remember to throttle back at the top, and
make certain you are on the desired rates (high/low rates).
A flight plan greatly reduces the chances of crashing your
model just because of poor planning and impulsive moves.
Remember to think.

Have a ball! But always stay in control and fly in a
safe manner.

GOOD LUCK AND GREAT FLYING!

Fill in and place on or inside your model.

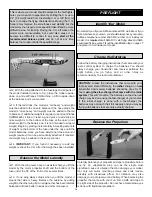
Great Planes ElectriFly Yak 55 EP 3D ARF
You don’t need expensive brushless motor systems for 3D
electric aerobatics. The Yak’s enormous control surfaces and
full flying stabilizer offer impressive maneuverability and
hovering potential with the powerful, included 280-size
brushed motor and 5:1 gearbox. Its low parts count and
easy final assembly will have this aerobat flight-ready in just
2-3 hours. The durable, lightweight EPS foam airframe
features a high-vis, preapplied trim scheme. An included
“prop saver” allows the prop to deflect back upon landing,
and is compatible with APC or GWS prop hubs. GPMA1190

Great Planes ElectriFly U-Can-Do 3D EP ARF
It’s a park flyer, ARF and 3D trainer all in one! Less than a
yard across the wing tips and weighing just 15 ounces, the
U-Can-Do 3D EP is small enough to fly at nearby parks and
fields. And its unique FlightFlex airframe not only simplifies
assembly to just 2 to 4 easy hours...it also results in virtual
indestructibility! Touch down hard – it’ll bounce and bend,
but not break. With the included ball bearing 280 motor, 5:1
gearbox and prop, it flies like a champ, performing hovers,
harriers and any other 3D stunt you care to name with
authority. GPMA1275

OTHER ITEMS AVAILABLE

FROM GREAT PLANES

Landing

17

Summary of Contents for FW-190 Focke Wulf

Page 1: ...ediately in new and unused condition to the place of purchase To make a warranty claim send the defective part or item to Hobby Services at the address below Hobby Services 3002 N Apollo Dr Suite 1 Ch...

Page 2: ...combat mount and experience the thrill of close in combat dogfighting With two or more of the Fun Force series combat aircraft you can recreate classic dogfights of history For the latest technical u...

Page 3: ...ly harm ONLY use a LiPo approved charger NEVER use a NiCd NiMH peak charger NEVER charge in excess of 4 20V per cell ONLY charge through the charge lead NEVER charge through the discharge lead NEVER c...

Page 4: ...5A continuous current is required Additionally the speed control should be as light as possible The ElectriFly C 25 High Frequency ESC w BEC GPMM2025 is suitable A charger capable of charging 3 cell 1...

Page 5: ...left side of the page Follow the instructions provided on the page to locate a U S Canadian or International dealer If a hobby shop is not available replacement parts may also be ordered from Tower H...

Page 6: ...Planes Product Support 3002 N Apollo Drive Suite 1 Champaign IL 61822 Telephone 217 398 8970 ext 5 Fax 217 398 7721 E mail airsupport greatplanes com KIT INSPECTION Kit Contents Photographed 1 Rudder...

Page 7: ...serts into the wing slot over the carbon joiner Make sure they are fully seated against the joiner The foam inserts may not be completely flush with the bottom of the wing 1 Insert the wing into the f...

Page 8: ...the carbon rod Be sure the two halves are even as shown 4 Glue the fin and rudder to the fuselage with epoxy Make sure that the fin remains perpendicular to the stab and centered on the fuselage 1 Loc...

Page 9: ...e head of the servo screw passes through 2 Trim the mounting posts off of the servo as shown in the photo 3 Place the original servo arm over the screw and glue the top of the arm to the extender with...

Page 10: ...ole on the aileron servo arm Insert the Z bend end of the pushrods into the outer hole in the aileron servo arm 2 Center your aileron servo to ensure it is at neutral Use a small clamp or some masking...

Page 11: ...ESC If your ESC has a BEC switch install it in the provided cutout For some electronic speed controls it may be necessary to trim the foam slightly to allow for wire clearance and switch mounting 3 S...

Page 12: ...oximate midpoint of the mount 5 Cut a 1 25 mm long groove in the bottom of the fuselage at the tail as shown The exact location is not important it simply needs to be at the tail of the fuselage Do no...

Page 13: ...t part of the elevators rudder and ailerons At this stage the model should be in ready to fly condition with all of the systems in place 1 Use a felt tip pen or 1 8 3 mm wide tape to accurately mark t...

Page 14: ...ttery charging instructions that came with your radio control system to charge the batteries You should always charge your transmitter and receiver batteries the night before you go flying and at othe...

Page 15: ...magazine the AMA web site or the Code that came with your AMA license 1 I will not fly my model aircraft in sanctioned events air shows or model flying demonstrations until it has been proven to be a...

Page 16: ...ain straight and level flight After flying around for a while and while still at a safe altitude with plenty of battery power practice slow flight and execute practice landing approaches by reducing t...

Page 17: ...check your altitude mind the wind direction anticipating rudder corrections that will be required to maintain heading remember to throttle back at the top and make certain you are on the desired rates...

Page 18: ...Triton Peak Charger makes it possible to accomplish all this and more through controls and menus so simple that programming is a breeze For more information log on at www electrifly com and be amazed...

Page 19: ...ct size and light weight which makes it ideal for small planes and park flyers The servo features a special four point micro servo horn and can be used for elevators ailerons and rudders FUTM0042 Grea...

Page 20: ...____________ Where Purchased _________________________ Date Construction Started __________________ Date Construction Finished _________________ Finished Weight __________________________ Date of Firs...

Reviews: