background image

Appendix

A-5

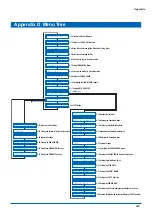
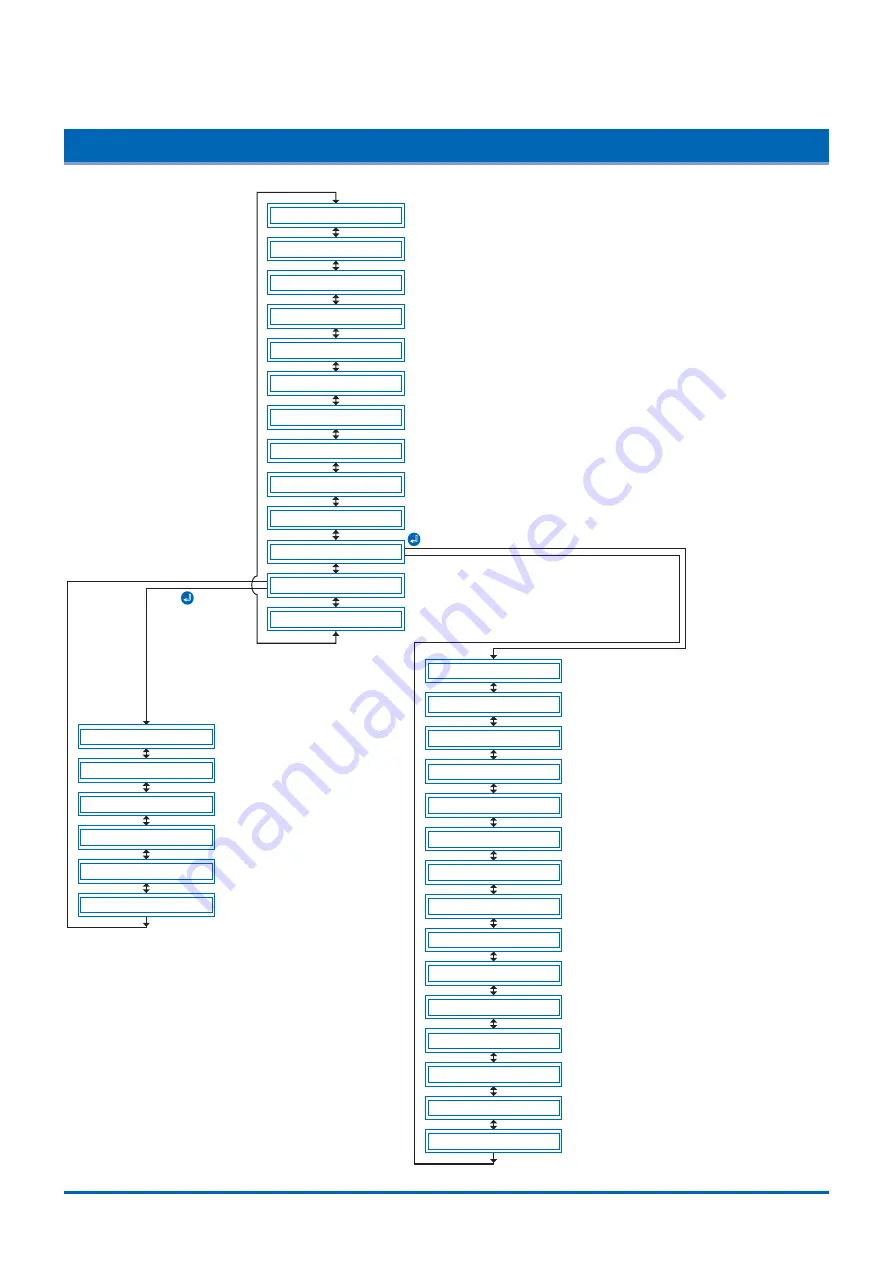
Appendix D  Menu Tree

S E L E C T   U S E R

C O M M A N D

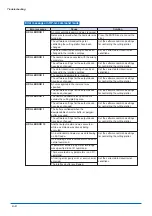
R S - 2 3 2 C

P A G E   L E N G T H

S E P A R A T O R

T I M E O U T

C L E A R   B U F F E R

D I S T A N C E   A D J U S T

A X I S   A L I G N M E N T

P L O T   A R E A

E X P A N D

R O T A T E

S O R T

S P A C E   R E A R

O F F S E T   F O R C E

I N I T .   D O W N   F O R C E

S T E P   P A S S

O F F S E T   A N G L E

F _ C U T

L E N G T H   U N I T

F E E D & C U T

B L A D E   W A R E   S E T U P

P E N   U P / D O W N

C U T   L I N E   P A T .

T A N G E N T I A L

I N I T .   B

P E N   U P   S P E E D

I N I T I A L   F E E D

A U T O   P R E   F E E D

A D V A N C E D   F U N C .

S E T U P   M E N U

T E S T

P E N   1 / 2   A D J

C O P Y

4.2 Clearing the Buffer Memory

4.3 Setting the FEED & CUT function

4.4 Blade Wear Detection (When Blade Wear Setup is On)

4.5 Raising and Lowering the Pen

4.6 Selecting the Type of Perforated Line.

4.7 Setting TANGENTIAL Mode

4.8 Selecting the Blade Tip's Initial Position

4.9 Setting the PEN UP SPEED

4.10 Specifying the INITIAL FEED Length

4.11 Setting AUTO PRE-FEED

4.33 TEST Mode

4.25 Setting the Distance Compensation Between the Pens

4.26 Cutting/Plotting Using the Buffer Memory (COPY Function)

4.12 Distance Adjustment

4.27 User-specified Settings

4.28 Setting the Format of Data to be Received

4.29 Interface Settings

4.30 Setting the PAGE LENGTH

4.31 Setting the SEPARATOR Function

4.32 Setting the TIMEOUT Function

4.13 Aligning the Coordinate Axes

4.14 Setting the Cutting/Plotting Area

4.15 Expanding the Cutting/Plotting Area

4.16 Rotating the Coordinate Axes

4.17 Sorting Settings

4.18 Specifying the SPACE REAR Distance

4.19 Setting the OFFSET FORCE (Initial Cutting Force)

4.20 Setting the Initial Down Force

4.21 Setting the STEP PASS

4.22 Setting the OFFSET ANGLE

4.23 Setting the F_CUT Function

4.24 Setting the LENGTH UNIT

(ENTER) key

(ENTER) key

Summary of Contents for CE3000-120

Page 1: ...CE3000 120AP CUTTING PLOTTER...

Page 2: ...f the categories before reading the Manual DANGER This category provides information that if ignored is highly likely to cause fatal or serious injury to the operator WARNING This category provides in...

Page 3: ...may cause electric shock or a fire hazard due to current leakage Contact with the high voltage parts within the cutting plotter may cause electric shock If the cutting plotter requires repairs contact...

Page 4: ...or moving parts such as the carriage while cutting or plotting is in progress Such action may result in injury Keep your hands hair etc away from the rollers or moving parts such as the carriage even...

Page 5: ...g water or other fluid on top of the cutting plotter Fluid falling inside the cutting plotter may cause electric shock or a fire hazard due to current leakage If water or foreign matter enters the cut...

Page 6: ...out of alignment When using indoor lighting such as fluorescent or other electrical lamps provide a distance of at least one meter between the cutting plotter and the light source Close proximity of s...

Page 7: ...No 18AWG x 3 NO 42 21 49 300 V 10 A Europe CEE 7 VII TYPE H05VV F 250 V IEC320 3 x 1 0 mm2 10 A CEE13 UK BS1363 TYPE H05VV F 250 V BS4491 3 x 1 0 mm2 5 A BS6500 Australia AS3112 TYPE OD3CFC 250 V AS3...

Page 8: ...means without the prior written permission of Graphtec Corporation 2 The product specifications and other information in this manual are subject to change without notice 3 While every effort has been...

Page 9: ...onnecting to Your Computer 2 2 2 2 Turning on the Power 2 3 2 3 Loading the Medium 2 4 Loading a Roll Medium 2 4 Loading Sheet Media 2 9 Aligning the Push Rollers 2 10 2 4 Adjusting and Mounting the C...

Page 10: ...the Coordinate Axes 4 16 4 14 Setting the Cutting Plotting Area 4 18 4 15 Expanding the Cutting Plotting Area 4 19 4 16 Rotating the Coordinate Axes 4 20 4 17 Sorting Settings 4 21 4 18 Specifying the...

Page 11: ...CTION 5 5 5 4 Setting Special Functions B 5 5 6 Troubleshooting 6 1 6 1 The Cutting Plotter Does Not Operate When Turned On 6 2 6 2 The Cutting Plotter Does Not Operate Correctly 6 2 6 3 The Cutting R...

Page 12: ...CHAPTER 1 Introduction 1 1 Checking the Accessories 1 2 Parts Names and Functions 1 3 Assembling the Stand...

Page 13: ...s representative or nearest Graphtec vendor promptly AC power cord Quick Start Manual Usage Precautions User Guide CD ROM Stand Cutter blade CB09UA Water based fiber tip pen 1 1 each 1 1 1 1 Cutter pl...

Page 14: ...ter pen to the left and right Cutter pen holder Hold the cutter pen and moves it up and down Pen holder Holds the pen and moves it up and down Pen station Used to mount the pen before it is used Media...

Page 15: ...ket Stand AC power inlet Connects the power cord to the cutting plotter Power switch Turns the power supply to the cutting plotter on or off Stand Supports the cutting plotter unit Alignment shaft Use...

Page 16: ...the LCD when in PAUSE status COND Press this function key to view the cutter pen condition settings PAUSE Press this function key once in READY status to switch to PAUSE status in order to change the...

Page 17: ...wing parts Stand side bar L R Center bar Alignment shaft Center bar Hexagonal socket bolt M6 x 8 Allen wrench M6 Stock shaft Basket Construction The basket is made up of the following parts Sheet supp...

Page 18: ...bars L R temporarily with the hexagonal socket bolts M6 using the Allen wrench Front side Stand side bar Center bar Hexagonal socket bolt M6 2 Fasten the sheet support pipe brackets to the stand tops...

Page 19: ...A M4 two or three turns and then insert the brackets on the end of the shaft using the elongated screw holes Tighten the screws to hold the brackets in place Push the shaft in until it contacts the cu...

Page 20: ...pin Hexagonal socket bolt M6 Stand CE3000 120AP cutting plotter CHECKPOINT Make sure that the casters with the stoppers are at the front 6 Attach the media guide bracket to the underside of the front...

Page 21: ...Pass the sheet under the center bar and fasten the ends to the support pipes using the press studs Sheet Pass under the center bar Sheet support pipe Press stud 9 Attach the stoppers L R to the stock...

Page 22: ...CHAPTER 2 Setting up The Cutter Plotter 2 1 Connecting to Your Computer 2 2 Turning on the Power 2 3 Loading the Medium 2 4 Adjusting and Mounting the Cutter Pen 2 5 Mounting the Pen...

Page 23: ...erface ports are available for use Use a Centronics compatible parallel cable serial cable or USB cable in accordance with the connection method chosen Obtain a Graphtec approved interface cable that...

Page 24: ...ing the power cord provided 3 Turn on the cutting plotter by pressing the side of the Power switch The STATUS lamp on the control panel will light up 4 If no medium has been loaded the message below a...

Page 25: ...opper Position the stoppers at the appropriate locations and then tighten the screws At this time if you have loaded a 950 mm media roll fix the stoppers at the positions shown in the following diagra...

Page 26: ...cutting or plotting is in progress please keep your hands hair etc away from the shaft holder and the collar Mount the stock shaft at the front of the cutting plotter 3 If you have not already done s...

Page 27: ...as been pushed down and engaged and the silver colored section is hidden The stock shaft rotates in the FREE status LOCK FREE CAUTION While cutting or plotting is in progress please keep your hands ha...

Page 28: ...er to the LOCK position LOCK position This is the status when the lever has been pulled up and inserted into the groove and the silver colored section can be seen The stock shaft does not rotate in th...

Page 29: ...the media set lever displays a menu for selection of the media mode Select the media mode R O L L 1 P R E S S E N T R CHECKPOINT If the REALIGN ROLLERS message is displayed when the medium is loaded a...

Page 30: ...s 2 Load the medium aligning the edges with the upper and lower scales on the front guide Align with scale Media sensor CHECKPOINT Load the medium so that it passes over the media sensor 3 Adjust the...

Page 31: ...from the application software on the computer Aligning the Push Rollers Adjust the position of the left and right hand push rollers to suit the medium width Position the push rollers at either edge o...

Page 32: ...ripped by the three push rollers 1 2 and 3 Push roller 1 Push roller 2 Push roller 3 Grit roller Media sensor Media NG OK NG OK CAUTION Push roller 1 must be positioned over the right hand wide grit r...

Page 33: ...equipment Be sure to mount the cutter blade in the corresponding cutter pen plunger Cutter blade Plunger cap Plunger Blade length adjustment knob Blue For 0 9 mm diameter blades Red For 1 5 mm diamete...

Page 34: ...blade from inside the plunger cap 4 Insert the new blade into the hole provided in the plunger cap 5 With the blade inserted into the plunger cap screw on the plunger from above Adjusting the Blade Le...

Page 35: ...adjust the blade length by gradually increasing the blade length as you alternately run a test cut to check whether or not the medium can be cut Mounting the Cutter Pen After the blade length has been...

Page 36: ...ching the pen immediately after the cutting plotter is turned on or whenever the pen is moving Open the holder arm of the pen station with your finger then mount the pen in the pen holder After the pe...

Page 37: ...ons 3 1 Setting the Cutter Pen Conditions 3 2 Displaying the Effective Cutting Area 3 3 Moving the Pen 3 4 Setting the Initial Cutting Position Origin Point 3 5 Stop Function 3 6 Moving the Pen Carria...

Page 38: ...setting is selected no OFFSET setting is required Reference Pen Conditions for Plotting Pens To preserve the pen life set the FORCE to the lowest setting and set the SPEED after checking to confirm t...

Page 39: ...ey to change the symbol to s and press again to move it to the right Press the key to move it to the left Use the or key to select the parameter to be changed and use the or key to select the setting...

Page 40: ...table entitled Optimal Cutting Conditions for Each Media Type on page 3 2 1 Press the COND key in READY mode to display the cutter pen conditions 2 Select the setting area condition number to be set...

Page 41: ...then use the or key to move the s symbol to the position shown below 2 0 9 U 1 2 3 3 0 2 3 Press the or key to select the value to be changed in the range specified below 1 2 Press the ENTER key to co...

Page 42: ...ting Area Press the ENTER key in READY mode to display the current effective cutting area X 0 0 0 0 m m Y 0 0 0 m m 3 3 Moving the Pen In READY mode press the or key to move the pen carriage to the le...

Page 43: ...axes have been rotated gives the following results Original origin New origin X Y When the Coordinate Axes are Rotated After Moving the Origin Point When the coordinate axes are rotated after the orig...

Page 44: ...or reset 1 Press the PAUSE key while cutting or plotting is in progress to stop cutting or plotting and display the PAUSE menu C L E A R B U F F E R 2 Pressing the PAUSE key while cutting or plotting...

Page 45: ...along the X and Y axes Y X Original pen carriage position Moved pen carriage position 100mm 100mm In READY mode press the key while holding down the ENTER key to move the pen carriage in 100 mm steps...

Page 46: ...are achieved If you perform test cutting while the cutter pen conditions are being set the test cutting will be performed under the conditions being set 1 Load the medium for test cutting on the cutt...

Page 47: ...tting the Cutting Plotting Area 4 15 Expanding the Cutting Plotting Area 4 16 Rotating the Coordinate Axes 4 17 Sorting Settings 4 18 Specifying the SPACE REAR Distance 4 19 Setting the OFFSET FORCE I...

Page 48: ...function 4 4 Blade Wear Detection When Blade Wear Setup is On 4 5 Raising and Lowering the Pen 4 6 Selecting the Type of Perforated Line 4 7 Setting TANGENTIAL Mode 4 8 Selecting the Blade Tip s Init...

Page 49: ...the following menu is displayed C L E A R B U F F E R 4 Press the ENTER key to display the clear buffer memory menu C L E A R Y E S 5 Press the or key to select YES or NO and then press the ENTER key...

Page 50: ...XT or PREV key until the following menu is displayed F E E D C U T 3 Press the ENTER key to display the FEED CUT selections F E E D C U T C U T 4 Press the or key to select F CUT or CUT and then press...

Page 51: ...ting distance for that operation is not included in wear detection calculations Checking the Wear Rate 1 Check to confirm that the cutting plotter is in READY mode displaying the current pen settings...

Page 52: ...o on so setting areas must be removed from one group before being registered in another To cancel the selection s press the NEXT or PREV key Setting Wear Rate Factors This sets factors corresponding t...

Page 53: ...splayed C L E A R G R O U P 4 Press the ENTER key to display the wear rate clear menu C L R G R O U P 1 Y E S 5 The number to the right of CLEAR GROUP is the group number Use the or key to increase or...

Page 54: ...until the following menu is displayed P E N U P D O W N 3 Press the ENTER key to lower the pen and press the ENTER key again to raise it B L A D E W A R E S E T U P C U T L I N E P A T T A N G E N T...

Page 55: ...e using cut shapes can be easily separated after cutting but will not come loose during cutting 1 Press the PAUSE key to switch to PAUSE mode 2 Press the NEXT or PREV key until the following menu is d...

Page 56: ...numbers 1 to 8 indicate the cutter setting areas and those marked with a s symbol have the TANGENTIAL mode set to ON 1 2 3 4 5 6 7 8 Use the and key to move the cursor and select a setting area Use t...

Page 57: ...ide of the effective cutting area 1 Press the PAUSE key to switch to PAUSE mode 2 Press the NEXT or PREV key until the following menu is displayed I N I T B Press the ENTER key to display the INIT BLA...

Page 58: ...jamming 1 Press the PAUSE key to switch to PAUSE mode 2 Press the NEXT or PREV key until the following menu is displayed P E N U P S P E E D 3 Press the ENTER key to display the pen up speed menu U P...

Page 59: ...key to display the INITIAL FEED setting I N I T I A L F E E D O F F 4 Press the or key to select OFF or ON and then press the ENTER key To cancel the selection press the NEXT or PREV key CHECKPOINT I...

Page 60: ...ayed A U T O P R E F E E D 3 Press the ENTER key to display the AUTO PRE FEED setting A U T O P R E F E E D O N Press the or key to select ON or OFF and then press the ENTER key to confirm 4 If ON is...

Page 61: ...3 4 5 6 7 8 Use the or key to move the cursor to select the required condition setting area Press the or key to display or not display thes symbol and then press the ENTER key to confirm To cancel pr...

Page 62: ...t Reloaded medium already plotted Alignment point 2 Drawing reference points New origin X Y 1 Press the PAUSE key to switch to PAUSE mode 2 Press the NEXT or PREV key until the following menu is displ...

Page 63: ...4 17 8 Press the PAUSE key to cancel PAUSE mode CHECKPOINT After the axes are aligned the settings will be reset if any of the following are performed Specification of a new origin Loading of a new me...

Page 64: ...il the following menu is displayed P L O T A R E A 4 Press the ENTER key to display the plotting area menu L L 0 0 5 Use the and POSITION keys to move the pen to the lower left setting position and th...

Page 65: ...he plotting area width setting menu E X P A N D O F F Press the or key to select ON or OFF and then press the ENTER key to confirm To cancel the selection press the NEXT or PREV key 5 If the settings...

Page 66: ...PREV key until the following menu is displayed R O T A T E 4 Press the ENTER key to display the coordinate axis rotation setting menu R O T A T E O F F Press the or key to select ON or OFF and then p...

Page 67: ...is displayed S O R T 4 Press the ENTER key to display the sorting setting menu S O R T O F F Press the or key to display the condition setting areas 2 through 8 or OFF Select the condition setting ar...

Page 68: ...y and then press the NEXT or PREV key until the following menu is displayed S P A C E R E A R 4 Press the ENTER key to display the SPACE REAR setting S P A C E R E A R 1 2 m m Press the or key to spec...

Page 69: ...ing menu is displayed A D V A N C E D F U N C 3 Press the ENTER key and then press the NEXT or PREV key until the following menu is displayed O F F S E T F O R C E 4 Press the ENTER key to display the...

Page 70: ...will be 29 Set the initial down force to suit the type of medium used by performing test cuts 1 Press the PAUSE key to switch to PAUSE mode 2 Press the NEXT or PREV key until the following menu is di...

Page 71: ...yed A D V A N C E D F U N C 3 Press the ENTER key and then press the NEXT or PREV key until the following menu is displayed S T E P P A S S 4 Press the ENTER key to display the step pass setting menu...

Page 72: ...displayed A D V A N C E D F U N C 3 Press the ENTER key and then press the NEXT or PREV key until the following menu is displayed O F F S E T A N G L E 4 Press the ENTER keyto display the offset angle...

Page 73: ...3 Press the ENTER key and then press the NEXT or PREV key until the following menu is displayed F _ C U T 4 Press the ENTER key to display the F_CUT setting F _ C U T O N Press the or key to specify...

Page 74: ...U N I T 4 Press the ENTER key to display the length unit menu L E N G T H U N I T m m Press the or key to select mm or inch and then press the ENTER key to confirm To cancel the selection press the N...

Page 75: ...TER key to start drawing the pattern Compensation value X Compensation value Y The cross drawn by the pen in Pen Holder 1 The cross drawn by the pen in Pen Holder 2 the reference pattern Y X 6 After t...

Page 76: ...If the data to be copied does not fit within the cutting plotting area the following message is displayed in step 5 C A N N O T C O P Y Use the and POSITION keys to change the initial copying position...

Page 77: ...ng from 1 through 8 and then press the ENTER key To cancel the selection press the NEXT or PREV key 5 Press the PAUSE key to cancel PAUSE mode B L A D E W A R E S E T U P C U T L I N E P A T T A N G E...

Page 78: ...ZE If HP GL is selected set the ORIGIN POINT If a command different from that set previously is selected the PAUSE mode is automatically canceled after STEP SIZE GP GL or ORIGIN POINT HP GL is set Set...

Page 79: ...ge this setting if your application specifies a different origin position 1 Set the command setting to HP GL C O M M A N D H P G L 2 Press the ENTER key to display the origin point setting O R I G I N...

Page 80: ...m left transfer rate baud rate parity data length and handshaking mode The baud rate can be set to 19200 9600 4800 2400 1200 600 or 300 The parity can be set to N None E Even parity or O Odd parity Th...

Page 81: ...ress the NEXT or PREV key 5 Press the PAUSE key to cancel PAUSE mode CHECKPOINT This setting is retained in the memory even when the power is turned off The cutting plotter s distance precision is gua...

Page 82: ...S E T U P M E N U 3 Press the ENTER key and then press the NEXT or PREV key until the following menu is displayed S E P A R A T O R 4 Press the ENTER key to display the SEPARATOR setting S E P A R A...

Page 83: ...V key until the following menu is displayed T I M E O U T 4 Press the ENTER key to display the TIMEOUT setting T I M E O U T 0 Press the or key to specify one of the available TIMEOUT settings and the...

Page 84: ...ist CAUTION The pen carriage begins moving as soon as this function is set Keep your hands and other objects away from the cutting plotter s moving parts Self Test Pattern Printing This function print...

Page 85: ...CHECKPOINT The dump list is printed out as ASCII character codes Characters without codes will be printed as small 2 digit figures Output data for READ type commands will be output as dummy data excep...

Page 86: ...CHAPTER 5 Setting and Using the Special Functions 5 1 Description of Special Functions A 5 2 Setting Special Functions A 5 3 Description of Special Functions B 5 4 Setting Special Functions B...

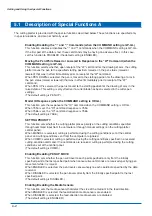
Page 87: ...esponse to the OI command when the COMMAND setting is HP GL When 7550 is set the OI command response is 7550 When 7586 is set the OI command response is 7586 The default setting is 7586 SETTING PRIORI...

Page 88: ...her the resolution is automatically set or fixed at a constant 5 degrees when a cutting plotter circle command is output while the COMMAND setting is HP GL The default setting is DEFAULT Enabling Disa...

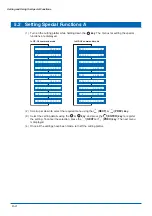
Page 89: ...E 2 0 M O D E L 7 5 8 6 P R I O R I T Y C O M D U P M O D E D I S A B L E D M E D I A E N A B L E D H O M E E N A B L E D P A R A L L E L I F 1 C I R C L E D E F A U L T B W S D I S A B L E D C R O S...

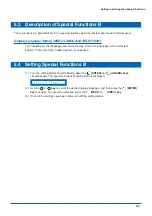
Page 90: ...six languages can be selected English French German Italian Spanish or Japanese 5 4 Setting Special Functions B 1 Turn the cutting plotter on while holding down the ENTER and ORIGIN keys simultaneousl...

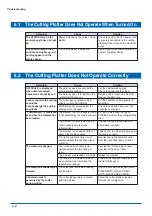
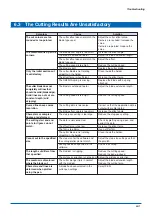
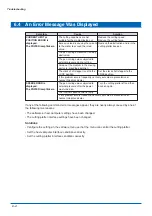
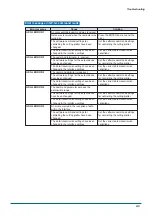
Page 91: ...ER 6 Troubleshooting 6 1 The Cutting Plotter Does Not Operate When Turned On 6 2 The Cutting Plotter Does Not Operate Correctly 6 3 The Cutting Results Are Unsatisfactory 6 4 An Error Message Was Disp...

Page 92: ...s semi transparent and is not detected by the media sensors The medium is not detected by the media sensors due to strong reflected light The medium is not loaded so that it passes the media sensors T...

Page 93: ...is too small The step pass setting is too large The data is not connected The offset force is too low The film is too flimsy The cutter blade is not rotating smoothly in the holder The step size for t...

Page 94: ...table for the medium being cut Excessive load is causing the current to the motor to exceed the rated value The pen carriage movement is being obstructed The pen carriage was subjected to external pre...

Page 95: ...ange The software settings for the output device have been changed The data transmission settings have been changed in the interface settings An error occurred in the reception of data within the inte...

Page 96: ...dable character buffer or polygon buffer was used The software settings for the output device have been changed Another output command was executed while a command was already being executed An invali...

Page 97: ...Appendix Appendix A Main Specifications Appendix B Options and Supplies Appendix C External Dimensions Appendix D Menu Tree...

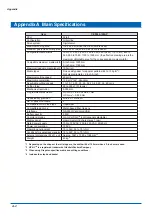
Page 98: ...Maximum loadable media length 100 m roll Media types Fine quality paper for apparel patterns 64 to 130 g m2 Roll media diameter 2 inch 3 inch Maximum cutting speed 60 cm s Maximum acceleration 13 9 m...

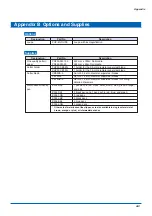
Page 99: ...er supersteel blade Cutter blade CB09UA 5 Set of 5 0 9 mm diameter supersteel blades CB15U 5 Set of 5 1 5 mm diameter supersteel blades CB15UB 5 Set of 5 1 5 mm diameter supersteel blades for cutting...

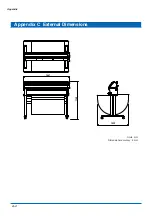
Page 100: ...A 4 Appendix Appendix C External Dimensions 1487 1020 1189 Units mm Dimensional accuracy 5 mm...

Page 101: ...ecting the Type of Perforated Line 4 7 Setting TANGENTIAL Mode 4 8 Selecting the Blade Tip s Initial Position 4 9 Setting the PEN UP SPEED 4 10 Specifying the INITIAL FEED Length 4 11 Setting AUTO PRE...

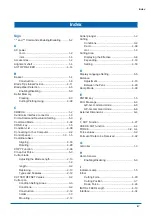
Page 102: ...lade Length 2 13 1 2 length 3 2 Replacing 2 13 Types and Features 2 12 CUTTER OFFSET Values 3 2 Cutter pen Condition Setting Areas 3 3 Conditions 3 2 Construction 2 12 holder 1 3 Mounting 2 14 Cutter...

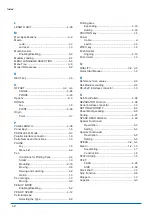
Page 103: ...oving 3 9 PEN UP MOVE Enabling Disabling 5 2 PEN UP SPEED 4 12 Perforated Line Selecting the Type 4 9 Plotting Area Expanding 4 19 Setting 4 18 POSITION key 1 5 Power Cable vi switch 1 4 PREV key 1 5...

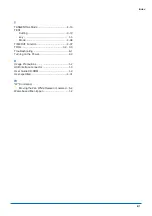
Page 104: ...4 38 TIMEOUT Function 4 37 TOOL 3 2 3 3 Troubleshooting 6 1 Turning on the Power 2 3 U Usage Precautions 1 2 USB interface connector 1 3 User Guide CD ROM 1 2 User specified 4 31 W W Command Moving th...

Page 105: ...The specifications etc in this manual are subject to change without notice CE3000AP UM 152 JUNE 28 2004 1st edition 01 GRAPHTEC CORPORATION...

Page 106: ...503 10 Shinano cho Totsuka ku Yokohama 244 8503 Japan Tel 81 045 825 6250 Fax 81 045 825 6396 Email info graphteccorp com Web www graphteccorp com Printed in Japan...

Reviews: