background image

7

8

The GXP2200 extension module is an ideal solution for the busy enterprise envi

-

ronment looking to add the ability to receive and dispatch calls efficiently. Each ex

-

tension module has 20 programmable buttons, Left and Right buttons, supporting 

40 Multiple Purpose Keys to be configured. GXP2200 supports up to 4 extension 

modules, adding 160 fully programmable phone extensions to the phone.

Note:

 The extension module is an additional accessory for the GXP2200 and is 

not included in the GXP2200 box.

Note: For the detailed user manual, please download from:

http://www.grandstream.com/support

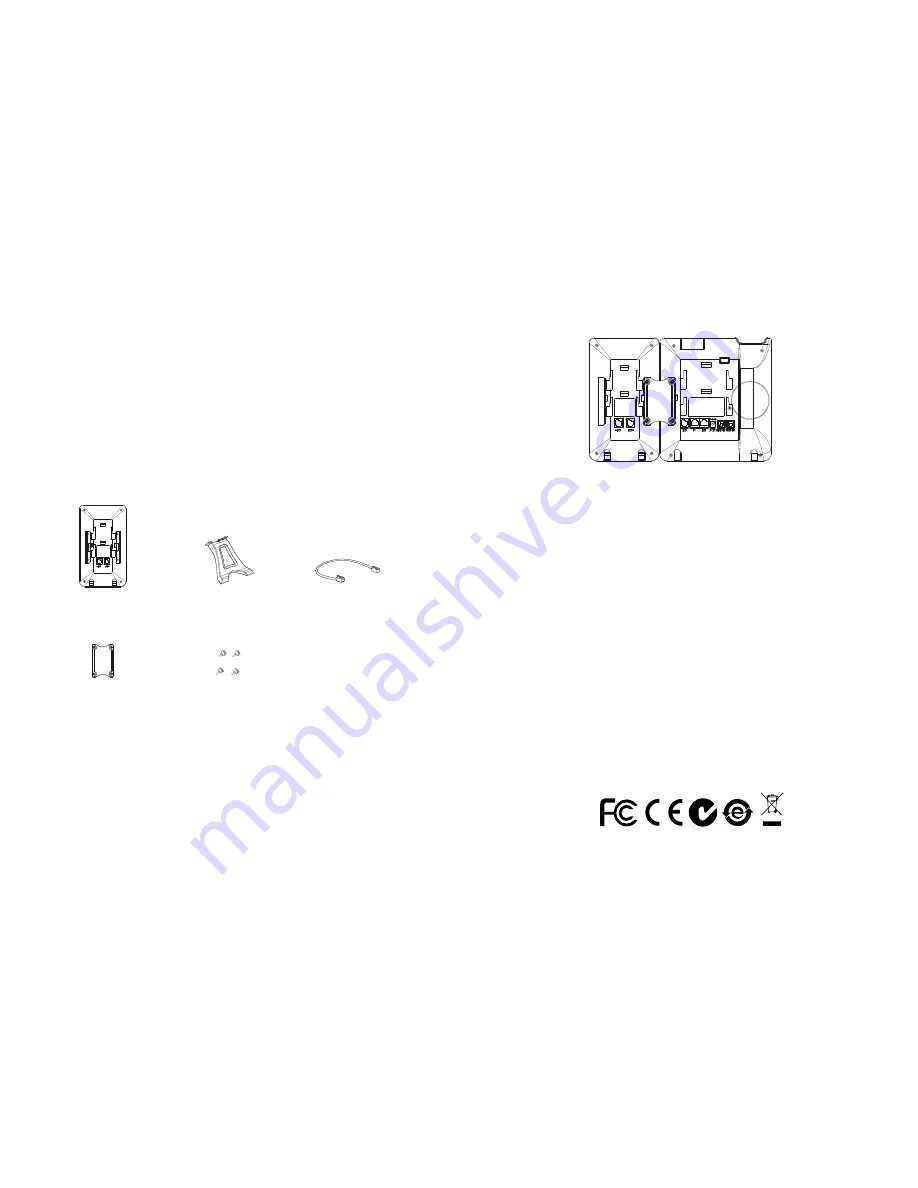
GXP2200 Extension Module Package Content:

Configuring GXP2200 Extension Module:

1. Login GXP2200’s web GUI and configure Multiple Purpose Keys for Extension 

board 1/2/3/4 following the GXP2200 web GUI tabs;

2. On the GXP2200 extension board, press Left or Right button to browse all the 

MPKs’ status in different pages;

3. For more information, please refer to the GXP2200 user manual.

3. Connect the extension board to GXP2200 via the EXT port using the RJ11-RJ11 

cable provided;

4. Install the phone stand on GXP2200 and extension board;

5. Power up the GXP2200. The GXP2200 extension board will show the booting 

up screen with version information and connecting status;

6. After successfully booting up, the extension board will stay in idle. Press and 

hold the Left button for 3 seconds to check the version information and status.

Installing GXP2200 Extension Module:

  1 X GXP2200 

Extension Board

1 X GXP2200 

Extension Board Stand

1 X RJ11-RJ11 Cable

1 X Extension Board 

Connector Plate

4 X Screws

1. On the back of GXP2200 and the extension board, there are slots for connector 

plate. Attach the connector plate between the slots for GXP2200 and the exten

-

sion board;

2. Apply the screws provided and securely tighten them in (see Figure in the next 

page);

GXP2200 EXTENSION MODULE:

Summary of Contents for GXP2200

Page 1: ...con Street 2nd Floor Brookline MA 02446 USA Tel 1 617 566 9300 Fax 1 617 249 1987 www grandstream com For Warranty and RMA information please visit www grandstream com GXP2200 Enterprise Multimedia Phone for AndroidTM Quick Start Guide ...

Page 2: ...Content English 1 简体中文 9 Español 17 Français 25 Deutsch 33 Italiano 41 Русскй 49 ...

Page 3: ...S VIA THE GXP2200 NEITHER GRANDSTREAM NOR ITS OFFICERS EMPLOYEES OR AFFILIATES MAY BE HELD LIABLE FOR ANY CLAIM DAMAGE OR LOSS AND YOU HEREBY WAIVE ANY AND ALL SUCH CLAIMS OR CAUSES OF ACTION ARISING FROM OR RELATING TO YOUR INABILITY TO USE THE GXP2200 TO CONTACT EMERGENCY SER VICES AND YOUR FAILURE TO MAKE ADDITIONAL ARRANGEMENTS TO ACCESS EMERGENCY SER VICES IN ACCORDANCE WITH THE IMMEDIATELY P...

Page 4: ...ed power for advanced custom business applications development and personalization Push phone stand upwards Power Headset Port SD Card Slot USB Port 1 Attach the phone stand to the back of the phone where there is a slot for the phone stand Upper part and bottom part are available for two angels 2 When using the bottom part for phone stand you may also adjust the tab from the handset cradle Pull o...

Page 5: ... 4 5 6 page to configure Account name SIP Server Outbound Proxy SIP User ID Authenticate ID and Authenticate Password to register the account on GXP2200 1 Make sure the phone is properly powered up and in idle screen 2 Tap on the screen Menu icon to access GXP2200 s applications and settings 3 Select Settings Advanced Settings Account Tap on one of the Account to configure Account name SIP Server ...

Page 6: ...d press Left or Right button to browse all the MPKs status in different pages 3 For more information please refer to the GXP2200 user manual 3 Connect the extension board to GXP2200 via the EXT port using the RJ11 RJ11 cable provided 4 Install the phone stand on GXP2200 and extension board 5 Power up the GXP2200 The GXP2200 extension board will show the booting up screen with version information a...

Reviews: