background image

 Front Matter

WARNING

Risk of fire. Highly flammable material.

W881

Read all instructions before using unit.

WARNING

FOR YOUR SAFETY, the information in this manual
must be followed to minimize the risk of fire or ex-
plosion or to prevent property damage, personal in-
jury or death.

W033

WARNING

• Do not store or use gasoline or other flammable

vapors and liquids in the vicinity of this or any
other appliance.

• WHAT TO DO IF YOU SMELL GAS:

• Do not try to light any appliance.
• Do not touch any electrical switch; do not use

any phone in your building.

• Clear the room, building or area of all occu-

pants.

• Immediately call your gas supplier from a

neighbor’s phone. Follow the gas supplier’s in-
structions.

• If you cannot reach your gas supplier, call the

fire department.

• Installation and service must be performed by a

qualified installer, service agency or the gas sup-
plier.

W052

IMPORTANT: Purchaser must consult the local gas
supplier for suggested instructions to be followed if
the dryer user smells gas. The gas utility instructions
plus the SAFETY and WARNING note directly above
must be posted in a prominent location near the dryer
for customer use.

WARNING

• Installation of unit must be performed by a quali-

fied installer.

• Install clothes dryer according to manufacturer’s

instructions and local codes.

• DO NOT install a clothes dryer with flexible plas-

tic venting materials. If flexible metal (foil type)
duct is installed, it must be of a specific type
identified by the appliance manufacturer as suita-
ble for use with clothes dryers. Refer to section
on connecting exhaust system. Flexible venting
materials are known to collapse, be easily crush-
ed, and trap lint. These conditions will obstruct
clothes dryer airflow and increase the risk of fire.

W729R1

WARNING

To reduce the risk of severe injury or death, follow
all installation instructions. Save these instructions.

W894

WARNING

FOR YOUR SAFETY

Do not store or use gasoline or other flammable vapors and
liquids in the vicinity of this or any other appliance.

W053

This product uses FreeRTOS V7.2.0 (www.freertos.org).

Front Matter

©

 Published by permission of the copyright owner -

 DO NOT COPY or TRANSMIT

  3

  Part No. 805898ENR1

Summary of Contents for 805898ENR1

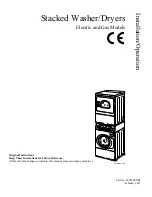
Page 1: ...acked Washer Dryers Electric and Gas Models SWD455C_SVG Original Instructions Keep These Instructions for Future Reference If this machine changes ownership this manual must accompany machine Part No...

Page 2: ......

Page 3: ...mells gas The gas utility instructions plus the SAFETY and WARNING note directly above must be posted in a prominent location near the dryer for customer use WARNING Installation of unit must be perfo...

Page 4: ...s Supply Pipe 20 Connect Dryer Exhaust System 22 Exhaust Direction 23 Exhaust System 23 Multi Dryer Installation Exhaust Requirements 24 Position and Level the Unit 26 Wipe Out Inside of Washer and Dr...

Page 5: ...termine Proper Controls 35 Set Fabric Selector 35 Insert Coins if Needed 35 Start Dryer 36 Remove Laundry 36 Indicator Lights 36 Maintenance 37 User Maintenance Instructions 37 Lubrication 37 Cold Wea...

Page 6: ...asher where it will be exposed to water and or weather Do not add the following substances or textiles containing traces of the following substances to the wash water gasoline kerosene waxes cooking o...

Page 7: ...ns when using your dryer fol low these basic precautions W130 Read all instructions before using the dryer Install this dryer according to the INSTALLATION IN STRUCTIONS Refer to the EARTH GROUND INST...

Page 8: ...duct should be cleaned periodically by qualified service personnel Do not repair or replace any part of the dryer or attempt any servicing unless specifically recommended in the user main tenance ins...

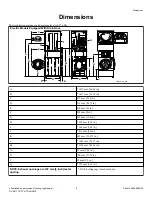
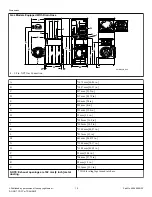
Page 9: ...8 375 in E 610 mm 24 in F 203 mm 8 in G 391 mm 15 4 in H 938 mm 36 9 in I 368 mm 14 5 in J 813 mm 32 in K 683 mm 26 875 in L 1986 mm 78 17 in M 1184 mm 46 62 in N 52 mm 2 04 in O 704 mm 27 73 in P 38...

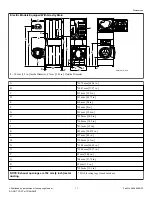
Page 10: ...G 391 mm 15 4 in H 59 mm 2 3 in I 938 mm 36 9 in J 368 mm 14 5 in K 1140 mm 44 87 in L 813 mm 32 in M 683 mm 26 875 in N 1986 mm 78 17 in O 1184 mm 46 62 in P 52 mm 2 04 in Q 704 mm 27 73 in R 38 mm...

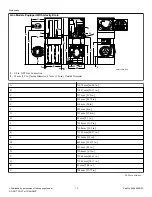
Page 11: ...mm 24 in F 203 mm 8 in G 391 mm 15 4 in H 938 mm 36 9 in I 368 mm 14 5 in J 813 mm 32 in K 683 mm 26 875 in L 107 mm 4 2 in M 104 mm 4 1 in N 1184 mm 46 62 in O 1986 mm 78 17 in P 52 mm 2 04 in Q 704...

Page 12: ...56 97 in C 597 mm 23 5 in D 213 mm 8 375 in E 610 mm 24 in F 203 mm 8 in G 391 mm 15 4 in H 60 mm 2 3 in I 938 mm 36 9 in J 368 mm 14 5 in K 1140 mm 44 87 in L 813 mm 32 in M 683 mm 26 875 in N 107 m...

Page 13: ...ousing IMPORTANT The dryer should have sufficient clear ance around it for needed ventilation and for the ease of installation and servicing For maximum drying per formance we recommend that more clea...

Page 14: ...299 Central Pay Models The machine is shipped from the factory with the Electronic Con trol Diagnostic Harness Assembly unplugged To avoid unauthor ized manual programming or vending perform the follo...

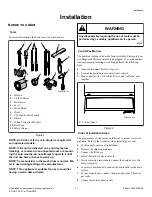
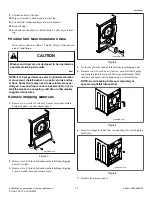
Page 15: ...ctures Remove Shipping Materials 1 Remove two screws at bottom of front access panel Rotate bottom of panel out and remove panel FLW2378N_SVG Figure 3 2 Remove two 9 16 inch bolts and washers holding...

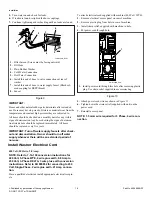
Page 16: ...pliance is to be connected to the water mains using new hose sets and the old hose sets should not be reused Turn on the water supply faucets and flush the lines for approxi mately two minutes to remo...

Page 17: ...there will be an extended period of non use All Other Models Connecting Hoses 1 Insert rubber washers and filter screens from accessories bag in water fill hose couplings two hoses supplied with wash...

Page 18: ...tion Owner should turn off water supply whenever there will be an extended period of non use Install Washer Electrical Cord 400 Volt 50 Hertz 9 8 Amp NOTE Refer to 7 14 190 conversion instructions for...

Page 19: ...outside diame ter drain hose Drain Flow Rate Drain Height Flow Rate liters per minute gal lons per minute 0 9 m 3 ft 27 7 7 3 1 5 m 5 ft 17 8 4 7 1 8 m 6 ft 13 4 3 5 2 1 m 7 ft 4 8 1 3 2 4 m 8 ft 0 0...

Page 20: ...ocated in the door re cess Use a new flexible stainless steel connector Use pipe joint compound insoluble in L P Lique fied Petroleum Gas or Teflon tape on all pipe threads Purge air and sediment from...

Page 21: ...Flexible Connector Use design CSA certified connector Use only if allowed by local co des 2 1 8 in NPT Pipe Plug 3 Equipment Shut Off Valve 4 Black Iron Pipe Shorter than 6 1 m 20 ft Use 9 5 mm 3 8 in...

Page 22: ...econdary lint filters or lint collectors If secon dary systems are mandated frequently clean the system to assure safe operation W749 IMPORTANT Installing in line filters or lint collectors will cause...

Page 23: ...ty NOTE Venting materials are not supplied with the dry er obtain locally IMPORTANT DO NOT block the airflow at the bottom of the dryer s front panel with laundry rugs etc Block age will decrease airf...

Page 24: ...er Installation Exhaust Requirements A direct individual outside venting is recommended When that is not possible a collector duct as shown below may be used SWD998N_SVG 4 3 2 1 1 58786 Backdraft Damp...

Page 25: ...reen or Cap 5 610 mm 24 in Minimum Clearance to Roof Ground 6 Exhaust Outlet 7 Air Flow 8 30 9 Clean Out Cover Inspect Monthly Figure 17 Duct Station Minimum Diameter of Collector Duct A 102 mm 4 inch...

Page 26: ...al exhaust system Position and Level the Unit WARNING Units elevated above floor level must be anchored to that elevated surface base or platform The material used to elevate the unit should also be a...

Page 27: ...block 6 Loosen 7 8 in locknut and adjust legs by screwing into or out of unit base until the unit is level from side to side and front to back using a level Unit should not rock NOTE Leveling legs ca...

Page 28: ...oad circuits DO NOT use an extension cord DO NOT use an adapter DO NOT operate both a washer and a gas dryer on the same circuit Machine Must Be Hard Wired SWD1034N_SVG NOTE Electrical disconnect must...

Page 29: ...ions MUST abide with local electrical codes It is the customer s responsibility to have the wiring and fuses checked by a qualified electrician to make sure the laundry room has adequate electrical po...

Page 30: ...ng legs Check Heat Source Electric Dryers 1 Close the loading door and start the dryer in a heat setting re fer to the operation instructions 2 After the dryer has operated for three minutes the exhau...

Page 31: ...warm DRY212N_SVG 6 5 4 3 2 1 1 Closed Position 2 Shut Off Valve Handle 3 Air Shutter Lockscrew 4 Air Shutter 5 3 1 mm 1 8 in Pipe Plug For checking manifold pres sure 6 Open Position Figure 24 Instal...

Page 32: ...hing bulky items such as blankets and comforters use the DELICATES BULKY cycle The cycle includes agi tation and final spin speeds that maintain the load s balance and minimize wear to the articles NO...

Page 33: ...W84R_SVG 40 NORMAL 40 Table continues FLW85R_SVG 60 PERM PRESS 60 FLW86R_SVG 30 DELICATES 30 FLW87R_SVG DELICATES COLD temperature of water from tap NOTE Changes can be made to Fabric Selector setting...

Page 34: ...d inside of washer control cabi net and check for broken loose or incorrect wiring NOTE Once a cycle has started the door can only be opened by first unplugging the power cord and waiting one minute W...

Page 35: ...oor 1 Close loading door 2 Dryer will not operate with the door open SWD1032N_SVG Figure 33 Determine Proper Controls The direction of the arrow indicates which control is for which unit SWD960N_SVG F...

Page 36: ...two minutes every hour without heat up to 18 hours or until door is opened Remove Laundry Remove laundry immediately after dryer stops D719I_SVG Figure 37 WARNING To prevent the risk of fire remove la...

Page 37: ...rder to assure that the door properly seals against water leaks the following surfaces should be wiped off periodically The outside perimeter of the door glass where the seal con tacts the glass The f...

Page 38: ...assembly requiring the use of tools must be performed by a suitably qualified service person W299 The exhaust duct should be inspected after one year of use and cleaned if necessary by a qualified ser...

Page 39: ...set itself Dryer can be restarted by pressing the START pad If overload protector cycles again remove the dryer from use and call the service person to correct the problem For Energy Conservation Make...

Page 40: ...Make sure door latch is properly adjusted relative to door lock Won t Spin Tumble Make sure power cord is plugged all the way into the electrical outlet Check the laundry room fuse or circuit breaker...

Page 41: ...e sure washer is level Uneven leveling can cause vibration Make sure washer is installed on a solid sturdy and level floor The washer should not be installed on carpeting soft tile a platform or other...

Page 42: ...ng Check weather hood to make sure flapper moves freely has not been pushed in or has not been blocked Dryer doesn t dry clothes satisfactorily Check exhaust duct to outside to see if it is kinked blo...

Page 43: ...erly and may cause wrinkling Clothes have odor Check room for odors before drying clothes Any odor fried foods paint varnish cleaners burning wood etc will trans fer to clothing as the dryer draws air...

Page 44: ...En suring this product is disposed of correctly will help prevent po tential negative consequences for the environment and human health which could otherwise be caused by inappropriate waste handling...

Page 45: ..._______ Model Number ______________________________ Serial Number _______________________________ Please include a copy of your bill of sale and any service receipts you have WARNING To reduce the ris...

Page 46: ......

Page 47: ......

Page 48: ...ums SWD1030N_SVG CHECK CHECK 4 Install Washer Electrical Cord SWD1022N_SVG1 10 Connect Unit to Elec trical Power SWD1034N_SVG CHECK CHECK 5 Connect Drain Hose to Drain Receptacle or Drain Outlet to Dr...

Reviews: