background image

LX8000-INS-LAB-RevA19 5

MAINTENANCE AND CLEANING

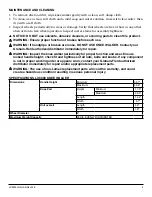
•  To remove dust and dirt, wipe knee walker gently with a clean, soft, damp cloth.
•  To clean, use a clean, soft cloth and a mild soap and water solution, rinse with clear water, then 

dry with a soft cloth.

•  Inspect wheels periodically for wear or damage. Verify that wheels are free of hair or any other 

obstruction to free wheel operation. Inspect caster stems for assembly tightness.

s

  NOTICE: DO NOT use solvents, abrasive cleaners, or scouring pads to clean this product.

  WARNING: Ensure proper function of brakes before each use.
  WARNING: If handgrips or brakes are loose, DO NOT USE KNEE WALKER. Contact your 

Graham-Field authorized distributor immediately for repair.

  WARNING: Inspect the knee walker periodically for proper function and wear. Ensure 

locked handle height; check fit and tightness of all nuts, bolts and knobs. If any component 

is not in proper working order or appears worn, contact your Graham-Field authorized 

distributor immediately for repair and/or appropriate replacement parts.

  WARNING: The use of non-Lumex replacement parts will void the warranty, and could 

create a hazardous condition resulting in serious personal injury.

SPECIFICATIONS, LX8000 KNEE WALKER

Dimensions

Handle Height

Minimum

36.7"

Maximum

40.6"

Knee Pad

Height

Minimum

17.5"

Maximum

20.5"

Length

14.2"

Width

6.7"

Unit overall

Length

40"

Width

18"

Wheel Diameter

8"

Maximum Weight Capacity

300 lb, EVENLY DISTRIBUTED

Summary of Contents for LUMEX LX8000

Page 1: ...ccording to your individual physical abilities and needs and to ensure the Knee Walker handle height and knee pad height are properly adjusted for your use WARNING DO NOT lean or pull on the steering mechanism while using the Knee Walker this could cause instability WARNING DO NOT attempt to reach or retrieve objects while using the Knee Walker this could cause instability WARNING Do not use the K...

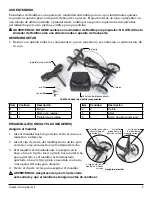
Page 2: ...ntity Description 1 1 Handle Bar 2 1 Frame with Wheels 3 1 Knee Pad Item Quantity Description 4 2 Knob 5 1 Pin 6 1 Storage Bag ASSEMBLY REFER TO PICTURES Secure handle bar 1 Rotate the handle bar up to vertical position as shown at right 2 Rotate the handle bar lock clip up to lock it as shown at far right 3 If the handle bar is wobbly and insecure in the base open the lock clip and turn it clockw...

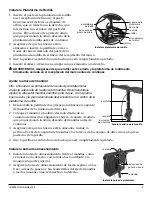
Page 3: ...nding with the good leg straight and the injured leg resting in the center of the knee pad 1 Unscrew the two piece knob to release the handle bar assembly from the steering column 2 Place the handle bars at the desired height inside in the steering column choosing the height adjustment hole that will provide the desired handle bar height before proceeding 3 Ensure holes are aligned Install the kno...

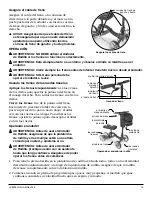
Page 4: ...oward you and push the locking pin on top of the lever down the pin will lock the wheels in place To release brakes squeeze the lever to disengage the pin and unlock the wheels Operating the Knee Walker WARNING Before using the Knee Walker ensure knee pad and handle bars are at a comfortable height for you and adjust if not WARNING Before using the Knee Walker practice using it with an attendant u...

Page 5: ...T USE KNEE WALKER Contact your Graham Field authorized distributor immediately for repair WARNING Inspect the knee walker periodically for proper function and wear Ensure locked handle height check fit and tightness of all nuts bolts and knobs If any component is not in proper working order or appears worn contact your Graham Field authorized distributor immediately for repair and or appropriate r...

Page 6: ...e to seek and obtain repair or replacement in a timely manner 2 Products which are not installed used or properly cleaned and maintained as required in the official manual for the applicable product 3 Products considered to be of a non durable nature including but not limited to filters fuses gaskets lubricants and charts 4 Accessories or parts not provided by GF 5 Charges by anyone for adjustment...

Page 7: ...s capacidades y necesidades y para asegurar que la altura de la mango y plataforma de rodilla están ajustadas apropiadamente para usted ADVERTENCIA No debe tratar y alcanzar o retirar objetos cuando usando el Andador de Rodilla esto podría causar inestabilidad ADVERTENCIA No debe utilizar Andador de Rodilla en escaleras o curbas Lesiones personales o daños a la propiedad puede ocurrir ADVERTENCIA ...

Page 8: ...llar el clip de cierre del manillar se muestra cerrado el clip de cierre del manillar se muestra cerrado el manillar girado hasta la posición vertical el manillar en posición horizontal según lo enviado Ítem Cantidad Descripción 1 1 Manija 2 1 Marco con ruedas 3 1 Plataforma de rodilla Ítem Cantidad Descripción 4 2 Cerilla 5 1 Afiler 6 1 Bolsa de almacenemiento ENSAMBLAJE CONSULTE LAS IMÁGENES Ase...

Page 9: ...na lesionada descansando en el centro de la plataforma de rodilla 1 Desatornille la perilla de dos piezas para liberar el conjunto del manillar de la columna de dirección 2 Coloque el manillar a la altura deseada dentro de la columna de dirección eligiendo el hueco de ajuste de altura que proporcionará la altura deseada del manillar antes de continuar 3 Asegúrese de que los huecos estén alineados ...

Page 10: ...te superior de la panca hacia abajo el afiler cerrará las ruedas en su lugar Para liberar los frenos apriete la palanca para desacoplar el afiler y abrir las ruedas Operando el andador ADVERTENCIA Antes de usar el Andador de Rodilla asegúrese de que la plataforma de rodilla y el las manijas estén a una altura cómoda para usted y ajústelos si no ADVERTENCIA Antes de usar el Andador de Rodilla pract...

Page 11: ...LLA Contacte a su distribuidor autorizado de Graham Field inmediatamente para reparación ADVERTENCIA Inspeccione el Andador de Rodilla semanalmente para función propio y uso Asegúrese de que todos los tuercas tornillo y perillas están apretados Si algún componente no está trabajando correctamente o se parece usado contacte a su distribuidor autorizado de Graham Field inmediatamente para reparación...

Page 12: ...daños u otras condiciones causadas en su totalidad o en parte por el mal uso abuso negligencia alteración accidentes daños durante el transporte manipulación indebida o dejar de solicitar y obtener la reparación o el reemplazo de una manera oportuna 2 Productos que no se instalen utilicen limpien y mantengan de manera apropiada como se requiere en el manual oficial aplicable para el producto 3 Pro...

Reviews: