background image

Tagliatutto Classic C 6 / Classic C 6

© Gebr. Graef & Co. KG

59

I

Requisiti  sul  luogo  di  col-
locazione

Al  fine  di  garantire  un  funziona-
mento  sicuro  e  privo  di  complica-
zioni dell'apparecchio è necessario 
che il luogo di collocazione soddisfi 
i requisiti seguenti:


L'apparecchio deve essere collo-
cato su un piano solido, livellato, 
orizzontale e non scivolante che 
presenti una sufficiente portata. 


Scegliere  un  luogo  di  colloca-
zione  non  accessibile  ai  bambi-
ni, in particolare per evitare che 
possano toccare le lame taglienti 
dell'apparecchio. 

Allacciamento elettrico

Al  fine  di  garantire  un  funziona-
mento  sicuro  e  privo  di  compli-
cazioni  dell'apparecchio,  allaccia-
mento elettrico sono da osservare 
le informazioni seguenti:


Prima di collegare l'apparecchio, 
controllare i dati di allacciamen-
to  (tensione  e  frequenza)  sulla 
targhetta  d'identificazione  con 
quelli  della  rete  elettrica.  Questi 
dati  devono  corrispondere,  per 
evitare dei danni all'apparecchio. 
In caso di dubbi, domandate ad 
un elettricista specializzato. 


Accertarsi che il cavo d'alimenta-
zione sia perfettamente intatto e 
che non possa strisciare su super-
fici o oggetti caldi. 


Il cavo d'alimentazione non deve 
essere teso. 


La  sicurezza  elettrica  dell'ap-
parecchio  può  essere  garantita 
soltanto  nel  collegamento  di  un 
sistema  a  conduttore  di  prote-
zione  installato  conformemen-
te  alle  prescrizioni  vigenti.  Non 
è  consentito  il  funzionamento 
con  una  presa  di  corrente  sen-
za  conduttore  di  protezione. 
In  caso  di  dubbi,  incaricare  un 
elettricista specializzato alla veri-
fica  dell'installazione  domestica.   
Il produttore non potrà assumer-
si alcuna responsabilità per danni 
attribuibili  ad  un  conduttore  di 
protezione mancante o interrot-
to.

Summary of Contents for Classic C 6

Page 1: ...6 C 9 Trancheuse Classic C 6 C 9 Cortadora de alimentos Classic C 6 C 9 Tagliatutto Classic C 6 C 9 Allessnijder Classic C 6 C 9 Bedienungsanleitung Operating instructions Notice d utilisation Manual de instrucciones Istruzioni per l uso Bedieningshandleiding ...

Page 2: ...Allesschneider Classic C 9 Classic C 6 Bedienungsanleitung Operating Instructions Notice d utilisation Manual de Instrucciones Istruzioni per l uso Bedieningshandleiding 3 16 28 41 54 67 D EN F ES I NL ...

Page 3: ...triebnahme Bedienung und Reinigung des Gerätes beauftragt ist Bewahren Sie diese Bedienungsan leitung auf und geben Sie diese mit dem Gerät an Nachbesitzer weiter Diese Bedienungsanleitung kann evtl nicht jeden denkbaren Einsatz berücksichtigen Für weitere Infor mationen oder bei Problemen die in dieser Anleitung nicht oder nicht ausführlich genug behandelt wer den wenden Sie sich an den Graef Kun...

Page 4: ...emäße Verwendung Von dem Gerät können bei nicht bestimmungsgemäßer Verwen dung und oder andersartiger Nutzung Gefahren ausgehen Das Gerät ausschließlich be stimmungsgemäß verwenden Die in dieser Bedienungsan leitung beschriebenen Vorge hensweisen einhalten Ansprüche jeglicher Art wegen Schä den aus nicht bestimmungsgemäßer Verwendung sind ausgeschlossen Das Risiko trägt allein der Betreiber Haftun...

Page 5: ...ch zu Personen und Sach schäden führen Gefahr durch elektrischen Strom VORSICHT Lebensgefahr durch elektrischen Strom Beim Kontakt mit unter Spannung stehenden Leitungen oder Bautei len besteht Lebensgefahr Beachten Sie die folgenden Sicherheitshinweise um eine Gefährdung durch elektrischen Strom zu vermeiden Benutzen Sie das Gerät nicht wenn die Anschlussleitung oder der Stecker beschädigt ist La...

Page 6: ...n Garantieanspruch mehr Defekte Bauteile dürfen nur gegen Original Ersatzteile ausgetauscht werden Nur bei diesen Teilen ist gewährleistet dass sie die Sicher heitsanforderungen erfüllen wer den Dieses Gerät ist nicht dafür be stimmt durch Personen einschließ lich Kindern mit eingeschränkten physischen sensorischen oder geistigen Fähigkeiten oder man gels Erfahrung und oder mangels Wissen benutzt ...

Page 7: ...ollständigkeit und auf sichtba re Schäden Melden Sie eine unvollständige Lieferung oder Schäden infolge mangelhafter Verpackung oder durch Transport sofort dem Spediteur und dem Lieferanten Auspacken Zum Auspacken des Gerätes gehen Sie wie folgt vor Entnehmen Sie das Gerät aus dem Karton Entfernen Sie alle Verpackungs teile Entfernen Sie eventuelle Aufkle ber am Gerät nicht das Typen schild entfer...

Page 8: ... Hinwei se zu beachten Vergleichen Sie vor dem Anschlie ßen des Gerätes die Anschlussda ten Spannung und Frequenz auf dem Typenschild mit denen Ihres Elektronetzes Diese Daten müs sen übereinstimmen damit keine Schäden am Gerät auftreten Im Zweifelsfall fragen Sie Ihre Elektro Fachkraft Vergewissern Sie sich dass die Anschlussleitung unbeschädigt ist und nicht über heiße Flächen oder scharfe Kante...

Page 9: ...entschalter 4 Einstellknopf 5 Glasbodenplatte 6 Alubodenplatte 7 Restehalter 8 Dauerfunktionsschalter 9 Kindersicherung 10 Verriegelungsknopf Schwenkmechanismus 11 Kabelfach 12 Schwenkhebel 13 Führungsprofil 14 Arretierungsbolzen 15 Arretierung der Schneidgut auflage 16 GENIO Schlitten 1 2 3 4 5 6 8 9 10 11 12 13 14 16 C 6 C 9 3 7 15 ...

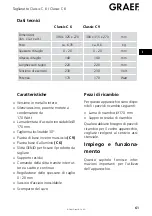
Page 10: ...mit Moment und Dauerschalter Schnittstärkeneinstellung 0 20 mm Edelstahltablett Kabelfach Ersatzteile Für dieses Gerät sind folgende Er satzteile lieferbar ø 170 mm Ersatz Messer Ersatz Restehalter Wenden Sie sich an den Kunden dienst wenn Sie Ersatzteile zu Ihrem Gerät benötigen Technische Daten Classic C 6 Classic C 9 Abmessungen L x B x H 390 x 325 x 270 390 x 315 x 270 mm Gewicht ca 6 35 ca 8 ...

Page 11: ...schlossen sein d h unter 0 stehen können Sie den Schlitten vor das Messer schie ben und den Schlittenriegel Kinder sicherung eindrücken Der Schlitten sitzt fest Schneiden mit Moment schalter Legen Sie das Schneidgut auf den Schlitten Stellen Sie die gewünschte Schnittstärke ein Schneidgut leicht gegen die An schlagplatte drücken und den Schlitten gleichmäßig gegen das Messer führen Drücken Sie mit...

Page 12: ...chwenkhe bel das Gerät kraftvoll hoch bis dieses hörbar einrastet Erst beim hörbaren Einrasten ist das Gerät gesichert Nun können Sie wie unter Schneiden beschrieben fort fahren Nach Beendigung des Schneid vorganges schwenken Sie das Gerät wieder zurück Drehen Sie den Schwenkhebel nach unten Durch Drücken auf den hinteren Teil des Profils rastet der Arretie rungsbolzen ein GENIO Schlitten Der GENI...

Page 13: ...este oder das klei nere Schneidgut auf den Schlit ten Setzen Sie den Restehalter auf die Schlittenrückwand und legen Sie den Restehalter an das Schneid gut an Verfahren Sie wie vorher beim Schneiden beschrieben Wichtig Der Restehalter ermöglicht es Ihnen kleineres Schneidgut wie z B Pilze oder Tomaten aufzuschneiden Das Gerät darf nicht ohne Restehalter benutzt werden es sei denn Größe und Form de...

Page 14: ...im Uhrzeigersinn dre hen Reinigen Sie die Innenseiten des Messers mit einem feuchten Tuch Einsetzen des Messers erfolgt in umgekehrter Reihenfolge Wichtig Fetten Sie die gekennzeichne ten Stellen regelmäßig ein WARNUNG Dieser Vorgang muss mit größ ter VORSICHT durchgeführt werden da es sich um einen sehr scharfen Gegenstand handelt Schlitten Um den Schlitten besser zu reinigen lässt sich dieser vo...

Page 15: ... Bitte fragen Sie bei Ihrer Gemeindeverwaltung nach der zu ständigen Entsorgungsstelle Garantie 5 Jahre Garantie Für dieses Produkt übernehmen wir beginnend vom Verkaufsdatum 60 Monate Herstellergarantie für Män gel die auf Fertigungs und Werk stofffehler zurückzuführen sind Ihre gesetzlichen Gewährleistungsan sprüche nach 439 ff BGB E blei ben von dieser Regelung unberührt In der Garantie nicht e...

Page 16: ...and pass them on to the next own er together with the unit It is possible that these operating instructions do not cover every possible use For more information or if you have any problems not covered or not sufficiently dealt with in these instructions please contact the Graef customer service department or your dealer Warnings The following warnings and signal words are used in these operating i...

Page 17: ...s on installation opera tion and care included in these op erating instructions accord with the latest state at the time of printing and have been made to the best of our knowledge with consideration of our previous experiences and in sights No claims can be derived from the information illustrations and de scriptions in these instructions The manufacturer does not assume any liability for damages...

Page 18: ...le damage to the housing the connector cable and the plug be fore using it Do not put a dam aged unit into operation If the machine s connecting ca ble is damaged continued use of the machine is only allowed it has been replaced with a new one Have it installed solely by the manufacturer or its customer service or a similarly qualified person to prevent hazards Repairs are only allowed to be perfo...

Page 19: ...ards and property damage Do not use the packing material as a toy Danger of suffocation Scope of delivery and shipping inspection The unit comes standard with the following components Universal slicer ø 170 mm serrated electrolytic polished stainless steel blade GENIO carriage Food holder Stainless steel tray Operating instructions Vaseline packs Important Check the delivery for com pleteness and ...

Page 20: ...t reach the sharp blade in the unit Electric connection Follow these instructions about the electrical connection for safe and flawless operation of the unit Before connecting the unit com pare the connection information voltage and frequency on the rating plate with those of your electrical network This informa tion must match to avoid dam age to the unit If in doubt ask your electrician Make sur...

Page 21: ...witch 4 Adjustment knob 5 Glass baseplate 6 Aluminium baseplate 7 Food holder 8 Continuous operation switch 9 Child proof safety catch 10 Lock button pivoting mechanism 11 Cable compartment 12 Tilting lever 13 Guide profile 14 Arresting bolt 15 Arresting the slicing sup port 16 GENIO carriage 1 2 3 4 5 6 8 9 10 11 12 13 14 16 C 6 C 9 3 7 15 ...

Page 22: ...re parts can be supplied for this unit ø 170 mm Replacement blade Replacement food holder Contact customer service if you need spare parts for your unit Control and operation This chapter provides you with im portant information on operating the unit Safety instructions CAUTION Follow the safety instructions below to prevent hazards and property damage Do not touch the cutter blade with your finge...

Page 23: ...e blade Use your thumb to press the quick action switch that switches on the motor Press your thumb against the quick action switch while slic ing As soon as you remove your thumb from the quick action switch the motor switches off Cutting with the continu ous operation switch Use the continuous operation switch to slice large quantities Place the items to be sliced on the carriage Set the desired...

Page 24: ...inuously adapts to the size and weight of the items to be sliced bringing them from the hard anodized aluminium slic ing support into the ideal position That makes additional fixation as used in conventional carriages un necessary while at the same time absolutely precluding the food from slipping or rolling off Re gardless of what is to be sliced the GENIO carriage completely rede fines slicing t...

Page 25: ...hapter provides you with im portant information on cleaning and caring for the unit Safety instructions CAUTION Follow the safety instructions below before you start cleaning the unit Make sure the unit is switched off and not connected to the mains supply Check to make sure the limit stop is closed cutter blade is covered Do not use any aggressive or abrasive cleaning agents and do not use any so...

Page 26: ... removed from the machine for better cleaning To do that pull out the carriage latch on the right side of the car riage Pull the carriage towards the back and remove it You can now take apart the GENIO carriage for better clean ing Remove the slicing support by placing it vertically and pulling it out to the top You can now also pull off the flat spring Clean all parts with a moist cloth or under ...

Page 27: ...ty Starting with the date of purchase we assume a 60 month manufacturer s warranty for defects that are attributable to manufacturing and material defects Your legal warranty rights in accordance with 439 ff German Civil Code E re main unaffected by this clause Not included in the warranty are damages that have arisen due to improper handling and use as well as defects which have only a slight inf...

Page 28: ...remettez la avec la machine à son prochain propriétaire Cette notice d utilisation ne tient éventuellement pas compte de toutes les utilisations possibles Pour de plus amples informations ou en cas de problème non abordé ou non suffisamment détaillé dans cette notice d utilisation veuillez vous adresser au service après vente Graef ou à votre revendeur Avertissements Les avertissements et les mots...

Page 29: ... Utilisez toujours la machine de manière conforme Respectez les consignes décrites dans cette notice d utilisation Toute réclamation pour des dom mages causés par une utilisation non conforme est exclue L utilisateur est seul responsable des risques Limitation de la responsa bilité Toutes les informations techniques données et consignes pour l ins tallation l utilisation et l entretien figurant da...

Page 30: ...ENCE Danger de mort par électrocu tion Danger de mort en cas de contact avec des câbles ou des pièces sous tension Respectez les consignes de sécu rité suivantes afin d éviter tout risque d électrocution N utilisez pas l appareil si le cordon d alimentation ou la fiche sont endommagés Avant de réutiliser l appareil faites remplacer le câble d ali mentation par le fabricant par son service après ve...

Page 31: ...us couverts par la ga rantie Les pièces défectueuses peuvent uniquement être remplacées par des pièces de rechange ori ginales Seules les pièces de re change originales garantissent le respect des normes de sécurité Cet appareil ne peut être uti lisé par des personnes y compris des enfants aux capacités phy siques sensorielles ou mentales réduites ou sans expérience et ou connaissances spécifiques...

Page 32: ...ivraison vérifiez si la machine est complète et ne présente pas de dommages apparents En cas de livraison incomplète ou de dommage causé par un emballage insuffisant ou par le transport informez immé diatement le transporteur et le fournisseur Déballage Procédez comme suit pour déballer la machine Sortez la machine du carton Retirez toutes les parties de l emballage Retirez les éventuels autocol l...

Page 33: ...ents de la machine les consignes suivantes doivent être respectées lors du raccordement électrique Avant de raccorder la machine comparez les données de raccorde ment tension et fréquence sur la plaque signalétique avec les don nées de votre réseau électrique Ces données doivent correspondre afin d éviter tout dommage sur la ma chine En cas de doute renseignez vous auprès de votre électricien Veil...

Page 34: ...emelle support en verre 6 Semelle support en aluminium 7 Guide aliments 8 Touche de fonctionnement en continu 9 Sécurité enfants 10 Bouton de condamnation mécanisme de pivotement 11 Range cordon 12 Levier de pivotement 13 Profilé de guidage 14 Tenon d arrêt 15 Arrêtage du support de coupe 16 Chariot GENIO 1 2 3 4 5 6 8 9 10 11 12 13 14 16 C 6 C 9 3 7 15 ...

Page 35: ...tantané et en continu Réglage d épaisseur de coupe 0 20 mm Plateau en inox Range cordon Pièces de rechange Les pièces de rechange suivantes sont disponibles pour cette ma chine Lame de rechange ø 170 mm Guide aliments de rechange Contactez le service après vente si vous avez besoin de pièces de re change pour votre machine Montage et fonctionment Caractéristiques techniques Classic C 6 Classic C 9...

Page 36: ...c à d placée en dessous de 0 pous sez le chariot devant la lame et ap puyez sur le bouton de sécurité du chariot sécurité enfants Le cha riot est bloqué Coupe avec le bouton de fonctionnement instantané Posez le morceau à couper sur le chariot Réglez l épaisseur de coupe sou haitée Pressez légèrement le morceau à couper contre la plaque de butée et dirigez le chariot lente ment vers la lame Appuye...

Page 37: ...t déverrouillé Relevez l appareil en tirant sur le levier de pivotement jusqu à ce qu il s enclique L appareil n est verrouillé que si vous avez entendu le clic Procédez ensuite comme décrit sous Coupe Une fois la coupe terminée ra menez l appareil à la position normale en le faisant pivoter Rabattez le levier de pivotement Appuyez sur la partie arrière du profilé pour que le tenon d arrêt s encli...

Page 38: ...ez le guide aliments sur la paroi arrière du chariot et pres sez le sur le morceau à couper Procédez ensuite comme décrit plus haut sous Coupe Important Le guide aliments vous permet de couper de petits aliments comme par ex des champi gnons ou des tomates L appareil ne peut être utilisé sans le guide aliments à moins que la taille et la forme du morceau à couper ne permet tent pas son utilisation...

Page 39: ... le sens contraire des ai guilles d une montre Nettoyez les deux faces de la lame avec un chiffon humide Réinsérez la lame en procédant dans le sens contraire Important Graissez régulièrement les endroits marqués ATTENTION Faites preuve d une extrême PRUDENCE car la lame est très tranchante Chariot Pour mieux le nettoyer vous pou vez retirer le chariot de l appareil Pour cela poussez le bouton de ...

Page 40: ...ommunale pour connaître les centres de recy clage Garantie Garantie de 5 ans À compter de la date d achat cet appareil est garanti 60 mois pour les dommages causés par des défauts de fabrication ou de ma tériaux Il n est pas dérogé à vos droits de garantie selon le 439 et suivants du code civil allemand BGB E Sont exclus de la garantie les dommages causés par une ma nipulation ou une utilisation n...

Page 41: ...ivo Conserve este manual de instruc ciones y en su caso transfiéralo con el dispositivo a sus nuevos du eños Este manual de instrucciones no puede contemplar todo uso ima ginable Para más información o en caso de problemas que no se traten en este manual de instruc ciones o no se traten con sufici ente detalle diríjase al servicio de atención al cliente de Graef o a su tienda especializada Indicac...

Page 42: ... presentar peligros Utilice el dispositivo exclusi vamente conforme a su uso adecuado Respete los procedimientos descritos en este manual de instrucciones Quedan descartadas las reclamaci ones de cualquier tipo por daños derivados de una utilización inade cuada El usuario corre con todo el riesgo Limitación de responsabi lidad Todas las informaciones datos e indicaciones técnicas contenidas en est...

Page 43: ...igro de muerte por corriente eléctrica Hay peligro de muerte al tomar contacto con cables o compo nentes bajo tensión Respete las siguientes indicacio nes de seguridad para evitar po nerse en peligro por la corriente eléctrica No utilice el dispositivo cuan do el cable de alimentación o el enchufe estén dañados Antes de reutilizar el dispositi vo mande sustituir el cable de alimentación por uno nu...

Page 44: ...cio de atención al cliente de Gra ef de lo contrario deja de haber derecho a la garantía en caso de daños posteriores Los componentes defectuosos sólo pueden ser sustituidos por repuestos originales Sólo en estas piezas queda garantizado que se cumplan los requisitos de seguridad Este dispositivo no está destina do a ser utilizado por personas incluidos niños con capacidades físicas sensoriales o ...

Page 45: ...material suministrado está completo y presenta daños visibles Avisen inmediatamente al transportista y al proveedor si el suministro está incompleto o si se han producido daños por un embalaje defectuoso o por el transporte Desembalaje Para desembalar el dispositivo pro ceda como sigue Extraiga del embalaje el disposi tivo Retire todos los accesorios de embalaje Retire en su caso adhesivos del dis...

Page 46: ...caciones al realizar la conexión eléctrica Antes de conectar el dispositivo compare los datos de conexión tensión y frecuencia indicados en la placa de características con los de su red eléctrica Estos da tos deben coincidir para que no se produzcan daños en el dispo sitivo En caso de duda consulte con su electricista Cerciórese de que el cable de ali mentación no esté dañado y no quede tendido so...

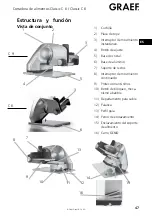
Page 47: ...antáneo 4 Botón de ajuste 5 Base de cristal 6 Base de aluminio 7 Soporte de restos 8 Interruptor de movimiento continuado 9 Protección anti niños 10 Botón de bloqueo meca nismo abatible 11 Departamento para cable 12 Palanca 13 Perfil guía 14 Perno de enclavamiento 15 Enclavamiento del soporte de alimento 16 Carro GENIO 1 2 3 4 5 6 8 9 10 11 12 13 14 16 C 6 C 9 3 7 15 ...

Page 48: ...los siguientes repuestos Cuchilla dentada de ø 170 mm Soporte de restos de repuesto Diríjase al servicio de atención al cliente si necesita repuestos para su dispositivo Manejo y servicio En este capítulo recibirá importan tes indicaciones acerca del manejo del dispositivo Instrucciones de seguridad PRECAUCIÓN Respete las siguientes indicaci ones de seguridad para evitar peligros y daños materiale...

Page 49: ...e levemente el alimento contra la placa de tope y lleve el carro uniformemente contra la cuchilla Pulse el interruptor de movi miento instantáneo con el pul gar para encender el motor Durante el proceso de corte pul se el interruptor de movimiento instantáneo con el pulgar En cuanto retire el pulgar del in terruptor de movimiento instan táneo se apaga el motor Corte con interruptor de movimiento c...

Page 50: ... finalizar el corte vuelva a abatir el dispositivo hasta su po sición inicial Tire de la palanca hacia abajo Al presionar en la parte poste rior del perfil se encaja el perno de enclavamiento Carro GENIO El carro GENIO mantiene el alimen to a cortar siempre en la posición de partida con su soporte elástico de carro Se adapta sin escalones al tamaño y al peso del alimento a cortar y con ello su sop...

Page 51: ...utilizado sin el soporte de restos salvo que el tamaño y la forma del alimento a cortar no permita utilizarlo Limpieza y cuidado En este capítulo recibirá importan tes indicaciones acerca de la lim pieza y el cuidado del dispositivo Instrucciones de seguridad PRECAUCIÓN Respete las siguientes instrucciones de seguridad antes de empezar a limpiar el dispositivo Asegúrese de que el dispositivo esté ...

Page 52: ...muy afilado Carro Para limpiar mejor el carro se pue de extraer de la máquina Para ello extraiga el bloqueo de carro situado en el lateral derecho del carro Saque el carro tirando del mis mo hacia atrás y retírelo Ya puede desmontar el carro GENIO para limpiarlo mejor Retire el soporte de alimento colocándolo en posición vertical y retirándolo hacia arriba Ahora podrá retirar también los muelles d...

Page 53: ...nte 60 meses desde la fecha de compra en los casos de fallos derivados de defectos de fabricación y materiales Sus derechos legales a la prestación de garantía conforme al apartado 439 ff BGB E de la Ley Alemana quedan intactos por esta política No incluidos en la garantía se encuentran los daños originados por un manejo inadecuado o una utilización inadecuada así como las faltas que sólo tengan u...

Page 54: ...Pulizia dell apparecchio Conservare sempre accuratamen te le presenti istruzioni per l uso e consegnarle anche ad un eventua le futuro proprietario dell apparec chio Le presenti istruzioni per l uso non possono comunque considerare qualsiasi applicazione pensabile Per maggiori informazioni o even tuali problemi non dettagliatamen te spiegati nelle presenti istruzioni per l uso vogliate rivolgervi ...

Page 55: ...cchio possono derivare imminenti pericoli Utilizzare l apparecchio esclusi vamente in modo appropriato Rispettare scrupolosamente le procedure descritte nelle pre senti istruzioni per l uso Si esclude qualsiasi pretesa di ri sarcimento danni attribuibili ad un impiego non appropriato Il rischio grava unicamente sull esercente Limitazione di responsabi lità Tutte le informazioni tecniche dati e not...

Page 56: ...e elettrica In seguito ad un contatto con i conduttori o i componenti sotto tensione persiste in imminente pericolo di morte Osservare le seguenti informa zioni di sicurezza per prevenire dei pericoli in seguito a corrente elettrica Non utilizzare l apparecchio in caso di difetti visibili nel cavo l alimentazione o nella spina Prima di utilizzare ulteriormen te l apparecchio incaricare il costrutt...

Page 57: ...io assistenziale Graef altrimenti per eventuali danni conseguenti saremo costretti a declinare qual siasi richiesta di garanzia I componenti difettosi possono essere sostituiti esclusivamente utilizzando pezzi di ricambio ori ginali Solo in questi componenti è possibile garantire un completo adempimento ai requisiti di sicu rezza Questo apparecchio non è stabi lito per essere utilizzato da parte d...

Page 58: ...ali danni in seguito ad un imballag gio carente o dovuti al trasporto Disimballaggio Per disimballare l apparecchio pro cedere nel modo seguente Prelevare l apparecchio dal car tone Rimuovere tutti i componenti d imballaggio Eliminare eventuali adesivi dall apparecchio ma non la tar ghetta d identificazione Smaltimento dei materiali d imballaggio L imballaggio è stabilito per pro teggere l apparec...

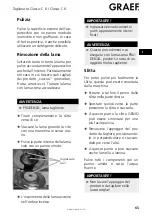
Page 59: ...arecchio controllare i dati di allacciamen to tensione e frequenza sulla targhetta d identificazione con quelli della rete elettrica Questi dati devono corrispondere per evitare dei danni all apparecchio In caso di dubbi domandate ad un elettricista specializzato Accertarsi che il cavo d alimenta zione sia perfettamente intatto e che non possa strisciare su super fici o oggetti caldi Il cavo d ali...

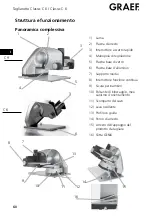
Page 60: ...e 5 Piastra base di vetro 6 Piastra base d alluminio 7 Supporto residui 8 Interruttore funzione continua 9 Sicura per bambini 10 Pulsante di bloccaggio mec canismo d orientamento 11 Scomparto del cavo 12 Leva oscillante 13 Profilo di guida 14 Perno di arresto 15 Arresto dell appoggio del prodotto da tagliare 16 Slitta GENIO 1 2 3 4 5 6 8 9 10 11 12 13 14 16 C 6 C 9 3 7 15 ...

Page 61: ... d acciaio inossidabile Scomparto del cavo Pezzi di ricambio Per questo apparecchio sono dispo nibili i pezzi di ricambio seguenti Lama di ricambio ø 170 mm Supporto residui di ricambio Qualora abbiate bisogno di pezzi di ricambio per il vostro apparecchio vogliate rivolgervi al servizio assi stenziale Impiego e funziona mento Questo capitolo fornisce infor mazioni importanti per l utilizzo dell a...

Page 62: ...are con l interruttore a scatto Appoggiare il prodotto da ta gliare sulla slitta Regolare lo spessore di taglio desiderato Premere leggermente il prodot to da tagliare contro la piastra d arresto e condurre quindi uni formemente la slitta contro la lama Premere con il pollice l interrut tore a scatto per avviare il mo tore Durante il ciclo di taglio preme re il pollice contro l interruttore a scat...

Page 63: ... è bloccato Procedere a questo punto come descritto al paragrafo Taglia re Al termine del ciclo di taglio orientare di nuovo indietro l ap parecchio Spostare la leva verso il basso Premendo sulla parte posteriore del profilo scatta in posizione il perno di bloccaggio Slitta GENIO La slitta GENIO con il suo supporto ammortizzato mantiene il prodotto da tagliare sempre in posizione di partenza Quest...

Page 64: ...ppoggiare il supporto residui sulla parte posteriore della slitta e appoggiare quindi supporto residui contro il prodotto da ta gliare Procedere come descritto in pre cedenza per il taglio Importante Il supporto residui consente il dettaglio di prodotti più piccoli ad esempio funghi o pomodori Non utilizzare l apparecchio senza supporto residui a meno che non fosse possibile a causa della grandezz...

Page 65: ...o con un panno umido L inserimento della lama avviene nell ordine inverso Importante Ingrassare periodicamente i punti appositamente identi ficati AVVERTENZA Questo procedimento va eseguito con la massima PRU DENZA poiché si tratta di un oggetto molto tagliente Slitta Per poter pulire più facilmente la slitta questa può essere smontata dalla macchina Estrarre a tal fine il perno dalla slitta nella...

Page 66: ...garanzia A partire dalla data d acquisto su questo prodotto concediamo una garanzia di 60 mesi per eventuali difetti errori di produzione e ma teriale I diritti di garanzia prescritti ai sensi di legge secondo il 439 segg E del codice civile rimango no comunque invariati da questa regolamentazione La garanzia non copre danni attribuibili ad un impiego o applicazione non appro priata né danni che p...

Page 67: ... in gebruik te nemen te bedienen en te reinigen Bewaar deze bedieningshand leiding en geef deze met het ap paraat door aan latere eigenaren Deze bedieningshandleiding kan evt geen rekening houden met iedere denkbare toepassing Voor nadere informatie of bij problemen die in deze handleiding niet of niet uitvoerig genoeg worden behan deld dient u zich te richten tot de klantenservice van Graef of uw...

Page 68: ... apparaat mag uitsluitend worden gebruikt voor de doelein den waarvoor dit bestemd is De in deze bedieningshandlei ding beschreven methode dient te worden nageleefd Aanspraken van welke aard dan ook op grond van schade uit niet reglementaire toepassing zijn uit gesloten Het risico draagt uitsluitend de ge bruiker Aansprakelijkheidsbeper king Alle in deze bedieningshandleiding voorkomende technisch...

Page 69: ...oom Bij het contact met onder span ning staande leidingen of com ponenten bestaat levensgevaar Let op de volgende veiligheids instructies om een gevaar door elektrische stroom te voorkomen Gebruik het apparaat niet wanneer de aansluitkabel of de stekker beschadigd is Laat alvorens u het apparaat opnieuw gebruikt een nieuwe aansluitkabel uitsluitend door de fabrikant of zijn klanten service of een ...

Page 70: ...chade geen recht op garantie meer Defecte componenten mogen uitsluitend door originele reser veonderdelen worden vervan gen Alleen bij deze onderdelen is gegarandeerd dat ze aan vei ligheidseisen zullen voldoen Dit apparaat is niet bestemd om door personen met inbegrip van kinderen met beperkte fysische sensorische of psychische vaar digheden of bij gebrek aan erva ring en of gebrek aan kennis te ...

Page 71: ... paneel Bedieningshandleiding Vaseline pakje belangrijk Controleer de levering ten aanzien van volledigheid en ten aanzien van zichtbare schade Meld een onvolledige leve ring of schade ten gevolge van gebrekkige verpakking of door transport onmiddel lijk aan de expediteur en de leverancier Uitpakken Voor het uitpakken van het ap paraat gaat u als volgt te werk Neem het apparaat uit de doos Verwijd...

Page 72: ...t dienen bij de elektrische aansluiting de volgende instructies in acht te worden geno men Vergelijk voor het aansluiten van het apparaat de aansluitspecifi caties spanning en frequentie op het typeplaatje met die van uw elektriciteitsnet Deze gege vens moeten overeenstemmen zodat er geen schade aan het apparaat kan ontstaan In geval van twijfel vraagt u uw elektro vakkracht Overtuigt u er zich va...

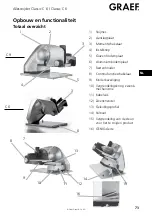
Page 73: ...elaar 4 Instelknop 5 Glazen bodemplaat 6 Aluminiumbodemplaat 7 Restenhouder 8 Continufunctieschakelaar 9 Kinderbeveiliging 10 Vergrendelingsknop zwenk mechanisme 11 Kabelvak 12 Zwenkhendel 13 Geleidingsprofiel 14 Palbout 15 Vergrendeling van de steun voor het te snijden product 16 GENIO slede 1 2 3 4 5 6 8 9 10 11 12 13 14 16 C 6 C 9 3 7 15 ...

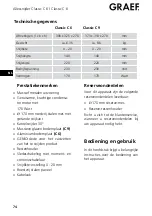
Page 74: ... 0 20 mm Roestvrij stalen paneel Kabelvak Reserveonderdelen Voor dit apparaat zijn de volgende reserveonderdelen leverbaar ø 170 mm reserve mes Reserve restenhouder Richt u zich tot de klantenservice wanneer u reserveonderdelen bij uw apparaat nodig hebt Bediening en gebruik In dit hoofdstuk krijgt u belangrijke instructies over de bediening van het apparaat Technische gegevens Classic C 6 Classic...

Page 75: ...erbeveiliging indruk ken De slede zit vast Snijden met momentscha kelaar Leg het te snijden product op de slede Stel de gewenste snijdikte in Druk het te snijden product licht tegen de aanslagplaat aan en laat de slede gelijkmatig tegen het mes aan lopen Druk met de duim tegen de mo mentschakelaar daarmee scha kelt u de motor in Bij het snijden de duim tegen de momentschakelaar aan druk ken Zodra ...

Page 76: ...t beveiligd Nu kunt u doorgaan zoals onder Snijden beschreven is Na het beëindigen van het snij den zwenkt u het apparaat weer terug Draai de zwenkhendel omlaag Door te drukken op het achters te gedeelte van het profiel klikt de palbout vast GENIO slede De GENIO slede houdt met zijn geveerde sledesteun het te snijden product steeds in de uitgangspo sitie Hij past zich traploos aan de grootte en he...

Page 77: ... restenhouder tegen het te snijden product aan Ga te werk zoals hiervoor bij het Snijden beschreven is Belangrijk De restenhouder maakt het u mogelijk om kleiner te snijden product zoals bijv paddesto elen of tomaten klein te snijden Het apparaat mag niet zonder restenhouder worden ge bruikt tenzij de grootte en de vorm van het te snijden product het gebruik ervan niet toelaten Reiniging en verzor...

Page 78: ...inig de binnenkanten van het mes met een vochtige doek Het aanbrengen van het mes vindt plaats in omgekeerd volgorde Belangrijk Vet de gemarkeerde plekken regelmatig in WAARSCHUWING Deze procedure moet zeer VOORZICHTIG worden uitge voerd omdat er sprake is van een zeer scherp voorwerp Slede Om de slede beter te reinigen kan deze van het apparaat worden af genomen Trek hiervoor de sledegrendel aan ...

Page 79: ...s mili eu Vraag a u b bij uw gemeente bestuur naar de bevoegde oprui mingsdienst Garantie 5 jaar garantie Op dit product bieden wij begin nend met de verkoopdatum 60 ma anden garantie voor gebreken die terug te voeren zijn op productie en materiaalfouten Uw wettelijke vrijwaringsaanspraken conform 439 e v BGB E worden door deze regeling niet aangetast Niet onder de garantie valt schade die door ni...

Page 80: ...Gebr Graef GmbH Co KG Donnerfeld 6 59757 Arnsberg 24015 01 ...

Reviews: