Gradient Lens LUXXOR User Manual Download Page 10

Luxxor

®

 Portable Video Camera User Guide

Phone:  

800.536.0790

   fax 585.235.6645   gradientlens.com   [email protected]

Luxxor

®

 Portable Video Camera User Guide

Phone:  

800.536.0790

   fax 585.235.6645   gradientlens.com   [email protected]

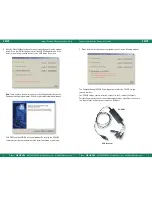
Select this function by pressing the OK 

button and use the       and       buttons to 

select time for auto power off or to disable 

the auto power off function. Press OK to 

confirm.

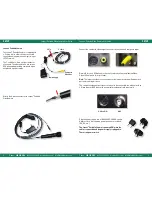
Use the included AV cable to connect your auxiliary display to the jack on the side of 

the PVM. 

note:

 The display must accept a composite input. The unit will automatically 

switch to the auxiliary display when the cable is connected. You may switch between 

the displays by using the VIDEO OUTPUT function on the main menu. The PVM display 

and the external display cannot be viewed at the same time.

The video output format to the auxiliary display may be switched between  

NTSC and PAL by using the VIDEO FORMAT function on the main menu.

auto Power Off

Connecting to an auxiliary Display

Menu Mode:

MENU

VIDEO OUTPUT

DATE / TIME SETUP

LANGUAGE

VIDEO FORMAT

AUTO POWER OFF

AUTO OFF

DISABLE

  5 MIN

10 MIN

15 MIN

30 MIN

Video Out

aV Cable

PVM OPeraTiOn

PVM OPeraTiOn

18 

19

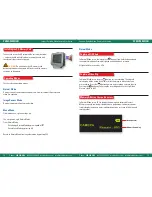
If your unit is supplied with a language option this function will allow you to 

select English or the optional language.

Language

Menu Mode:

This function allows you to choose the 

format of the output video signal for an 

auxiliary display. The options are NTSC and 

PAL. Use the        and        to select and press 

OK to confirm.

Video Format

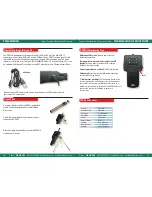
While the TV OUTPUT options are 

displayed, pressing the    button will 

display the FACTORY SETUP menu.   

Here the factory settings for the video 

display may be changed or reset.  

Use       and       and press OK to select 

the property to be changed. Then 

use        and       to change the setting 

and OK to confirm. Holding the       or 

buttons down for a couple of seconds 

will cause the settings to change more 

rapidly. DEFAULT restores the original 

factory settings.

MENU

DELETE ALL

VIDEO OUTPUT

DATE / TIME SETUP

LANGUAGE

VIDEO FORMAT

TV OUTPUT

NTSC

PAL

MENU

BRIGHTNESS  128

CONTRAST 

120

HUE                114

SATURATION  90

DEFAULT

Summary of Contents for LUXXOR

Page 1: ...LE CAMERA LUXXOR PORTABLE video CAMERA UserGuide Phone 800 536 0790 fax 585 235 6645 gradientlens com info gradientlens com 207 Tremont Street Rochester New York 14608 800 536 0790 Fax 585 235 6645 RE...

Page 2: ...ion images can then be viewed live and captured documented and e mailed PORTABLE CAMERA Table of Contents Warnings Page 3 Set Up Page 4 PVM Operation Page 12 Troubleshooting Page 21 Specifications Pag...

Page 3: ...o a monitor with an S Video Input or BNC Input with an appropriate adapter sold separately Plug the power supply into a 100 240 VAC 50 60 Hz outlet Adapters for a few common power outlets are included...

Page 4: ...er 5 The installer will now move to the Install Video ToolBox step Click Install to install the Video ToolBox software setup SETUP Computer Ready Option Install the Software WARNING The included softw...

Page 5: ...xor Portable Camera and converts the analog composite video signal from the camera to a digital signal for input to your computer s USB port 6 After the Video ToolBox software has been installed you w...

Page 6: ...cted and the power supply plugged in There is no power switch After the software has been properly installed connect the composite output from the Y cable to the composite input yellow of the VC USB2...

Page 7: ...these indicators disappear the unit is in Normal Mode displaying a live image from the camera To turn the unit off push and hold the power button for 1 2 seconds until it turns off Power ON OFF 10 Ma...

Page 8: ...ft of the image to indicate that you are recording Press the button again to stop recording and save the clip Pressing the button will also stop the recording and save the clip Video files are saved a...

Page 9: ...images will always include a time date stamp Confirm changes by pressing OK ERASE ALL YES NO MENU DELETE ALL VIDEO OUTPUT DATE TIME SETUP LANGUAGE VIDEO FORMAT MENU DELETE ALL VIDEO OUTPUT DATE TIME...

Page 10: ...Auto Power Off Connecting to an Auxiliary Display Menu Mode MENU VIDEO OUTPUT DATE TIME SETUP LANGUAGE VIDEO FORMAT AUTO POWER OFF AUTO OFF DISABLE 5 MIN 10 MIN 15 MIN 30 MIN Video Out AV Cable PVM op...

Page 11: ...ng SPECIFICATIONS Sensor 1 4 CCD Effective Pixels 768 x 494 Scanning 2 1 Interlace Resolution 520 TV Lines Output Composite Output Format NTSC Length 6 25 159 mm Max Diameter 1 74 44 2 mm Weight 6 3 o...

Page 12: ...ce components found to be defective or at variance from the manufacturer s specifications within this time at no cost to the customer It shall be the purchaser s responsibility to return the instrumen...

Reviews: