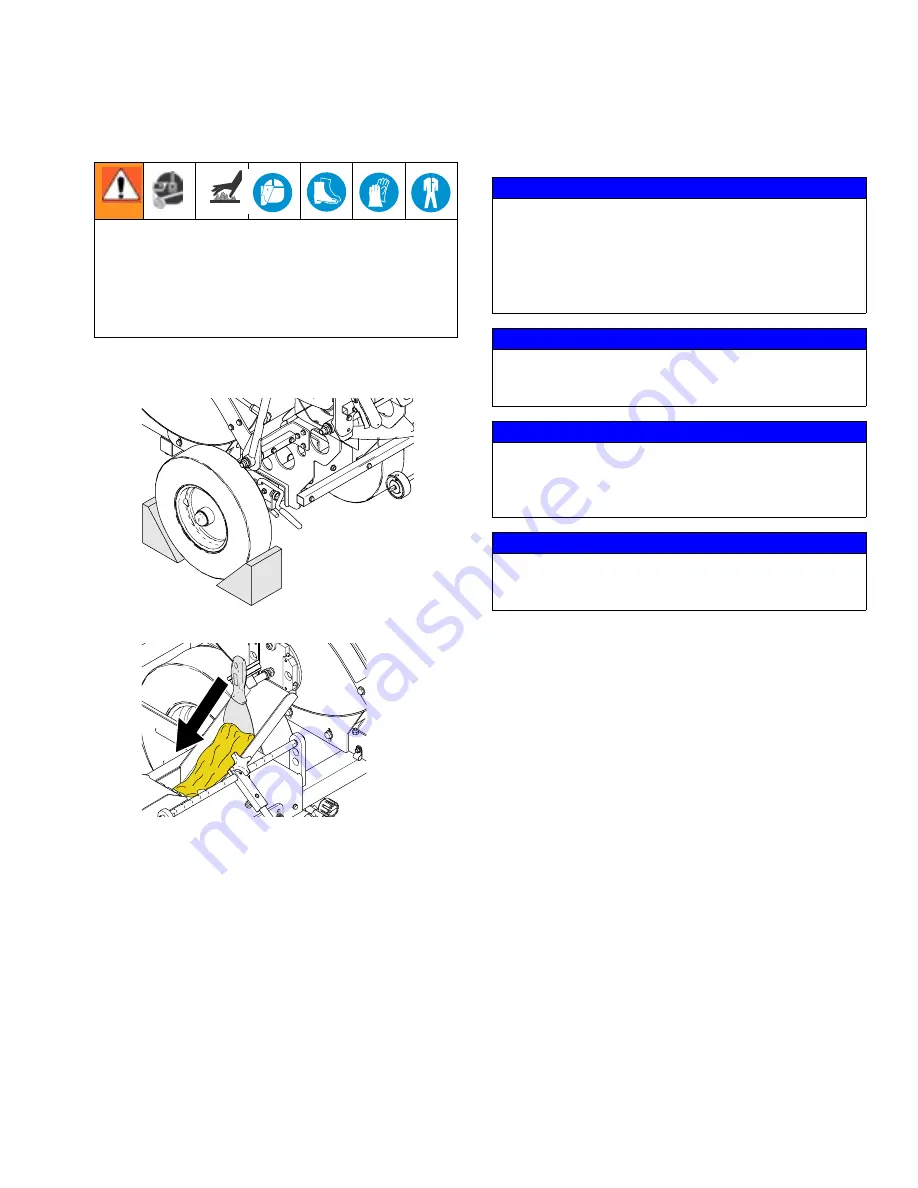
background image

Clean-Up

313787C

19

Clean-Up

1.

Secure ThermoLazer

 by chocking wheels.

2.

Use scraper to clean out trough and screed box.

Transporting

Remove LP-Gas supply cylinder from ThermoLazer


before transporting. Secure in an approved location and 
method as authorized by local, state, federal, national, 
and international agencies.

Always use the designated mounted lifting lugs when 

lifting the Thermolazer

. When lifting the Thermolazer


only use ANSI approved slings and equipment rated for 
a minimum of 2000 lb. Always use ANSI approved 
equipment for securing ThermoLazer to transporting 
equipment.

Never scoop out remaining melted thermoplastic from 
kettle. Remaining thermoplastic can be left to harden 
inside the kettle and can be remelted at a later date.

Always secure ThermoLazer

 by chocking wheels 

when adding thermoplastic.

ti14603a

ti14529a

NOTICE

Be sure to thoroughly clean all material on BlackMax


Screed Die bar of screed box and any open areas to 
prevent material from freezing moving parts of screed 
box. Always run all material out of each die before 
removing. Scrape out all remaining material before it 
sets within the die.

NOTICE

To prevent material from hardening and blocking flow, 
scrape all excess material off of external surfaces after 
each use, including the material trough.

NOTICE

When using hand torch to loosen material from screed 
box, do not allow flames to come in contact with screed 
box springs. Screed box springs will lose their temper 
from flames and will not properly close screed box. 

NOTICE

Remove any remaining beads in the bead hopper and 
bead dispenser to prevent beads from clogging hopper 
and dispenser.

Summary of Contents for ThermoLazer 257500

Page 1: ...y max 300 lb 136 kg Related Manuals For use with the following SmartDie Screed Box IMPORTANT SAFETY INSTRUCTIONS Read all warnings and instructions in this manual Save these instructions Repair 313879...

Page 2: ...afety Information 7 Lighting Instructions 10 SmartDie Screed Box 13 Preparing ThermoLazer for Application 16 Bead Dispenser Box 17 Adding Beads to SplitBead Bead Hopper 17 Applying Material to a Surfa...

Page 3: ...450 F 232 C Fire extinguisher equipment shall be present and working Keep work area free of debris including solvent rags and gasoline EQUIPMENT MISUSE HAZARD Misuse can cause death or serious injury...

Page 4: ...must wear appropriate protective equipment when operating servicing or when in the operating area of the equipment to help protect you from serious injury including eye injury inhalation of toxic fume...

Page 5: ...l Regulations 1987 SI 1987 116 Pattern Approval Regulations for EEC type cylinders under European Directive 84 525 EEC 84 526 EEC and 84 527 EEC Y ti14145a N S R AB M U X P W Z K H T U J A C L V A Ket...

Page 6: ...ture Control Knob BB Kettle Temperature Indicator CC Kettle Gas Safety Valve DD Kettle Pilot Burner Ignitor EE SmartDie Screed Box GG SmartDie Screed Box IR Burner HH IR Burner Safety Shut Off Valve w...

Page 7: ...s Regulators 2001 S1 2001 1426 The Gas Cylinders Pattern Approval Regulations 1987 SI 1987 116 Pattern Approval Regulations for EEC type cylinders under European Directive 84 525 EEC 84 526 EEC and 84...

Page 8: ...a gas fitting tighten fitting until leak stops If leak is from a gas line shut off at LP gas cylin der and replace gas line Immediately call your gas supplier from a remote phone Follow gas supplier...

Page 9: ...flow control valve Check to make sure exhaust openings on kettle are not obstructed Check to make sure combustion air supply openings on kettle are not obstructed If you do not follow these instructi...

Page 10: ...erve that main burn ers shut off 11 Close burner view port 12 Turn temperature control to desired setting Shutting Off Burner 1 Turn gas safety valve to OFF 2 Close manual shut off valve on propane ta...

Page 11: ...l torch from holder 4 Slowly open torch flame adjusting valve and use striker to ignite flame 5 Adjust flame to desired length Shutting Off Torch 1 Fully close torch flame adjusting valve 2 Close torc...

Page 12: ...e flames position 4 Open screed box shroud access door 5 Place torch at end of IR burner next to stainless steel mesh on burner 6 Press in safety shut off valve knob HH 7 Hold in safety shut off knob...

Page 13: ...ie lever 6 Align hole of rod clevis with connecting hole in SmartDie screed box yoke and install hairpin cot ter pin 7 Close and lock screed shroud door 8 Re light SmartDie screed box IR burner as req...

Page 14: ...rmoplastic material make sure the SmartDie screed box die runner is par allel to road surface 1 Loosen two bolts on SmartDie screed box mount ing bracket 2 Slide mount down until leading box edge of S...

Page 15: ...ush spring guard up and over second pin on SmartDie screed box NOTE Make sure spring end is fully engaged in groove to prevent spring from coming loose Line Thickness Adjustment To adjust the thicknes...

Page 16: ...position and fill screed box with melted ther moplastic material NOTE The material gate is adjustable The gate is factory set at a 0 5 in 1 3 cm gap You can increase this gap for more material flow o...

Page 17: ...adjacent beads and harden Bead Dispenser Engagement Wheel To properly dispense beads drive wheel 27 must be in direct contact with tire 89 If drive wheel 27 becomes loose and or starts to slip use al...

Page 18: ...manual shut off valve KK below kettle and behind propane tank OFF 5 Turn torch gas flow valve to closed position 6 Turn torch manual shut off valve OFF 7 Turn main gas valve on propane tank OFF Always...

Page 19: ...n be remelted at a later date Always secure ThermoLazer by chocking wheels when adding thermoplastic ti14603a ti14529a NOTICE Be sure to thoroughly clean all material on BlackMax Screed Die bar of scr...

Page 20: ...3 in 5 0 7 6 cm high and blue orange in color DAILY Make sure kettle main burners A are burning correctly The flame should be 1 2 in 2 5 5 0 cm high and blue orange in color DAILY Make sure IR burner...

Page 21: ...Check caster locking pin 86t for wear If pin is worn out there will be play in the caster wheel Reverse or replace the pin as needed PERIODICALLY Check caster wheel alignment as nec essary FatTrack F...

Page 22: ...aximum 3800 btu hr 1 11 kW IR burner heating capacity maximum 14 000 btu hr 4 10 kW Torch heating capacity maximum 100 000 btu hr 29 31 kW Kettle holding capacity maximum 300 lb 136 kg thermoplastic t...

Page 23: ...Notes 313787C 23 Notes...

Page 24: ...f the equipment does not disclose any defect in material or workmanship repairs will be made at a reasonable charge which charges may include the costs of parts labor and transportation THIS WARRANTY...

Reviews: