background image

Graco Standard Warranty 

20

311771D

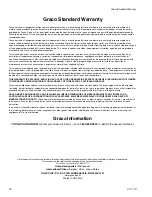
Graco Standard Warranty

Graco warrants all equipment referenced in this document which is manufactured by Graco and bearing its name to be free from defects in 
material and workmanship on the date of sale the original purchaser for use. With the exception of any special, extended, or limited warranty 
published by Graco, Graco will, for a period of twelve months from the date of sale, repair or replace any part of the equipment determined by 
Graco to be defective. This warranty applies only when the equipment is installed, operated and maintained in accordance with Graco’s written 
recommendations.

Graco warrants all equipment referenced in this document which is manufactured by Graco and bearing its name to be free from defects in 
material and workmanship on the date of sale by an authorized Graco distributor to the original purchaser for use. With the exception of any 
special, extended, or limited warranty published by Graco, Graco will, for a period of twelve months from the date of sale, repair or replace any part 
of the equipment determined by Graco to be defective. This warranty applies only when the equipment is installed, operated and maintained in 
accordance with Graco’s written recommendations.

This warranty does not cover, and Graco shall not be liable for general wear and tear, or any malfunction, damage or wear caused by faulty 
installation, misapplication, abrasion, corrosion, inadequate or improper maintenance, negligence, accident, tampering, or substitution of 
non-Graco component parts. Nor shall Graco be liable for malfunction, damage or wear caused by the incompatibility of Graco equipment with 
structures, accessories, equipment or materials not supplied by Graco, or the improper design, manufacture, installation, operation or 
maintenance of structures, accessories, equipment or materials not supplied by Graco.

This warranty is conditioned upon the prepaid return of the equipment claimed to be defective to an authorized Graco distributor for verification of 
the claimed defect. If the claimed defect is verified, Graco will repair or replace free of charge any defective parts. The equipment will be returned 
to the original purchaser transportation prepaid. If inspection of the equipment does not disclose any defect in material or workmanship, repairs will 
be made at a reasonable charge, which charges may include the costs of parts, labor, and transportation.

THIS WARRANTY IS EXCLUSIVE, AND IS IN LIEU OF ANY OTHER WARRANTIES, EXPRESS OR IMPLIED, INCLUDING BUT NOT LIMITED 
TO WARRANTY OF MERCHANTABILITY OR WARRANTY OF FITNESS FOR A PARTICULAR PURPOSE

Graco’s sole obligation and buyer’s sole remedy for any breach of warranty shall be as set forth above. The buyer agrees that no other remedy 
(including, but not limited to, incidental or consequential damages for lost profits, lost sales, injury to person or property, or any other incidental or 
consequential loss) shall be available. Any action for breach of warranty must be brought within two (2) years of the date of sale.

GRACO MAKES NO WARRANTY, AND DISCLAIMS ALL IMPLIED WARRANTIES OF MERCHANTABILITY AND FITNESS FOR A 
PARTICULAR PURPOSE, IN CONNECTION WITH ACCESSORIES, EQUIPMENT, MATERIALS OR COMPONENTS SOLD BUT NOT 
MANUFACTURED BY GRACO

. These items sold, but not manufactured by Graco (such as electric motors, switches, hose, etc.), are subject to 

the warranty, if any, of their manufacturer. Graco will provide purchaser with reasonable assistance in making any claim for breach of these 
warranties.

In no event will Graco be liable for indirect, incidental, special or consequential damages resulting from Graco supplying equipment hereunder, or 
the furnishing, performance, or use of any products or other goods sold hereto, whether due to a breach of contract, breach of warranty, the 
negligence of Graco, or otherwise.

Graco Information

TO PLACE AN ORDER

, contact your Graco distributor, or call 

1-800-690-2894

 to identify the nearest distributor.

All written and visual data contained in this document reflects the latest product information available at the time of publication. 

Graco reserves the right to make changes at any time without notice.

This manual contains English: MM 311771

Graco Headquarters: 

Minneapolis

International Offices: 

Belgium, China, Japan, Korea

GRACO INC. P.O. BOX 1441 MINNEAPOLIS, MN 55440-1441

www.graco.com

Printed in USA 2007

Summary of Contents for RTX-650

Page 1: ...73 50 psi 0 35 MPa 3 5 bar Maximum Fluid Working Pressure 100 psi 0 7 MPa 7 0 bar Maximum Air Pressure Related Manuals Important Safety Instructions Read all warnings and instructions in this manual Save these instructions 311777 311767 Model 254973 Shown ti8370a 311771D Repair Interior Texture Sprayer RTX 650 US C Conforms to ANSI UL standard 1450 ...

Page 2: ...e Comply with all applicable state and national fire electrical and safety regulations Keep a fire extinguisher in the work area Equipment Misuse Hazard Equipment misuse can cause equipment to rupture malfunction or start unexpectedly and cause serious injury Before operating this equipment read all manuals tags and labels including material labels and instructions Do not expose system to rain Alw...

Page 3: ...ur hand body glove or rag Wear protective clothing gloves and eyewear Cleaning Solvent Hazard with Plastic Parts Use only compatible water based solvents to clean plastic structural or pressure containing parts Many solvents can degrade plastic parts to the point where they could fail Such failure could cause serious injury or property damage See Technical Data on page 19 of this instruction manua...

Page 4: ...ove material line from sprayer 2 Tip sprayer up as shown Before adding material or starting unit in cold weather run warm water through pump Install burp guard J before adding material to hopper When only a small amount of material remains in the hopper the burp guard prevents material from shooting out when the sprayer is turned off This material could splash into the operator s eyes or skin ti90...

Page 5: ...Component A Pump Hose Outlet J Burp Guard B RotoFlex II Pump inside K ON OFF Switch C Texture Spray Gun Manual 311777 L Power Cord 120V 15 ft D Nozzle 2 included M Material Hopper 5 gallon E Material Hose 20 ft N Cord Wrap F Material Thickness Gauge P Handle G Accessories Bag Q Air Compressor Not Supplied by Graco H Gun Air Valve R Knob Pressure Control ...

Page 6: ...Check with a qualified electrician or if grounding instructions are not completely understood or if in doubt as to whether the product is properly grounded Do not modify plug provided if it will not fit the outlet have proper outlet installed by a qualified electrician 120V AC Systems This equipment requires a 120V AC 60 Hz 15A circuit with a grounding receptacle Do not use an adapter with this pr...

Page 7: ...6 2 Unplug sprayer from outlet 3 Remove two screws 15 and two screws 64 from back of shroud 7 4 Pull shroud 7 back and up over knob 41 Reassembly 1 Slide shroud 7 onto base 2 2 Tighten two bottom screws 15 and two top screws 64 into shroud 7 ti2810b ti9658a 15 7 64 ti9659a 7 2 ...

Page 8: ... outlet 3 Remove Shroud page 7 4 Loosen two spacers 56 and knob 41 5 Loosen hopper fitting by hand to remove hopper 1 6 Use 3 8 in socket to remove screw 36 from hose bracket 27 7 Slide hose fittings out of hose bracket 27 and remove hose 23 from base 2 ti2810b ti9657a 41 56 ti8781a 1 ti9065a 36 ti3084a ...

Page 9: ...o set pressure apply petroleum jelly to threads 41 tighten knob 41 until back of bracket 25 is approximately 1 2 in from front of tensioning bracket 16 Tighten front spacer 56 until flush to front of ten sioning bracket 16 Tighten back spacer 56 3 8 in from tensioning bracket CAUTION Make sure protective fabric faces outside of hose Roller will touch exposed area of pump hose when pump is in place...

Page 10: ... 1 4 in socket to remove grounding screw 22 8 Disconnect extension cable 29 from pulley 17 and spring 19 to allow motor tray to pivot 9 Remove two clevis pins 20 from base 10 Slide motor tray 32 out of slots in base 2 to remove motor and tray from sprayer 11 Remove Belt page 13 12 Loosen bolts 4 and remove motor 31 from motor tray 32 ti2810b ti9657a 41 ti9064a 22 ti9058a 17 29 19 ti8783a 20 ti9070...

Page 11: ...or tray 32 to create slack in extension cable 29 Loop extension cable 29 through pulley 17 and connect to extension spring 19 Apply petroleum jelly to pulley 17 and threads on knob 41 7 Tighten knob 41 8 To set pressure tighten knob 41 until back of bracket 25 is approximately 1 2 in from front of tensioning bracket Tighten front spacer 56 until flush to front of ten sioning bracket 16 Tighten bac...

Page 12: ...ge The motor has a replaceable fuse attached to the motor bracket The fuse assembly A is fastened to the motor bracket along with a clamp To remove the motor fuse press down on the round center cover C and turn it counterclockwise The cover will pop up to allow the fuse F to be inspected and replaced if needed ti9206a A ti9200a C ti9201a F ...

Page 13: ... make sure teeth of belt 24 and pulley are aligned 2 Insert flat screwdriver into slot on back of motor tray 32 and use screwdriver as a lever to pull motor 31 into position 3 Use 9 16 in wrench to tighten two mounting screws 4 while keeping motor 31 in position with screw driver 4 Reassemble Motor page 10 5 Reassemble Shroud page 7 ti2810b ti9063a 32 ti9066a ti9069a Once the motor is in place you...

Page 14: ...ump material Failed motor or motor shield Replace motor or motor fuse Mix too thick Add water to thin material Use Mate rial Thickness Gauge Plugged gun Relieve Pressure page 6 Remove gun from hose Clean gun RotoFlex II pump worn out Replace hose Recommended hose replacement once a year or every 3000 gallons Pump cold or material frozen in pump Move pump to warm room and allow it to warm up or run...

Page 15: ...flow adjustment nut Intermittent flow sputtering Hopper connection not tight Check gasket TIghten connection Debris in system Clean system Gun will not shut off Worn nozzle or needle Relieve Pressure page 6 Replace worn parts Debris in needle passage Relieve Pressure page 6 Clean Fluid leaking at Flow Adjustment Nut on gun Damaged seal Relieve Pressure page 6 Replace seal Fluid leaking out of eith...

Page 16: ...WiringDiagram 16 311771D Wiring Diagram ti9199a 25 10 39 ON OFF Switch Black Wire Black Wire Power Cord 31 8 Chassis Ground White Wire White Wire Green Wire Green Wire Motor Red Wire ...

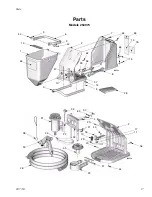
Page 17: ...arts 311771D 17 Parts Models 254973 42 ti9654a 12 1 3 6 14 5 2 7 15 8 10 31 24 33 23 19 29 20 43 20 4 2 36 21 16 32 ti9655b 27 17 11 44 22 46 47 13 18 25 41 37 55 39 42 56 63 37 9 9 64 64 65 28 38 30 26 ...

Page 18: ...xtension 1 20 15J510 PIN detent clevis 2 21 101242 RING retaining ext 2 22 115498 SCREW mach slot hex wash hd 2 23 288623 HOSE 1 24 288718 BELT timing 1 25 15K155 BRACKET cover cord 1 26 288622 HOSE coupled 20 feet 1 27 15J500 BRACKET hose 1 28 15J506 BAG accessories 1 29 120658 CABLE extension 1 30 288629 GUN spray texture 1 31 288740 MOTOR includes item 39 1 32 288229 TRAY motor weld 1 33 288225...

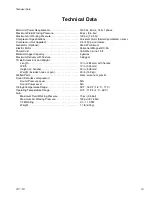
Page 19: ... AWG 3 wire 15 ft Material Hopper Capacity 5 gallons Maximum Delivery with Texture 0 65 gpm TX 65 Dimensions and Weight Length 19 in 482 mm with handle Width 12 in 305 mm Height no handle 20 in 508 mm Weight includes hoses or gun 33 lb 14 9 kg Wetted Parts brass aluminum plastic Sound Data less compressor Sound Pressure Level N A Sound Power Level N A Storage Temperature Range 35 F 160 F 1 6 C 71 ...

Page 20: ...raco will repair or replace free of charge any defective parts The equipment will be returned to the original purchaser transportation prepaid If inspection of the equipment does not disclose any defect in material or workmanship repairs will be made at a reasonable charge which charges may include the costs of parts labor and transportation THIS WARRANTY IS EXCLUSIVE AND IS IN LIEU OF ANY OTHER W...

Reviews: