background image

Spraying

Spraying

Spraying

Spraying

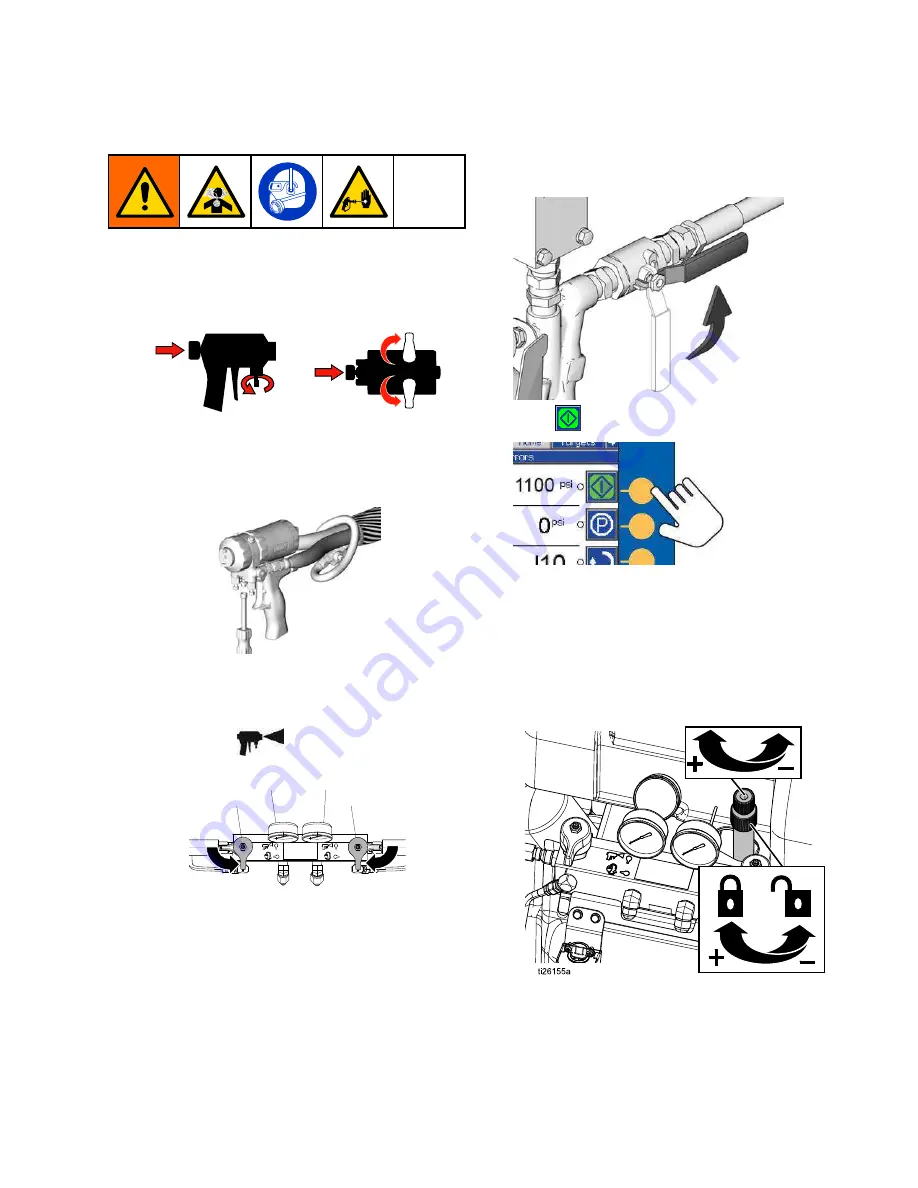
The Fusion AP gun is shown.

1. Engage gun piston safety lock and close gun

luid inlet valves A and B.


Fusion

Fusion

Fusion

Probler

Probler

Probler

2. Attach gun luid manifold. Connect gun air line.

Open air line valve.

3. Adjust the gun air pressure. Do not exceed 130

psi (0.2 MPa, 2 bar).

4. Set PRESSURE RELIEF/SPRAY valves (SA,

SB) to SPRAY

.

SB

SA

GA

GB

5. Verify heat zones are on and temperatures are

on target, see

Home

System Off, page 39

.

6. Open luid inlet valve (FV) located at each pump

inlet.

7. Press

to start motor and pumps.

8. Adjust pressure compensator knob to desired

luid stall pressure. Turn knob clockwise to

increase pressure and counter-clockwise to

decrease pressure. Use hydraulic pressure

gauge (HPG) to view hydraulic pressure. Once

desired luid stall pressure is set, lock the knob

in place by rotating lower portion clockwise until

tight.

Component A and B outlet pressures will be

higher than the hydraulic set pressure, depending

on the model. Component A and B (GA, GB)

pressure may be viewed on the pressure gauges

or the ADM.

334945C

49

Summary of Contents for Reactor 2 Hydraulic

Page 1: ...gs coatings Not Not Not for for for outdoor outdoor outdoor use use use For For For professional professional professional use use use only only only Not Not Not approved approved approved for for for...

Page 2: ...Install Fluid Temperature Sensor 31 Install Heated Hose to Proportioner 31 Advanced Display Module ADM Operation 32 Advanced Setup Screens 35 System 1 36 System 2 36 System 3 36 Recipes 36 Run Mode 3...

Page 3: ...th if splashed in the eyes or on skin inhaled or swallowed Read Safety Data Sheet SDS for handling instructions and to know the speciic hazards of the luids you are using including the effects of long...

Page 4: ...ON EXPLOSION HAZARD HAZARD HAZARD Flammable fumes such as solvent and paint fumes in work work work area area area can ignite or explode Paint or solvent lowing through the equipment can cause static...

Page 5: ...on and equipment rupture Failure to follow this warning can result in death serious injury or property damage Do not use 1 1 1 trichloroethane methylene chloride other halogenated hydrocarbon solvents...

Page 6: ...replacement parts only Do not alter or modify equipment Alterations or modiications may void agency approvals and create safety hazards Make sure all equipment is rated and approved for the environmen...

Page 7: ...inhalation of isocyanate mists vapors and atomized particulates everyone in the work area must wear appropriate respiratory protection Always wear a properly itting respirator which may include a sup...

Page 8: ...Moisture Moisture Moisture Sensitivity Sensitivity Sensitivity of of of Isocyanates Isocyanates Isocyanates Exposure to moisture such as humidity will cause ISO to partially cure forming small hard a...

Page 9: ...1 246102 AHH031 246102 APH032 246102 AHH032 246102 APH131 246102 AHH131 246102 APH132 246102 AHH132 246102 Fusion Fusion Fusion CS CS CS Package Package Package Gun Part No CSH031 CS02RD CHH031 CS02RD...

Page 10: ...02 APH144 246102 AHH144 246102 Fusion Fusion Fusion CS CS CS Package Package Package Gun Part No CSH043 CS02RD CHH043 CS02RD CSH044 CS02RD CHH044 CS02RD CSH143 CS02RD CHH143 CS02RD CSH144 CS02RD CHH14...

Page 11: ...246102 AHH145 246102 APH146 246102 AHH146 246102 Fusion Fusion Fusion CS CS CS Package Package Package Gun Part No CSH045 CS02RD CHH045 CS02RD CSH046 CS02RD CHH046 CS02RD CSH145 CS02RD CHH145 CS02RD...

Page 12: ...6102 AHH156 246102 Fusion Fusion Fusion CS CS CS Package Package Package Gun Part No CSH053 CS02RD CHH053 CS02RD CSH056 CS02RD CHH056 CS02RD CSH153 CS02RD CHH153 CS02RD CSH156 CS02RD CHH156 CS02RD Pro...

Page 13: ...ion Fusion AP AP AP Package Package Package Gun Part No APH062 246101 AHH062 246101 APH162 246101 AHH162 246101 Probler Probler Probler P2 P2 P2 Package Package Package Gun Part No P2H062 GCP2R1 PHH06...

Page 14: ...er Probler Probler P2 P2 P2 Package Package Package Gun Part No P2H074 GCP2R2 PHH074 GCP2R2 P2H076 GCP2R2 PHH076 GCP2R2 P2H174 GCP2R2 PHH174 GCP2R2 P2H176 GCP2R2 PHH176 GCP2R2 24K241 24K241 24K241 24K...

Page 15: ...Systems Shutdown Quick Guide 334006 Reactor 2 Hydraulic Proportioning Systems Startup Quick Guide Related Related Related Manuals Manuals Manuals The following manuals are for accessories used with t...

Page 16: ...N Figure 1 Shown exposed for clarity Wrap with tape during operation A Reactor Proportioner B Heated Hose C Fluid Temperature Sensor FTS D Heated Whip Hose E Fusion Spray Gun F Gun Air Supply Hose G...

Page 17: ...n B RES M K M R J G H K L B D S C P E R A A ISO G J F Figure 2 Shown exposed for clarity Wrap with tape during operation A Reactor Proportioner B Heated Hose C Fluid Temperature Sensor FTS D Heated Wh...

Page 18: ...K L B J D S C P E R A ISO G A N N F Figure 3 Shown exposed for clarity Wrap with tape during operation A Reactor Proportioner B Heated Hose C Fluid Temperature Sensor FTS CK Circulation Block accesso...

Page 19: ...Notes Notes Notes Notes 334945C 19...

Page 20: ...Component Identiication Component Component Component Identiication Identiication Identiication B D S C P E Figure 4 20 334945C...

Page 21: ...Connection HC Heated Hose Electrical Junction Box HP Hydraulic Driver behind shroud MP Main Power Switch PA ISO Side Pump PB RES Side Pump RR Graco InSite Cellular Module Elite models only RS Red Sto...

Page 22: ...rtup or shutdown the system Stop Stop Stop Press to stop all proportioner processes This is not a safety or emergency stop Soft Soft Soft Keys Keys Keys Press to select the speciic screen or operation...

Page 23: ...ription Description Green Solid Run Mode System On Green Flashing Setup Mode System On Yellow Solid Run Mode System Off System System System Status Status Status Yellow Flashing Setup Mode System Off...

Page 24: ...lities Icon Icon Icon Function Function Function No Icon No information or no error has occurred Advisory Deviation Alarm See Troubleshoot Errors page 60 for more information Status Status Status The...

Page 25: ...Errors page 60 for more information Pump Moving Left Pump Moving Right Softkeys Softkeys Softkeys Icon Icon Icon Function Function Function Start Proportioner Stop Proportioner Turn on or off the spe...

Page 26: ...raulic Control Module HCM AAC Enclosure Fan s AAD Wiring Terminal Blocks H 30 H XP2 only AAE Power Supply AAF Sacriicial Surge Protector SSP AAG Hose Breaker AAH Motor Breaker AAJ A Side Heat Breaker...

Page 27: ...Rotary Switch HCM HCM HCM Rotary Rotary Rotary Switch Switch Switch RS RS RS Positions Positions Positions 0 Reactor 2 H 30 1 Reactor 2 H 40 2 Reactor 2 H 50 3 Reactor 2 H XP2 4 Reactor 2 H XP3 Table...

Page 28: ...ted Hose 7 Module Status LEDs 8 Heater A ISO Temperature 9 Heater B RES Temperature 10 Hose Temperature Table Table Table 4 4 4 TCM TCM TCM Module Module Module LED LED LED 7 7 7 Status Status Status...

Page 29: ...correct size generator Using the correct size generator and proper air compressor will enable the proportioner to run at a nearly constant RPM Failure to do so will cause voltage luctuations that can...

Page 30: ...mm 2 mm 2 mm 2 200 240 VAC 1 Phase 4 21 2 2 wire ground 200 240 VAC 3 Phase DELTA 8 8 4 3 wire ground H 30 10 2 kW 350 415 VAC 3 Phase WYE 8 8 4 4 wire ground 200 240 VAC 1 Phase 4 21 2 2 wire ground...

Page 31: ...ottom NOTE NOTE NOTE The return RT must reach the bottom of the reservoir to ensure that isocyanate crystals will settle to the bottom and not be siphoned into the supply tube ST and returned to the p...

Page 32: ...tor Light is illuminated green see Advanced Display Module ADM page 22 If the System Status Indicator Light is not green press the ADM Power On Off button The System Status Indicator Light will illumi...

Page 33: ...nt password then press Press to navigate through the Setup Mode screens see Navigating the Screens page 24 Set Set Set Password Password Password Set a password to allow Setup screen access see Advanc...

Page 34: ...Advanced Display Module ADM Operation Setup Setup Setup Screens Screens Screens Navigation Navigation Navigation 34 334945C...

Page 35: ...rd 0000 for none or 0001 to 9999 and screen saver delay zero equals screen saver off Advanced Advanced Advanced Screen Screen Screen 2 2 2 Units Units Units Use this screen to set the temperature unit...

Page 36: ...system can operate if the sensors were to malfunction see Manual Hose Heat Mode page 51 for more information Default settings are 10 psi 0 07 MPa 0 7 bar for low inlet pressure alarm and 50 F 10 C for...

Page 37: ...ress to clear the old recipe name 2 Use to highlight the next ield and use the number pad to enter a value Press to save Enable Enable Enable or or or Disable Disable Disable Recipes Recipes Recipes 1...

Page 38: ...Mode The ADM will start in the Run screens at the Home screen Press to navigate through the Run Mode screens See Run Screens Navigation Diagram page 44 From the Run screens press to access the Setup...

Page 39: ...essures These will not be shown on models without inlet sensors Home Home Home System System System With With With Error Error Error Active errors are shown in the status bar The error code alarm bell...

Page 40: ...wnloaded on a USB lash drive To download logs see Download Procedure page 61 Events Events Events This screen shows the date time event code and description of all events that have occurred on the sys...

Page 41: ...for the selected error Press to access the QR code screen for an error code that is not listed on this screen See Error Codes and Troubleshooting page 61 for more information on error codes QR QR QR...

Page 42: ...rrent Hose Current Volts Volts Volts A Voltage B Voltage Hose Voltage Pressure Pressure Pressure Pressure A chemical Pressure B chemical Cycles Cycles Cycles CPM cycles per minute Total Cycles lifetim...

Page 43: ...ADM Red Stop Button Pressed EBDA Heat Off A EBDB Heat Off B EBDH Heat Off Hose EBPX Pump Off EBUX USB Drive Removed EC0X Setup Value Changed ECDA A Temperature Setpoint Changed ECDB B Temperature Set...

Page 44: ...daily See Pump Lubrication System page 59 3 Use A and B Drum Level Sticks 24M174 to measure the material level in each drum If needed the level can be entered and tracked in the ADM See Advanced Setu...

Page 45: ...to the gun manifold see Circulation Through Gun Manifold page 48 d Turn both PRESSURE RELIEF SPRAY valves SA SB to SPRAY SB SA GA GB e Open luid inlet valves FV Check for leaks Cross contamination can...

Page 46: ...temperature exceeds 110 F 43 C Thermal expansion can cause over pressurization resulting in equipment rupture and serious injury including luid injection Do not pressurize system when preheating hose...

Page 47: ...ines must be open so valves can automatically relieve pressure when machine is operating 2 See Typical Installation with system luid manifold to drum circulation page 17 Route circulation lines back t...

Page 48: ...AP gun manifold is shown CK CK CK Gun Gun Gun Manual Manual Manual 246362 Fusion AP 309818 256566 Fusion CS 313058 2 Route circulation lines back to respective component A or B supply drum Use hoses r...

Page 49: ...see Home System Off page 39 6 Open luid inlet valve FV located at each pump inlet 7 Press to start motor and pumps 8 Adjust pressure compensator knob to desired luid stall pressure Turn knob clockwis...

Page 50: ...tments Adjustments Adjustments Flow rate atomization and amount of overspray are affected by four variables Fluid Fluid Fluid pressure pressure pressure setting setting setting Too little pressure res...

Page 51: ...rst priority is to ix the RTD Manual Hose Mode can help inish a job while waiting for repair parts Enable Enable Enable Manual Manual Manual Hose Hose Hose Mode Mode Mode 1 Disconnect the hose RTD sen...

Page 52: ...r error alarm will display each time the system is powered up Disable Disable Disable Manual Manual Manual Hose Hose Hose Mode Mode Mode 1 Enter Setup Mode and navigate to System 2 Screen and deselect...

Page 53: ...e for editing 3 Select the Standby Idle Time drop down using and the arrow keys Select the desired delay using and the arrow keys Press enter to select the desired value 4 Exit the page and return to...

Page 54: ...ssure Pressure Relief Relief Relief Procedure Procedure Procedure Follow the Pressure Relief Procedure whenever you see this symbol This equipment stays pressurized until pressure is manually relieved...

Page 55: ...o waste containers or supply tanks Turn PRESSURE RELIEF SPRAY valves SA SB to PRESSURE RELIEF CIRCULATION Ensure gauges drop to 0 SA SB GA GB 7 Engage gun piston safety lock 8 Disconnect gun air line...

Page 56: ...ers separately from heated hoses set PRESSURE RELIEF SPRAY valves SA SB to PRESSURE RELIEF CIRCULATION Flush through bleed lines N SA SB GA GB To lush entire system circulate through gun luid manifold...

Page 57: ...Change break in oil in a new unit after the irst 250 hours of operation or within 3 months whichever comes irst See the table below for recommended frequency of oil changes Table Table Table 6 6 6 Fr...

Page 58: ...l contamination of the A side screen Note Clean the A side screen only during daily startup This minimizes moisture contamination by immediately lushing out any isocyanate residue at the start of disp...

Page 59: ...lubricant 1 Follow Pressure Relief Procedure page 54 2 Lift the lubricant reservoir LR out of the bracket RB and remove the container from the cap Holding the cap over a suitable container remove the...

Page 60: ...ter critical to the process has reached a level requiring attention but not suficient enough to stop the system at this time Advisories are indicated by This condition indicates a parameter that is no...

Page 61: ...ates the most recent data download 10 Open log ile Log iles open in Microsoft Excel by default as long as the program is installed However they can also be opened in any text editor or Microsoft Word...

Page 62: ...nused column Total pump cycle count for day Total volume sprayed for day System System System Software Software Software Log Log Log The system software ile name is 4 SYSTEM CSV and is stored in the D...

Page 63: ...ile is used you must deine a custom string for each entry in the DISPTEXT TXT ile Blank second column ields will be displayed blank on the ADM The ile name must be DISPTEXT TXT The ile format must be...

Page 64: ...NOTICE To prevent system damage do not pressurize the system above the line for the gun tip size being used Foam Foam Foam Performance Performance Performance Chart Chart Chart Table Table Table 7 7...

Page 65: ...J H XP3 at 50 Hz K H XP3 at 60 Hz PRESSURE psi MPa bar FLOW rate in gpm lpm Heater Heater Heater Performance Performance Performance Chart Chart Chart Table Table Table 9 9 9 Heater Heater Heater Per...

Page 66: ...P3 2 79 1 Fluid Fluid Fluid Inlets Inlets Inlets Component A ISO 3 4 npt f 300 psi maximum 3 4 npt f 2 07 MPa 20 7 bar maximum Component B RES 3 4 npt f 300 psi maximum 3 4 npt f 2 07 MPa 20 7 bar max...

Page 67: ...ity Capacity 3 5 gal 13 6 liters Recommended Recommended Recommended Hydraulic Hydraulic Hydraulic Fluid Fluid Fluid Citgo A W Hydraulic Oil ISO Grade 46 Sound Sound Sound Power Power Power per per pe...

Page 68: ...Dimensions Dimensions Dimensions Dimensions 68 334945C...

Page 69: ...Notes Notes Notes Notes 334945C 69...

Page 70: ...reach of warranty must be brought within two 2 years of the date of sale GRACO GRACO GRACO MAKES MAKES MAKES NO NO NO WARRANTY WARRANTY WARRANTY AND AND AND DISCLAIMS DISCLAIMS DISCLAIMS ALL ALL ALL I...

Reviews: