


Clean-up (Power Flush)
6
3A1292C
Clean-up (Power Flush)
This procedure is for water-based architectural
paints and coatings only.
System is pressurized.
Failure to properly depressur-
ize system will result in material discharging from hose
and possible injury.
Always turn off and slowly remove air compressor from
lid assembly to depressurize system before removing:
•
Hose set from sprayer
•
Hose set from lid
•
Lid from reservoir
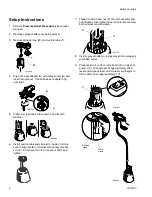
1.
Turn air compressor switch off and slowly remove
air compressor from lid assembly.
2.
Remove suction hose and drain hose from lid
assembly.
3.
Connect suction hose nut to faucet or garden hose.
Put the prime/relief valve in the up position on the
sprayer, then turn on water supply and run water
through system while squeezing trigger
until clear
water comes out end of drain hose
. For best
results, use hot water.
NOTE:
Be sure to aim the drain hose into a waste
container when squeezing trigger to prevent spilling
water and material.
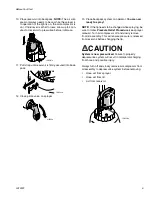
4.
Put the prime/relief valve in the down position.
Spray into waste area with tip in reverse position
until water comes out clear. Put the prime/relief
valve in the up position and shut off water.
Disconnect hose/sink from suction hose.
5.
Remove sprayer battery or unplug sprayer. Remove
tip assembly from sprayer and rinse. Re-install tip
assembly into sprayer.
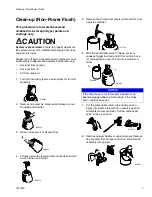
6.
Remove lid from reservoir. Rinse out reservoir or
dispose of liner. Disassemble lid, suction tube and
strainer then rinse.
NOTE:
Always follow local and
state regulations when disposing material.
7.
Wipe away any excess material from external parts
of sprayer.
CAUTION
ti16510a
ti16505a
ti16513a
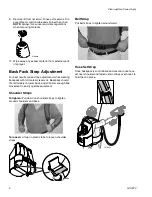
NOTICE
If the drain hose is not thoroughly cleaned, it can
become plugged due to paint buildup. If this does
occur, replace hose set.
ti17827a
ti17822a
ti17158a


