


Maintenance
313872B
25
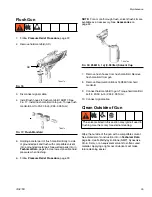
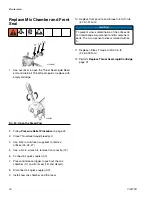
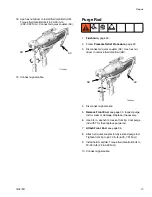
Flush Gun
1.
Follow
Pressure Relief Procedure
, page 22.
2.
Remove fluid manifold (AD).
3.
Disconnect signal cable.
4.
Install flush hoses to flush manifold 15B817. See
F
IG
. 17. Install flush manifold onto gun. Torque flush
manifold bolt to 20-30 in-lb (2.26-3.39 N•m).
5.
Holding a metal part of flush manifold firmly to side
of grounded pail and flush with compatible solvent
into a grounded metal pail. See wetted parts info in
Technical Data
, page 55. Use lowest possible fluid
pressure when flushing.
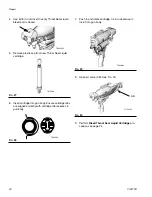
6.
Follow
Pressure Relief Procedure
, page 22.
NOTE:
For a more thorough flush, solvent flush kits are
available as an accessory. See
Accessories
on
page 53.
7.
Remove flush hoses from flush manifold. Remove
flush manifold from gun.
8.
Remove Recirculation Block 15C850 from fluid
manifold.
9.
Connect fluid manifold to gun. Torque fluid manifold
bolt to 20-30 in-lb (2.26-3.39 N•m).
10. Connect signal cable.
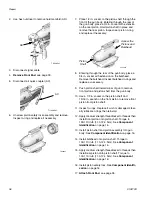
Clean Outside of Gun
Wipe the outside of the gun with a compatible solvent.
See materials of construction info in
Technical Data
,
page 55. Use N-Methylpyrrolidone (NMP), Dynasolve
CU-6, Dzolv, or an equivalent solvent to soften cured
material. Applying a light coat of lubricant will make
future cleaning easier.
F
IG
. 16
F
IG
. 17: Flush Manifold
TI14457a
AD
TI2647a
F
IG
. 18: 256510, 1 qt (0.95 liter) Solvent Cup
The solvents listed in this section may ignite if used in
flushing. Use them only for external cleaning.
TI14470a