background image

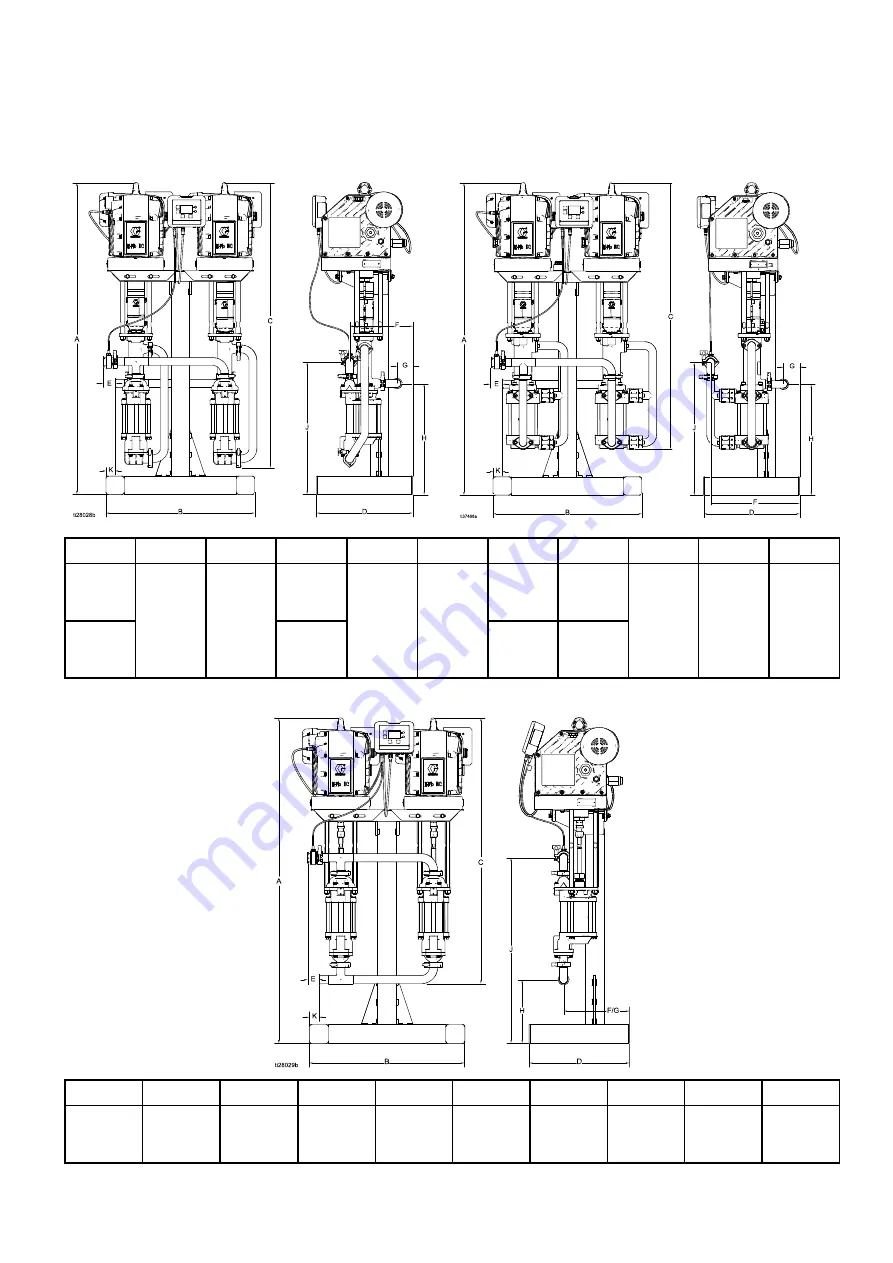
Dimensions

Dimensions

Dimensions

Dimensions

Pump

Pump

Pump with

with

with Sealed

Sealed

Sealed 4–Ball

4–Ball

4–Ball Lower

Lower

Lower

Pump

Pump

Pump with

with

with Sealed

Sealed

Sealed 4–Ball

4–Ball

4–Ball Plus

Plus

Plus Lower

Lower

Lower

Pumps

Pumps

Pumps

A

A

A

B

B

B

C

C

C

D

D

D

E

E

E

F

F

F

G

G

G

H

H

H

JJ

J

K

K

K

DC

4-Ball

54.5 in.

(138.4

cm)

12.1 in.

(30.7

cm)

3.0 in.

(7.6 cm)

Sealed

4-Ball

Plus

59.7 in.

(151.6

cm)

28.5 in.

(72.4

cm)

51.0 in.

(129.5

cm)

18.4 in.

(46.7

cm)

2.1 in.

(5.3 cm)

17.1 in
(43.4
cm)

3.1 in.
(7.9 cm)

21.2 in.

(53.8

cm)

25.4 in.

(64.5

cm)

1.8 in.

(3.8 cm)

Pump

Pump

Pump with

with

with Open

Open

Open Wet

Wet

Wet Cup

Cup

Cup Lower

Lower

Lower

A

A

A

B

B

B

C

C

C

D

D

D

E

E

E

F

F

F

G

G

G

H

H

H

JJ

J

K

K

K

59.7 in.

(151.6

cm)

28.5 in.

(72.4 cm)

45.5 in.

(115.6

cm)

18.4 in.

(46.7

mm)

2.1 in.

(5.3 cm)

12.1 in.

(30.7 cm)

12.1 in.

(30.7 cm)

11.7 in.

(29.7

mm)

34.1 in.

(86.6 cm)

1.75 in.

(4.4 cm)

58

3A3453H

Summary of Contents for E-Flo DC Series

Page 1: ...int paint circulation circulation circulation applications applications applications For For For professional professional professional use use use only only only Important Important Important Safety...

Page 2: ...Parts 51 Pump Assembly 51 Pump Matrix 55 24P822 Control Module Kit 56 Accessories 57 Back Pressure Regulators 57 Control Module 57 Dimensions 58 Mounting Hole Patterns 59 Appendix A Modbus Variable M...

Page 3: ...pen Wet Cup tri clamp EC 6 4000 cc J 2 Horsepower 3 Phase ATEX FM IECEx The The The part part part number number number for for for your your your equipment equipment equipment is is is printed printe...

Page 4: ...int fumes in work work work area area area can ignite or explode Paint or solvent flowing through the equipment can cause static sparking To help prevent fire and explosion Use equipment only in well...

Page 5: ...e Procedure Procedure when equipment is not in use Check equipment daily Repair or replace worn or damaged parts immediately with genuine manufacturer s replacement parts only Do not alter or modify e...

Page 6: ...ERSONAL PROTECTIVE PROTECTIVE PROTECTIVE EQUIPMENT EQUIPMENT EQUIPMENT Wear appropriate protective equipment when in the work area to help prevent serious injury including eye injury hearing loss inha...

Page 7: ...e See Figures Figures Figures 2 2 2 and and and 3 3 3 1 Place each pump 4 onto the stand frame 6 and align the mounting holes of the motor stand bracket 2 with the stand frame 6 Install washers 13 and...

Page 8: ...full assembly use the lift rings on both motors Failure to use both lift rings will cause the pump to become unbalanced make it difficult to move and could result in damage to the assembly Figure 2 M...

Page 9: ...Installation Figure 3 Mount the Pump with Open Wet Cup Lower 3A3453H 9...

Page 10: ...nnect Connect the the the Control Control Control Module Module Module 1 If still on shut off and lock out power to the motor 2 Connect the gray end of the accessory cable 25 into port 3 on the bottom...

Page 11: ...kVA 3 0 kVA per motor Hazardous Hazardous Hazardous Area Area Area Cabling Cabling Cabling and and and Conduit Conduit Conduit Requirements Requirements Requirements Explosion Explosion Explosion Proo...

Page 12: ...2 2 Typical Typical Typical Installation Installation Installation Pump Pump Pump with with with Sealed Sealed Sealed Bellows Bellows Bellows Lower Lower Lower NON NON NON HAZARDOUS HAZARDOUS HAZARDOU...

Page 13: ...or for Table Table Table 2 2 2 and and and Table Table Table 3 3 3 A Electrical Supply must be sealed conduit approved for use in hazardous locations B Fused Safety Switch with lock C Start Stop Contr...

Page 14: ...locked out 2 Install a start stop control C in the electrical supply line A within easy reach of the equipment The start stop control must be approved for use in hazardous locations NOTE NOTE NOTE Th...

Page 15: ...1 P1 P2 GND P1 P2 Lock Out Box Motor 2 P1 P2 Two Two Two motors motors motors connected connected connected to to to a a a single single single power power power drop drop drop GND P1 P2 Lock Out box...

Page 16: ...or or relieving relieving relieving pressure pressure pressure Hold metal part of the spray gun or valve firmly to the side of a grounded metal pail then trigger the gun or open the valve Fluid Fluid...

Page 17: ...B 3 Open the fluid drain valve H having a waste container ready to catch drainage Leave open until you are ready to pressurize system again Control Control Control Module Module Module Overview Overvi...

Page 18: ...ICE NOTICE To prevent damage to the softkey buttons do not press the buttons with sharp objects such as pens plastic cards or fingernails Table 4 explains the function of the membrane keys on the cont...

Page 19: ...d to cancel data entered and return to original data Exit Screen Exit data editing Up Down Arrows Use to move between screens or fields on a screen or to increment or decrement the digits in a settabl...

Page 20: ...Mode Mode Select Pressure Mode Flow Mode System Mode System Reset Lower Size Back Pressure Regulator Maximum Limit Minimum Limit Maximum and Minimum Limits Deviation Enable Alarm Enable Calibration Jo...

Page 21: ...n empty box 2 The feature is enabled if a is in the box Reset Reset Reset Field Field Field The reset field is used for totalizers Press to reset the field to zero When all data is correct press to ex...

Page 22: ...ge page page 30 30 30 Run Run Run Screen Screen Screen 2 2 2 page page page 26 26 26 Setup Setup Setup Screen Screen Screen 7 7 7 page page page 35 35 35 Setup Setup Setup Screen Screen Screen 3 3 3 p...

Page 23: ...reens Screens 1 8 1 8 1 8 Setup Setup Setup Screen Screen Screen 12 12 12 page page page 38 38 38 Setup Setup Setup Screen Screen Screen 13 13 13 page page page 39 39 39 Setup Setup Setup Screen Scree...

Page 24: ...S PROFILES PROFILES Setup Setup Setup Screens Screens Screens 1 4 1 4 1 4 RUN RUN RUN Run Run Run Screens Screens Screens 1 8 1 8 1 8 Setup Setup Setup Screen Screen Screen 18 18 18 page page page 42...

Page 25: ...1 2 and 3 Run Run Run Screen Screen Screen 1 1 1 This screen displays information for a selected profile A box around an icon indicates which mode the profile is running pressure or flow Figure 6 Run...

Page 26: ...feature allows the user to run the motor past the tank level low alarm to empty the tank Select this box and hold the softkey button to manually control the fill pump solenoid output Current primary t...

Page 27: ...n 5 5 5 This screen displays the current pressure readings of transducers 1 and 2 Pressure can be displayed as psi bar or MPa See Setup Screen 18 page 42 Figure 15 Run Screen 5 Run Run Run Screen Scre...

Page 28: ...e pressure if set as an alarm In flow mode the motor maintains a constant speed to maintain the target flow rate set on Setup Screen 3 regardless of the fluid pressure up to the pump s maximum working...

Page 29: ...e system is equipped with a back pressure regulator BPR kit P N 24V001 set the target air pressure to the BPR from 0 to 100 percent approximately 1 to 100 psi Leave the field set to 000 for a system w...

Page 30: ...pressure is displayed as a pressure value psi bar MPa rather than a percentage of maximum pressure See Setup Screen 8 page 36 to enable closed loop pressure control Fluid pressure minimum See Step 5 O...

Page 31: ...in flow mode NOTE If the profile does not have a maximum flow rate setting the motor will not run and error code WSC_ appears Flow rate minimum See Step 5 This softkey is disabled by default and only...

Page 32: ...the maximum entered on Setup Screen 3 for five seconds an alarm symbol appears on the screen and the pump shuts down Line 2 Pressure Minimum Select Limit Limit Limit Deviation Deviation Deviation or...

Page 33: ...Mode Mode Examples Examples Examples Runaway Runaway Runaway Control Control Control The user may choose to set the minimum pressure to Alarm If a hose bursts the pump will not change speed but the ba...

Page 34: ...default is blank If custom is selected a field will open to input the size of the lower in cc Select to initiate automatic system calibration The pump must be running a profile prior to selection for...

Page 35: ...ot resettable Batch Totalizer displays the batch total in selected volume units Reset Batch Totalizer resets the batch totalizer to zero Setup Setup Setup Screen Screen Screen 7 7 7 Use this screen to...

Page 36: ...lect from the dropdown options to enable the transducer Enables the pump to use the transducer to control to a pressure setpoint psi bar mpa rather than force Enter the calibration scale factor from t...

Page 37: ...ure begins to operate outside of the system settings Pressure transducer 2 monitors the pressure at the BPR Delta pressure monitors the difference between the pump outlet and the BPR Figure 43 Setup S...

Page 38: ...Screen Screen Screen 12 12 12 Use this screen to set your modbus preferences Figure 45 Setup Screen 12 Setup Setup Setup Screen Screen Screen 12 12 12 Key Key Key Control location Select local or remo...

Page 39: ...OTE NOTE NOTE The non editable box shows the status of the modbus register Select this box to enable the tank to automatically fill You can then set the fill levels When the tank level reaches this le...

Page 40: ...eive an alarm when the level of the Primary Tank is above the value that is defined in the Primary Tank High field This value is a percentage of the total level of the Primary Tank Configures Port 4 p...

Page 41: ...nd set the time out value in minutes Setup Setup Setup Screen Screen Screen 17 17 17 Use this screen to enable or disable the run stop switch and auto restart Figure 53 Setup Screen 17 Setup Setup Set...

Page 42: ...18 Key Key Key Select the pressure units psi bar default MPa Select the volume units liters default gallons cc Select the flow rate units L min default gpm cc min oz min cycles min Select the system...

Page 43: ...l when the software update is initiated Figure 59 Setup Screen 19 Setup Setup Setup Screen Screen Screen 19 19 19 Key Key Key Select your preferred date format from the menu MM DD YY DD MM YY default...

Page 44: ...eded and then determine a regular schedule for checking your system Flushing Flushing Flushing To avoid fire and explosion always ground equipment and waste container To avoid static sparking and inju...

Page 45: ...n both strokes Worn piston packing Replace See lower manual Held open or worn ball check valves Check and repair See lower manual Pump output low on only one stroke Worn piston packing Replace See low...

Page 46: ...tor of which pump is active A4N_ A4N_ A4N_ 6 Alarm The motor current exceeded 13A or the hardware overcurrent tripped at 20A CAC_ CAC_ CAC_ Advanced None Alarm Display detects a loss of CAN communicat...

Page 47: ...None Deviation The primary tank current level is below the primary tank deviation set point L3A0 L3A0 L3A0 Advanced None Deviation The primary tank current level is above the primary tank deviation s...

Page 48: ...over temperature Motor will throttle itself to stay below 85 C 185 F internally V1I_ V1I_ V1I_ Basic and Advanced 2 Alarm Brown out voltage supplied to motor is too low V2I_ V2I_ V2I_ Basic and Advanc...

Page 49: ...If the coupling adapter 16 and tie rods 9 have not been disassembled from the motor 1 skip to step 2 If the coupling adapter 16 and tie rods 9 have been disassembled from the motor 1 follow these ste...

Page 50: ...and reconnect the inlet and outlet manifolds 3 10 Flush and test the pump before reinstalling it in the system Connect hoses and flush the pump While it is pressurized check for smooth operation and l...

Page 51: ...p Pump Pump Assembly Assembly Assembly See Models page 3 for an explanation of the pump part number Models Models Models ECxx41 ECxx41 ECxx41 with with with Sealed Sealed Sealed 4 Ball 4 Ball 4 Ball L...

Page 52: ...See Models page 3 for an explanation of the pump part number Models Models Models ECxx61 ECxx61 ECxx61 with with with Open Open Open Wet Wet Wet Cup Cup Cup 4 Ball 4 Ball 4 Ball Lower Lower Lower 52 3...

Page 53: ...See Models page 3 for an explanation of the pump part number Models Models Models EC8J41 EC8J41 EC8J41 with with with Sealed Sealed Sealed 4 Ball 4 Ball 4 Ball Plus Plus Plus Lower Lower Lower 3A3453...

Page 54: ...up 9 16X771 Sealed Lowers 6 10 24F251 SHIELD coupler 2 13 100101 SCREW cap hex hd 16 14 100133 WASHER lock 3 8 16 15 120351 GASKET sanitary 4 16 15H369 ADAPTER M22x1 5 2 17 17F000 NUT coupling 2 18 18...

Page 55: ...41 A EM0026 17K657 EC4061 A EM0026 17K665 EC4941 A EM0025 17K657 EC4961 A EM0025 17K665 EC5041 A EM0026 17K658 EC5061 A EM0026 17K666 EC5941 A EM0025 17K658 EC5961 A EM0025 17K666 EC6041 A EM0026 17K6...

Page 56: ...cludes item 5a 1 5a SCREW cap socket head M5 x 40 mm 1 6 24P823 BRACKET KIT control module includes items 6a 6f 1 Ref Ref Ref Part Part Part Description Description Description Qty Qty Qty 6a BRACKET...

Page 57: ...max fluid pressure 1 1 2 npt 288262 Pneumatic BPR 20 gpm 300 psi max fluid pressure 2 in Tri Clamp Control Control Control Module Module Module Part Part Part Description Description Description 16P91...

Page 58: ...n 138 4 cm 12 1 in 30 7 cm 3 0 in 7 6 cm Sealed 4 Ball Plus 59 7 in 151 6 cm 28 5 in 72 4 cm 51 0 in 129 5 cm 18 4 in 46 7 cm 2 1 in 5 3 cm 17 1 in 43 4 cm 3 1 in 7 9 cm 21 2 in 53 8 cm 25 4 in 64 5 c...

Page 59: ...atterns Mounting Mounting Mounting Hole Hole Hole Patterns Patterns Patterns KEY KEY KEY A A A 19 88 in 505 mm B B B 14 50 in 368 mm C C C 16 88 in 429 mm D D D 17 00 in 432 mm E E E Hole size 59 in 1...

Page 60: ...te 16 Bit Pressure units see Table 7 403232 Configurable IO Type Read Write 16 Bit 0 Reed switch input 1 Drum cover switch input 403233 Agitator Half Status Read Write 16 Bit 0 Drum cover down 1 Drum...

Page 61: ...4150 Pressure Minimum Read Only 16 Bit Pressure units see Table 7 404151 Pressure Target Read Only 16 Bit Pressure units see Table 7 404152 Pressure Maximum Read Only 16 Bit Pressure units see Table 7...

Page 62: ...34 47 mPa 344 74 bar 3 5 psi 34 5 kPa 0 345 bar Tank level sensor 404207 Closed Loop Enable Transducer 1 Read Write 16 Bit 404208 Closed Loop Enable Transducer 2 Read Write 16 Bit 0 Not Enabled 1 Enab...

Page 63: ...rce or Pressure Read Only 406105 Transducer 1 Pressure Read Only 0 65535 406106 Transducer 2 Pressure Read Only 0 65535 406107 ADCM Input Status Bits Read Only bit 0 bit 1 0 Stop 1 Run 2 Toggle bit 2...

Page 64: ...0 Clear Alarm bit 1 Reset Batch bit 2 Reset Maint Counter 1 bit 3 Reset Maint Counter 2 bit 4 Reset Maint Agitator 406140 Configuration Read Write bit 0 0 Local 1 Remote bit 14 Run Stop Switch 0 Disab...

Page 65: ...06153 TBD Read Write 0 65535 406154 TBD Read Write 0 65535 406155 Closed Loop Enable Transducer Read Write bit 0 Enable Disable Trans 1 bit 1 Enable Disable Trans 2 406156 Pump Lower Size Read 0 65535...

Page 66: ...ssure units see table 7 405x02 Pressure Force Maximum Read Write 16 Bit Pressure units see table 7 405x03 Flow Minimum Read Write 16 Bit Flow units see table 7 405x04 Flow Target Read Write 16 Bit Flo...

Page 67: ...libration in progress 13 Alarm A4N_ Over Current 14 Alarm T4D_ Over Temperature Alarm 15 Alarm WCW_ Dual Lower System with Display in Single Lower Mode 404113 404113 404113 Pump Pump Pump Events Event...

Page 68: ...d 13 Reserved 14 Reserved 15 Reserved 404117 404117 404117 Pump Pump Pump Events Events Events 2 2 2 Low Low Low Word Word Word Bit Event Type Event Code Event Name 0 Advisory E5F_ X2 Calibration Erro...

Page 69: ...ts Events Events Low Low Low Word Word Word Bit Event Type Event Code Event Name 0 Alarm P5D_ Transducer Assignment Conflict 1 Deviation P1D_ Unbalanced Load 2 Deviation CAG_ Solenoid Keep Alive Signa...

Page 70: ...Reads 1 if there are any active deviations 4 Reads 1 if there are any active advisories 5 Setup changed 6 Reserved 7 Run Stop switch closed 8 Profile 1 changed 9 Profile 2 changed 10 Profile 3 change...

Page 71: ...er 10 10 1 0 L min Gallons min 403210 1 Flow Register 10 10 1 0 Gal min cc min 403210 2 Flow Register 1 1 cc min oz min 403210 3 Flow Register 1 1 oz min Flow Cycles min 403210 4 Flow Register 10 10 1...

Page 72: ...ds 1 if the pump is currently moving Example 2 Register 404100 bit 2 reads 1 if the pump has an active alarm 5 Monitor Monitor Monitor alarms alarms alarms and and and deviations deviations deviations...

Page 73: ...g flashing red light No harm can be done by attempting to program the module multiple times 1 Remove power from the Graco Control Module by turning off system power NOTE NOTE NOTE Alternately software...

Page 74: ...date successful Update unsuccessful Update complete no change necessary 9 Press to continue If the token is still inserted the remote loading procedure will begin anew Return to step 5 for step progre...

Page 75: ...Notes Notes Notes Notes 3A3453H 75...

Page 76: ...ent to an air motor operating at 100 70 and 40 psi 100 of maximum force 70 of maximum force 40 of maximum force Models Models Models EC4xxx EC4xxx EC4xxx 2000cc 2000cc 2000cc 2x 2x 2x 1000 1000 1000 c...

Page 77: ...PRESSURE PRESSURE PRESSURE psi bar MPa NOTE NOTE NOTE The shaded area within the table shows the recommended range for continuous duty circulation Models Models Models EC6xxx EC6xxx EC6xxx 4000 4000...

Page 78: ...orce CYCLES CYCLES CYCLES PER PER PER MINUTE MINUTE MINUTE 20 1 4 0 14 40 2 8 0 28 60 4 1 0 41 80 5 5 0 55 100 6 9 0 69 120 8 3 0 83 140 9 7 0 97 160 11 0 1 10 180 12 4 1 24 200 13 8 1 38 220 15 2 1 5...

Page 79: ...Cx0xx 200 240 Vac single phase 50 60 Hz 5 8 kVA 2 9 kVA per motor Input Voltage Power Models ECxJxx 380 480 Vac three phase 50 60 Hz 6 0 kVA 3 0 kVA per motor Power inlet port size 3 4 14 npt f Ambien...

Page 80: ...TY AND AND AND FITNESS FITNESS FITNESS FOR FOR FOR A A A PARTICULAR PARTICULAR PARTICULAR PURPOSE PURPOSE PURPOSE IN IN IN CONNECTION CONNECTION CONNECTION WITH WITH WITH ACCESSORIES ACCESSORIES ACCES...

Reviews: