


Operation
8
3A5576D
Operation
1. Ensure all LazerVac motor switches are turned to
“OFF”. Plug vacuum into grounded power source.
2. Turn Auto Filter Cleaner Power Switch to “ON”.
Ensure the sound of the Filter Cleaner Bar is heard
contacting the inside of the filter. If no sound is
heard, replace the Plastic Inserts on the cleaning
bar. See page 18.
3. After 10 seconds, turn on a Vacuum Motor Switch.
Turn on additional vacuum motors if more vacuum
power is needed.
4. LazerVac is now ready for dust collection from the
GrindLazer or other removal equipment.
5. Use the vacuum accessories shown in the section
titled
Main Assembly Diagram (LazerVac)
to pick up dust from the ground between grinding
passes.
Emptying Collection Tanks
1. When Dust Collection Tanks are full, turn off all
vacuum motors and leave Auto Filter Cleaner power
switch to “ON”. After 2 minutes of cleaning the
vacuum filters, turn off cleaning switch and unplug
vacuum from power source.
2. If LazerVac is full, remove Dust Collection Tank by
pulling up on the Engagement Lever.
3. If Cyclone separator is full, remove the Separator
Lid.
4. Remove the Dust Bag Holder from the tank.
5. Wearing a respirator, gather and secure the top of
the collection bag. Lift and remove the collection
bag, tie up and then dispose. Follow local
ordinances and regulations for disposal.
6. Insert new bags into the collection tanks and insert
the Dust Bag Holder on top of the bag. Then reinsert
the tanks into the Cyclone separator and into the
bottom of the LazerVac. Ensure the Dust Collection
Tank is securely attached to the body of the vacuum
by pushing down on the Engagement Lever.
DUST HAZARD
Grinding concrete and other surfaces can create dust
that contains hazardous substances. To reduce the
risk of serious injury:
•
Respirator must be worn when emptying or
cleaning Dust Collection Tanks or bags.
•
Follow local ordinances and regulations for
disposal.
Summary of Contents for 25E237
Page 11: ...NOTES 3A5576D 11 NOTES...
Page 12: ...Parts 12 3A5576D Parts Main Assembly Diagram LazerVac...
Page 14: ...Parts 14 3A5576D Motor Housing Assembly Diagram LazerVac 230...
Page 16: ...Parts 16 3A5576D Motor Housing Assembly Diagram LazerVac 330...
Page 19: ...NOTES 3A5576D 19 NOTES...
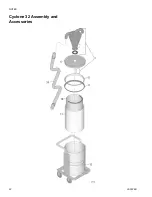
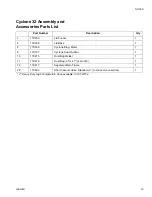
Page 20: ...NOTES 20 3A5576D Cyclone 20 Assembly and Accessories...
Page 22: ...NOTES 22 3A5576D Cyclone 32 Assembly and Accessories...