background image

Installation 

4

308883S

Mounting

1. Plan the mounting layout for easy operator access 

to the pump air controls, sufficient room to change 
drums and a secure mounting platform.

2. If using a follow plate (H), remove the drum cover. 

Scoop the material to the center of the drum. Place 
the plate on the material. Guide the pump foot valve 
through the plate.

3. Mount the pump to the drum cover or other suitable 

mounting device.

4. For ease in changing drums, install a pump eleva-

tor.

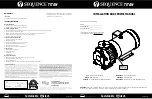
Air and Fluid Line Accessories

Refer to F

IG

. 2 for the following instructions.

Three accessories are 

required

 in your system: an air 

shut-off valve/air bleed device, fluid drain valve, and 
ground wire. These accessories help reduce the risk of 
serious bodily injury, including fluid injection, splashing 
in the yes or on the skin, injury from moving parts if 
you are adjusting or repair the pump, and explosion 
from static sparking.

• The air bleed device relieves air trapped between it 

and air motor after the air supply is shut off. 
Trapped air can cause the motor to cycle 
unexpectedly, causing serious injury if you are 
adjusting or repairing the pump. Use a bleed-type 
master air valve (J). Install them near the pump air 
inlet within easy reach from the pump.

• The fluid drain (K) assists in relieve fluid pressure 

in the displacement pump, hoses, and dispensing 
valve. Triggering the valve to relieve pressure may 
not be sufficient.

• The ground wire (B) reduces the risk of static 

sparking.

NOTE: 

Install the air line accessories in the order shown 

in Fig.

1. Install a pump runaway valve (G) to shut off the air 

to the pump if the pump accelerates beyond the 
pre-adjusted setting. A pump that runs too fast can 
be seriously damaged.

2. Install an air line lubricator (F) for automatic air 

motor lubrication.

3. Install a bleed-type master air valve (J) to relieve air 

trapped between the valve and the motor.

4. Install the air regulator (C) to control pump speed 

and pressure.

5. Install an air line filter (E) to remove harmful dirt and 

contaminants from the compressed air supply.

6. Install a second bleed-type master air valve (J) 

upstream from all other accessories, to isolate the 
accessories for servicing.

Mount the pump securely so that it cannot move 
around during operation. Failure to do so could result 
in personal injury or equipment damage.

NOTICE

Do not hand the air accessories directly on the air 
inlet. The fittings are not strong enough to support the 
accessories and may cause one or more to break. 
Provides a bracket on which to mount the accesso-
ries.

Summary of Contents for 239877

Page 1: ...8400 psi 58 MPa 580 bar Maximum Working Pressure 140 psi 0 97 MPa 9 7 bar Maximum Air Input Pressure Important Safety Instructions Read all warnings and instructions in this manual Save these instruct...

Page 2: ...void agency approvals and create safety hazards Make sure all equipment is rated and approved for the environment in which you are using it Use equipment only for its intended purpose Call your distri...

Page 3: ...k onto the pump and tighten securely Connect the other end of the ground wire to a true earth ground See Fig To order a ground wire clamp order Part No 222011 Key A Fluid dispense line B Pump ground w...

Page 4: ...Install them near the pump air inlet within easy reach from the pump The fluid drain K assists in relieve fluid pressure in the displacement pump hoses and dispensing valve Triggering the valve to re...

Page 5: ...ial being pumped NOTE A pump runaway valve G can be installed on the air line to automatically shut off the pump if it starts to run too fast 7 Read and follow the instructions supplied with each comp...

Page 6: ...of the piston 52 Remove the lower ball 56 Screw the piston out of the extension rod 57 Remove the upper ball 56 retaining washer 53 and seal 54 8 Clean all the parts in a compatible solvent and inspe...

Page 7: ...tube 64 at 45 55 ft lb 61 75 N m Torque the shovel rod 58 to the piston 52 at 25 30 ft lb 34 41 N m Torque the piston 52 to the extension rod 57 at 25 30 ft lb 34 41 N m 5 60 64 59 56 52 62 61 63 58...

Page 8: ...hold the cylinder 17 to the base Carefully pull the cylinder straight up off the piston 2 9 Use a screw driver to push down on the trip rod yoke 22 and snap the toggles down Remove the lockwires 31 f...

Page 9: ...Repair 308883S 9 FIG 4 5 8 57 64 74 2 11 21 17 38 6...

Page 10: ...p off the top part shown with dotted lines in FIG 5 7 Install the transfer valve grommets 12 and reas semble the valve mechanism Before you install the lockwires 31 in the adjusting nuts 30 use the sp...

Page 11: ...service air motor Erratic pump operation Exhausted fluid supply Refill and reprime or flush Worn pump seals Replace Damaged shovel tube Replace Damaged check seat replace pump piston or shovel rod or...

Page 12: ...Parts 12 308883S Parts 29a 29b 28 17 31 30 22 13 23 25 27 26 11 15 14 24 2 33 8 74 1a 1b 30 12 38 6 9 10 5 21 20 19 64 57 53 18 4 7 60 60 59 56 52 56 62 61 63 58 66 67 54 16...

Page 13: ...32 x 0 38 inches 10 mm long 12 20 PLATE warning with muffler 1 21 101578 SCREW hex head no 8 32 x 0 38 inches 10 mm long 6 22 158360 YOKE rod trip 1 23 158362 PIN toggle 2 24 O RING nitrile rubber 1...

Page 14: ...6 in 853 mm 26 7 in 678 mm 17 5 in 445 mm grounding screw 1 4 npt f fluid outlet grounding screw grounding screw 1 4 npt f fluid outlet 1 4 npt f fluid outlet 3 8 npt f air inlet 3 8 npt f air inlet...

Page 15: ...psi 0 638 m3 minute at 0 95 liter min at 0 7 MPa 7 bar Maximum fluid output Maximum recommended pump speed 76 cycles min at 0 22 gpm 76 cycles min at 0 82 liter min Cycles per gallon liter 110 28 Sou...

Page 16: ...of the equipment does not disclose any defect in material or workmanship repairs will be made at a reasonable charge which charges may include the costs of parts labor and transportation THIS WARRANT...

Reviews: