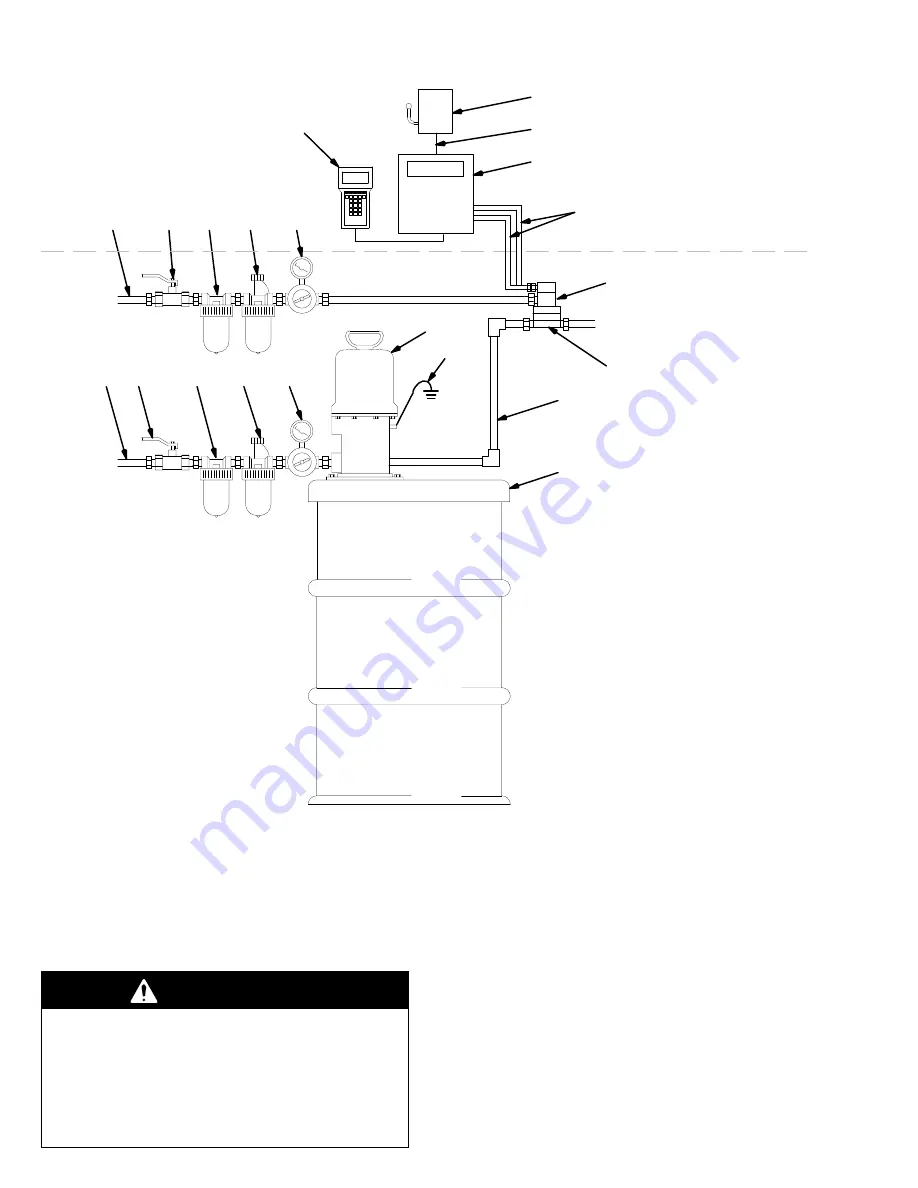
background image

4

308–287

Installation

A

B

2

C

D

E

G

H

B

1

C

D

E

F

J

K

KEY

A

Air Supply Line

B

Bleed-Type Air Supply Line 
Shut-off Valve 

(required)

C

Air Line Filter

D

Air Line Lubricator

E

Air Line Regulator

F

Pump

G

Fiber Optic Cable

H

Flow Meter

J

Fluid Supply Line

K

Fluid Supply

L

Main Power Switch

M

Pendant

N

Pump Grounding Wire 

(required)

P

Fluid Manifold

R

115V 60 Hz Electrical Supply

S

Controller

L

M

N

NON-HAZARDOUS AREA

HAZARDOUS AREA

A

P

01848

R

S

The PRO Pulse Volumetric Flow Meter is designed to
detect the pulses induced on a magnetic sensor each
time a gear tooth passes by the sensor. A specific
volume of fluid flows through the meter with each gear
tooth rotation. See the front cover for the specific fluid
volume flow of your meter.

Installing the System

WARNING

To help reduce the risk of serious injury, including
splashing in the eyes or on the skin, the bleed-type
air shut-off valve (B

1

) must be installed in the

system to relieve air trapped between this valve
and the pump after the air is shut off. Trapped air
can cause the pump to cycle unexpectedly. Locate
the valve close to the pump.

The Typical Installation shown above is only a guide
for selecting and installing the flow meter. For assis-
tance in designing a particular type and size system for
your application, contact your Graco representative.

Install the air line accessories in the order shown in the
Typical Installation, using adapters as necessary.

Connect the air line to the Flow Meter by pressing the
front ferrule (D) and back ferrule (C) onto the tubing
(A). See Fig. 1. Press the assembly into the fitting (E)
and tighten the nut (A). Connect the fiber optic cables
by pressing the front ferrule (L) and back ferrule (K)
onto the cable (G).

The maximum fiver optic cable length is 100 ft (30.5
m) with two splices. See Accessories on page 14 to
order cables.

Summary of Contents for 235-402

Page 1: ... Class I Group D hazardous environment 2800 psi 19 6 MPa 196 bar Maximum Working Fluid Pressure 50 psi 350 kPa 3 5 bar Maximum Working AirPressure Part No 235 402 Series A Flow Meter with 0 1 cc per tooth fluid volume flow Model 235 403 Series A Flow Meter with 0 4 cc per tooth fluid volume flow NOTE See the Accessories section to order Fiber Optic Cables and to order the Fluid Manifold U S and Fo...

Page 2: ...but it is a serious injury Get immediate medi cal attention Do not stop or deflect fluid leaks with your hand body glove or rag Follow the Pressure Relief Procedure on page 6 whenever you are instructed to relieve pres sure stop operation or clean check or service the equipment and install or clean the spray tip Tighten all the fluid connections before operating the equipment Check the hoses tubes...

Page 3: ...ts and accessories D Check the equipment daily Repair or replace worn or damaged parts immediately D Do not exceed the maximum working pressure of the lowest rated system component This equip ment has a 2800 psi 19 6 MPa 196 bar maximum working pressure D Use fluids that are compatible with the equipment wetted parts See the Technical Data section of all the equipment manuals Read the fluid manufa...

Page 4: ...ury including splashing in the eyes or on the skin the bleed type air shut off valve B1 must be installed in the system to relieve air trapped between this valve and the pump after the air is shut off Trapped air can cause the pump to cycle unexpectedly Locate the valve close to the pump The Typical Installation shown above is only a guide for selecting and installing the flow meter For assis tanc...

Page 5: ...L B 01849 Check the Electrical Grounding WARNING Proper electrical grounding of your system is essential when used with flammable or combustible liquids For you safety read the warning section FIRE EXPLOSION AND ELECTRIC SHOCK HAZARD on page 2 Have a qualified electrician check the electrical grounding continuity between the flow meter electrical chassis and a true earth ground as shown in Fig 2 I...

Page 6: ...efore starting to operate the system to help ensure you of safe efficient opera tion Be sure all operators are properly trained and qualified to safely operate your system Be sure all operators are trained how to properly and completely relieve system pressure according to the Pressure Relief Procedure at left Be sure the system is thoroughly grounded See FIRE EXPLOSION AND ELECTRIC SHOCK HAZARD p...

Page 7: ...ible solvent as instructed at right Flushing the Meter WARNING To reduce the risk of serious injury whenever you are instructed to relieve pressure always follow the Pressure Relief Procedure on page 6 1 Relieve the pressure 2 Connect the fluid line to the solvent supply unit 3 Flush the meter until it is clean 4 Relieve the pressure then disconnect the fluid line from the solvent supply unit 5 Re...

Page 8: ...low meter Turbine alternator not working Check for dirt or moisture in turbine Faulty turbine alternator Be sure plug is in place on back of turbine alternator housing Remove and test alternator Excess moisture in air lines Use filter moisture separator Turbine not connected to PC board Connect 3 pin connector to square pins Top PC board not connected to bot tom PC board Tighten bolts to compress ...

Page 9: ...d will not function properly if removed Fig 3 G B E F A C Torque to 7 5 ft lb 10 N m D 01851 KEY A Screw B Electronic Module C O Ring D Manifold E Top Gear Housing F Gear Housing Assy G Fiber Optic Cable Replacing the Turbine Alternator 1 Remove the top chassis 3 from the bottom chassis 2 See Fig 4 2 Disconnect the 3 pin connector J from the square pins H 3 Carefully pull the alternator 4 away fro...

Page 10: ...e in the center to press out the bearings and spacers 6 Press the bearing tool with an arbor press or tap it with a soft hammer until the bearings and spacers are removed Repeat with the other gear To install the kit parts and assemble the gear housing 1 Place a gear on a flat surface Position the bear ings P spacers R and S and the bearing tool T as shown in Fig 7 2 Press the bearing tool with th...

Page 11: ... U Flat Surface T S L R P P U Parts Bearing Repair Kit 223 276 For Meter Model 235 402 with 0 1 cc per tooth fluid volume flow Bearing Repair Kit 223 277 For Meter Model 235 403 with 0 4 cc per tooth fluid volume flow Bearing Repair Kits include the following parts Ref Letter Description Qty C O RINGS not shown See Fig 3 2 or 4 K WASHER 4 M O RING 1 P BEARINGS 4 R INNER SPACER 2 S OUTER SPACER 2 T...

Page 12: ... Part No 235 402 Series A 0 1 cc per tooth fluid volume flow 7 6 8 5 13 14 2 3 4 28 29 30 15 12 10 2a 1 4a 11 16 17 Model 235 402 only Model 235 403 only 9 1a 1b Part No 235 403 with 0 4 cc per tooth fluid volume flow ...

Page 13: ... 7 186 853 FLAME ARRESTOR 1 8 110 420 SCREW cap 10 24 x 1 5 6 9 111 308 SCREW top mounting M4 x 0 7 x 30 mm long 2 Ref No Part No Description Qty 10 186 922 FITTING valve 1 11 107 107 WASHER flow 1 12 186 921 BODY 1 13 101 435 BALL 1 14 108 046 SPRING 1 15 186 923 RETAINER 1 16 187 125 LABEL warning 1 17 187 124 LABEL warning 1 28 111 284 NUT tube fitting 1 4 OD 2 29 111 285 FERRULE back 1 4 OD 2 ...

Page 14: ... Connector 224 261 For connection between two fiber optic cables Grounding Clamp and Wire 222 011 12 ga 25 ft 7 6 m wire Fluid Manifold Contact your local Graco representative to order proper manifold Part No 223 869 Part No 624 708 0186 0187 Fluid Filter 223 160 5000 psi 35 0 MPa 350 bar Maximum Working Pressure Stainless steel bowl and polyethylene support NOTE This filter has a 60 mesh screen T...

Page 15: ... Fluid Pressure 2800 psi 19 6 MPa 196 bar Maximum Working Air Pressure 50 psi 350 kPa 3 5 bar Fluid Pressure Operating Range 0 2800 psi 0 19 6 MPa 0 196 bar Air Pressure Operating Range 20 50 psi 140 350 kPa 1 4 3 5 bar Air Inlet 1 4 inch OD tube Maximum Fiber Optic Cable Length 100 ft 30 5 m with two splices Wetted Parts Stainless Steel PTFE Manual Change Summary This manual was revised to includ...

Page 16: ...to incidental or consequential damages for lost profits lost sales injury to person or property or any other incidental or consequential loss shall be available Any action for breach of warranty must be brought within two 2 years of the date of sale GRACO MAKES NO WARRANTY AND DISCLAIMS ALL IMPLIED WARRANTIES OF MERCHANTABILITY AND FITNESS FOR A PARTICULAR PURPOSE IN CONNECTION WITH ACCESSORIES EQ...

Reviews: