


16
17
Parental Controls (V-Chip)
1. Press the Source button to switch to TV mode.
2. Press the Setup button.
3. Press the Arrow (
) buttons to highlight Lock, and press the Enter button.
4. Enter the default passcode to access the Lock preferences. The default passcode is 0 0 0 0.
5. From this menu, you can lock out specific ratings from the United States rating system or the Canadian
rating system by accessing the V-CHIP settings. You can also lock the buttons on the television or lock
specific sources from access.
Setting Favorites
1. Press the Source button to switch to TV mode.
2. Press the Setup button to access the setup menu.
3. Press the Arrow (
) buttons to highlight the Channel icon. Press the Enter button.
4. Press the Arrow (
) buttons to highlight the Favorites icon. Press the Enter button.
5. Use the Arrow (
) buttons to select the desired channels and then press the Enter button.
Viewing Favorites
1. Press the Source button to switch to TV mode.
2. Press the Favorites button to view a list of your saved favorites.
Setting the Clock
1. Press the Setup button to access the setup menu.
2. Press the Arrow (
) buttons to highlight the Time icon, and press the Enter button.
3. Press the Arrow (
) buttons to highlight Time Zone, and press the Arrow (
) buttons to select your
current time zone.
4. Press the Arrow(
) buttons to highlight Auto Clock, and press the Arrow(
) buttons to turn auto clock on
or off. When the correct time zone is set, auto clock will automatically set your clock and date for you.
5. To set the time and date manually, turn Auto Cock off, highlight Clock, and use the Arrow and Enter buttons to
manually set the time and date.
Settings
Auto Scanning for Channels
The Auto Channel Scan must be run before any channels can be viewed on the television. Initial channel scanning
process may take up to 15 min.
1. Press the Source button to switch to TV mode.
2. Press the Setup button to access the Setup menu.
3. Press the Arrow (
) buttons to highlight the Channel icon, and press the Enter button.
4. Press the Arrow (
) buttons to highlight AIR/Cable, and press (
) to select AIR.
5. Press the Arrow (
) buttons to highlight Auto Scan, and press the Enter button to begin scanning
for available channels.
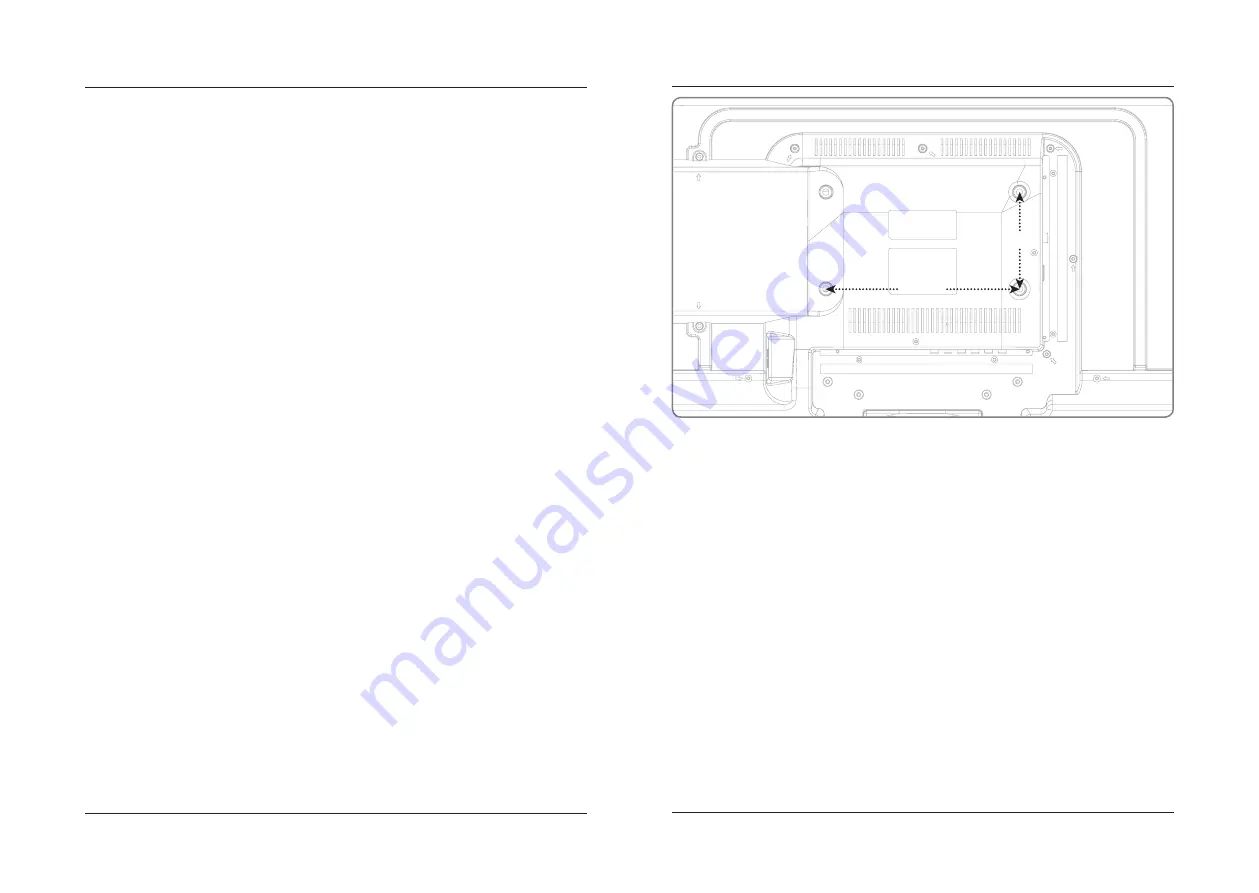
100mm
200mm
VESA Specifications
• 200mm x 100mm spacing (wth. x ht.)
• M6 bolt pattern and thread pitch
A 15 to 25mm long bolt is recommended, depending on the thickness of the wall bracket selected.
WE STRONGLY RECOMMEND HAVING THIS TELEVISION MOUNTED PROFESSIONALLY.
Mounting to a Wall
Summary of Contents for TDE3274-v1508-01
Page 10: ...18 19 Notes...