background image

8

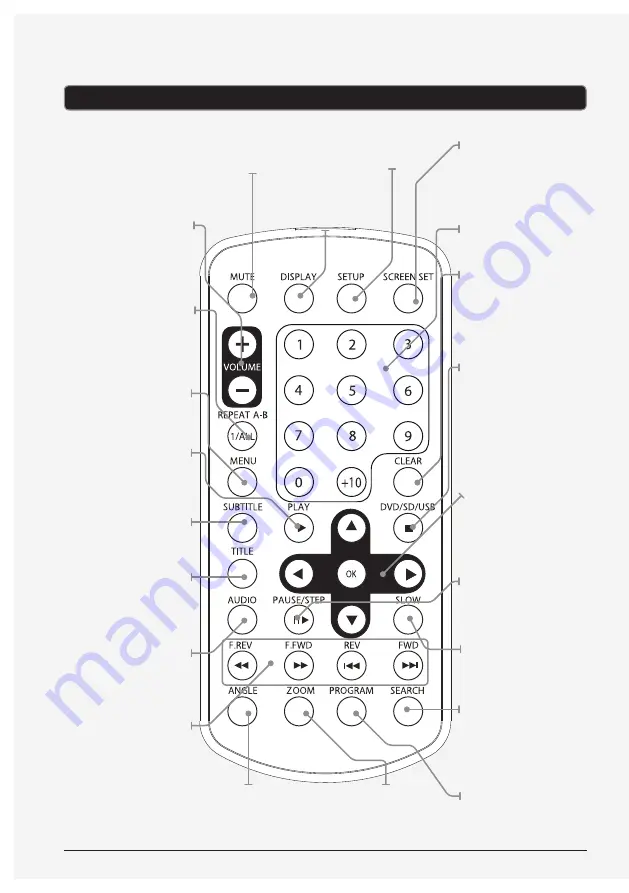
Introduction - Remote

VOLUME (±)

Press to adjust the 

volume.

REPEAT A-B/1/ALL

Press repeatedly to 

repeat a track, chapter, 

title, or entire disc, or to 

create a repeating A-B 

loop.

MENU

Press to access the 

loaded DVD’s main 

menu.

PLAY

Press to play a loaded 

disc.

SUBTITLE

Press repeatedly to 

cycle through available 

subtitle options.

TITLE

Press to access the 

loaded DVD’s title 

menu.

AUDIO

Press repeatedly to 

cycle through available 

audio options.

F.REV/REV/

F.FWD/FWD

Press to skip between 

tracks or chapters. Press 

to search through the 

current chapter or track.

SCREEN SET

Press to adjust the 

brightness and color 

on the primary display. 

Press and hold turn off 

the primary display.

NUMBER KEYPAD

CLEAR

Press to clear numbers 

entered using the 

number keypad.

STOP/DVD/SD/USB

Press to stop a disc 

during play. Press 

and hold and use the 

ARROW/OK buttons to 

choose between DISC, 

USB, and CARD.

ARROWS (

▼▲◄►

)/

OK

Press to navigate on-

screen menus. Press 

to make selections in 

on-screen menus.

PAUSE/STEP

Press to pause a loaded 

disc. Press repeatedly to 

step through a DVD one 

frame at a time.

SLOW

Press repeatedly to view 

a DVD in slow motion.

SEARCH

Press and enter a track, 

chapter, title, or time to 

skip directly to on the 

loaded disc.

PROGRAM

Press to program a 

loaded disc to play 

tracks or chapters in a 

specified order.

ZOOM

Press repeatedly to 

zoom in or out on a 

playing DVD.

SETUP

Press to access the 

setup menu.

DISPLAY

Press to view the on-

screen display.

ANGLE

Press to view alternate 

angles on supported 

DVDs.

MUTE

Press to mute the 

volume.

Summary of Contents for ONNPD7711B

Page 1: ...USER S GUIDE V 1602 0715 11 For the most up to date version of this User s Guide go to www gpx com ONNPD7711B Dual 7 DVD Player with Built in Rechargeable Battery...

Page 2: ...surface WARNING Use of this unit near fluorescent lighting may cause interference regarding use of the remote If the unit is displaying erratic behavior move away from any fluorescent lighting as it m...

Page 3: ...l qu un vase ne doit tre plac sur l objet Main plug is used as disconnect device and it should remain readily operable during intended use In order to disconnect the apparatus from the mains completel...

Page 4: ...a DC car adapter included AC power requires an AC DC power adapter included DC battery power built in rechargeable lithium polymer battery DC power requires a DC car adapter included AC power require...

Page 5: ...y Display Power Secondary Display Remote DVD and CD 10 Loading a Disc Playing a Loaded Disc Programming a Loaded Disc Setup Menu Contents Memory Card Slot 13 Connecting a Memory Card Accessing Content...

Page 6: ...to access the setup menu PLAY PAUSE Press to play or pause a loaded disc F REV REV F FWD FWD Press to skip between tracks or chapters Press and hold to search through the current chapter or track DC P...

Page 7: ...5 7 Introduction Secondary Display BRIGHTNESS Press to adjust the brightness COLOR Press to adjust the color VOLUME Press to adjust the volume DC POWER INPUT POWER Adjust to turn the power off or on S...

Page 8: ...mary display NUMBER KEYPAD CLEAR Press to clear numbers entered using the number keypad STOP DVD SD USB Press to stop a disc during play Press and hold and use the ARROW OK buttons to choose between D...

Page 9: ...rechargeable battery POWER CHARGE INDICATOR Off Fully Charged or Powered Off Red Charging Green Powered On DC power input requires an AC DC power adapter included or DC car adapter included Requires 1...

Page 10: ...player label side facing up 3 Manually close the disc door After a disc is loaded it will begin playing automatically Playing a Loaded Disc 1 Follow the instructions for Loading a Disc 2 If the disc d...

Page 11: ...oading a Disc and Playing a Loaded Disc 2 While the loaded disc is playing press the PROGRAM button on the remote 3 Use the NUMBER KEYPAD and ARROW buttons to enter in tracks or chapters and titles in...

Page 12: ...IES WITH PART 15 OF THE FCC RULES AND DHHS STANDARDS 21 CFR SUBCHAPTER J AT DATE OF MANUFACTURED OPERATION IS SUBJECT TO THE FOLLOWING TWO CONDITIONS 1 THIS DEVICE MAY NOT CAUSE HARMFUL INTERFERENCE A...

Page 13: ...MC memory card to the MEMORY CARD SLOT Supports JPEG MP3 MPEG1 and MPEG2 1 Follow the instructions for Connecting a Memory Card 2 Press and hold the STOP USB CARD button and press the ARROW and OK but...

Page 14: ...to the USB PORT Supports JPEG MP3 MPEG1 and MPEG2 1 Follow the instructions for Connecting a USB thumb drive 2 Press and hold the STOP USB CARD button and press the ARROW and OK buttons to switch to...

Page 15: ...be seen on the secondary display Requires a 3 5mm to 3 x RCA audio video adapter included and an RCA audio video cable not included 1 Connect the 3 5mm to 3 x RCA audio video adapter to the 3 5mm AUDI...

Page 16: ...ng green office procedures other initial program efforts include Reduction of all packaging sizes Recyclable plastics for clamshell packages with a plan to eventually replace plastic with recyclable p...

Reviews: