

Connecting the Unit to a Computer
Playing Music on the Unit
Searching for Music on the Unit
Loading Music onto the Unit
Loading Music onto the Unit
Loading Music onto the Unit
Step 1:
Slide the
USB Release Button
to expose the
USB Connection
.
Step 2:
Insert the
USB Connection
into a USB Port on a computer.
• Please note, USB connections will only fit one way. Avoid using excessive force
to reduce the chances of damaging the unit or the computer.
• Please note, the connected computer must be powered on in order for music to
be loaded onto the unit from the computer.
Step 1:
Slide the
Power/Hold Button
to the On position.
Step 2:
Connect a set of earbuds or headphones to the
Headphone Jack.
Step 3:
Press the
Play/Pause Button
to begin playing music that has been loaded onto the
unit.
Step 1:
While playing music on the unit, press the
Play/Pause Button
to pause the unit.
Step 2:
Press and hold the
Mode Button
to access the
Search
feature.
Step 3:
Press the
Mode Button
to search by
Filename
,
Song, Artist,
or
Album.
Step 4:
Press the Play button
Step 5:
Press the
Skip/Search Buttons
to change the characters, and press the
Mode Button
to select the chosen character.
Step 6:
Repeat step 5 until the filename, song, artist, or album you are searching for has been
spelled, then press the
Play/Pause Button
.
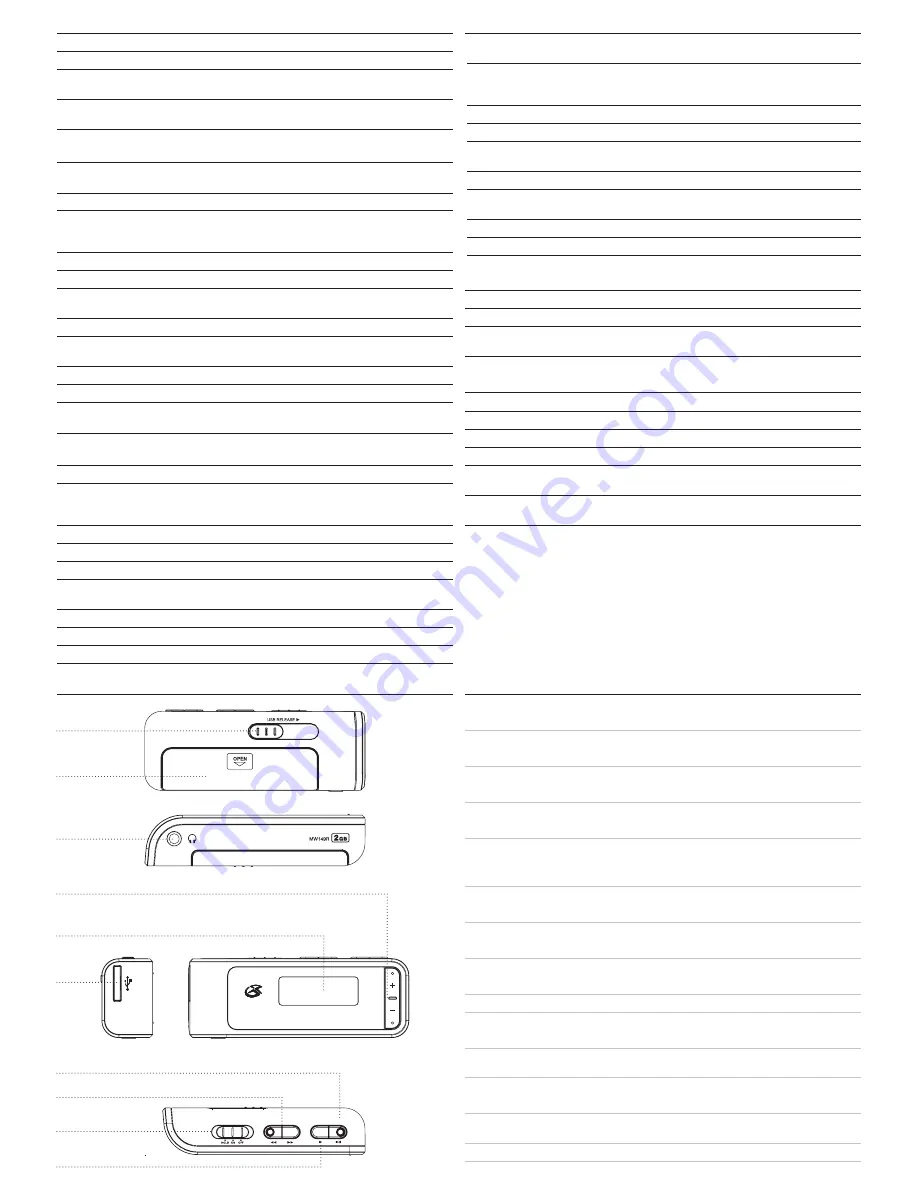
Locations of Controls
Control Definitions
1.
USB Release Button
Slide the USB Release Button to expose or retract the USB connection.
2.
Battery Compartment
(Requires 1 AAA battery, not included)
3.
Headphone Jack
Use the Headphone Jack to connect a set of headphones or earbuds to the unit.
4.
Volume Buttons
Press the Volume Buttons to adjust the volume of the unit.
5.
LCD Display
The LCD Display presents the current song’s ID3 tag information, digital track number,
volume indicator, power indicator, and current mode.
6.
USB Connection
Use the USB connection to connect the unit to a computer.
7.
Play/Pause Button
Press the Play/Pause Button to play or pause an audio track.
8.
Skip/Search Buttons
Press the Skip/Search Buttons to skip between audio tracks.
Press and hold the Skip/Search Button to search through an individual audio track.
9.
Power/Hold Button
Adjust the Power/Hold Button to On or Off to power the unit on or off.
Adjust the Power/Hold Button to the Hold position to lock the unit’s buttons so that they
cannot be accidentally pressed.
10. Mode Button
Press the Mode Button to switch between Repeat 1, Repeat All, Random, and no mode at all.
Press and hold the Mode Button to cycle through the available preset EQ settings. (Normal,
Pop, Rock, Classic, Jazz and Bass)
In
Pause Mode
, press and hold the Mode Button to enter
Search Mode
.
1
2
3
6
9
10
7
8
4
5
If you are using Windows XP with Windows Media Player 10 , you will need to follow these
instructions.
Note: You will be able to download purchased/subscribed songs to the unit.
Step 1:
Start Windows Media Player 10 and then connect your unit to your computer. If you
have not set up synchronization between your computer and this device, the Device
Setup Wizard starts.
Step 2:
In the Device Setup Wizard, select Manual.
Step 3:
Click Finish. The wizard closes and the Sync feature in the Player is displayed.
Step 4:
Select the Library option. On the left pane select Sync List.
Step 5:
From the left pane you can select All Music or My Playlists and you will see the
songs located within these folders in the center pane.
Step 6:
Select the songs from the center pane, and drag them to the Sync List.
Step 7:
Click the Start Sync button on the Sync List pane.
Step 8:
Repeat steps 4-7 for any other items that you want to copy to your unit.
If you are using Windows 2000 , Windows 98SE , and Windows ME with Windows Media Player 9,
you will need to follow these instructions.
Note: You will not be able to transfer purchased/subscribed songs to this unit using Windows
Media Player 9. You need Windows XP with Windows Media Player 10 to do so. However, you
will be able to download regular MP3/WMA songs.
Step 1:
Start Windows Media Player 9 and then connect your unit to your computer.
Step 2:
Click Copy to CD or Device.
Step 3:
In the Items to Copy pane, in the drop-down list, select the playlist, category, or
other collection that you want to copy.
Step 4:
Check the box next to any file you want to transfer to your mp3 player.
Step 5:
In the Items on Device pane, in the drop-down list, click the device to where you
want your music files transferred.
Step 6:
Click the Copy button.
Step 7:
Repeat steps 2-5 for any other items that you want to copy to your unit.
If you are using Windows Vista with Windows Media Player 11 , you will need to follow these
instructions.
Note: You will be able to download purchased/subscribed songs to the unit.
Step 1:
Start Windows Media Player 11 and then connect your unit to your computer. If you
have not set up synchronization between your computer and this device, the Device
Setup Wizard starts.
Step 2:
In Device Setup - Configure Sync, write a name for your mp3 player.
Step 3:
Click Finish. The window closes and the Sync feature is displayed.
Step 4:
From the left pane of this Sync feature, you can select from Pictures, Music, and
Video.
Step 5:
After selecting a category, select the desired songs from the center pane.
Step 6:
Drag these songs, pictures, or video into the Sync List, which is the right pane of the
Sync feature.
Step 7:
Click the Start Sync button on the Sync List pane.
Step 8:
Repeat steps 4-7 for any other items that you want to copy to your unit.


