

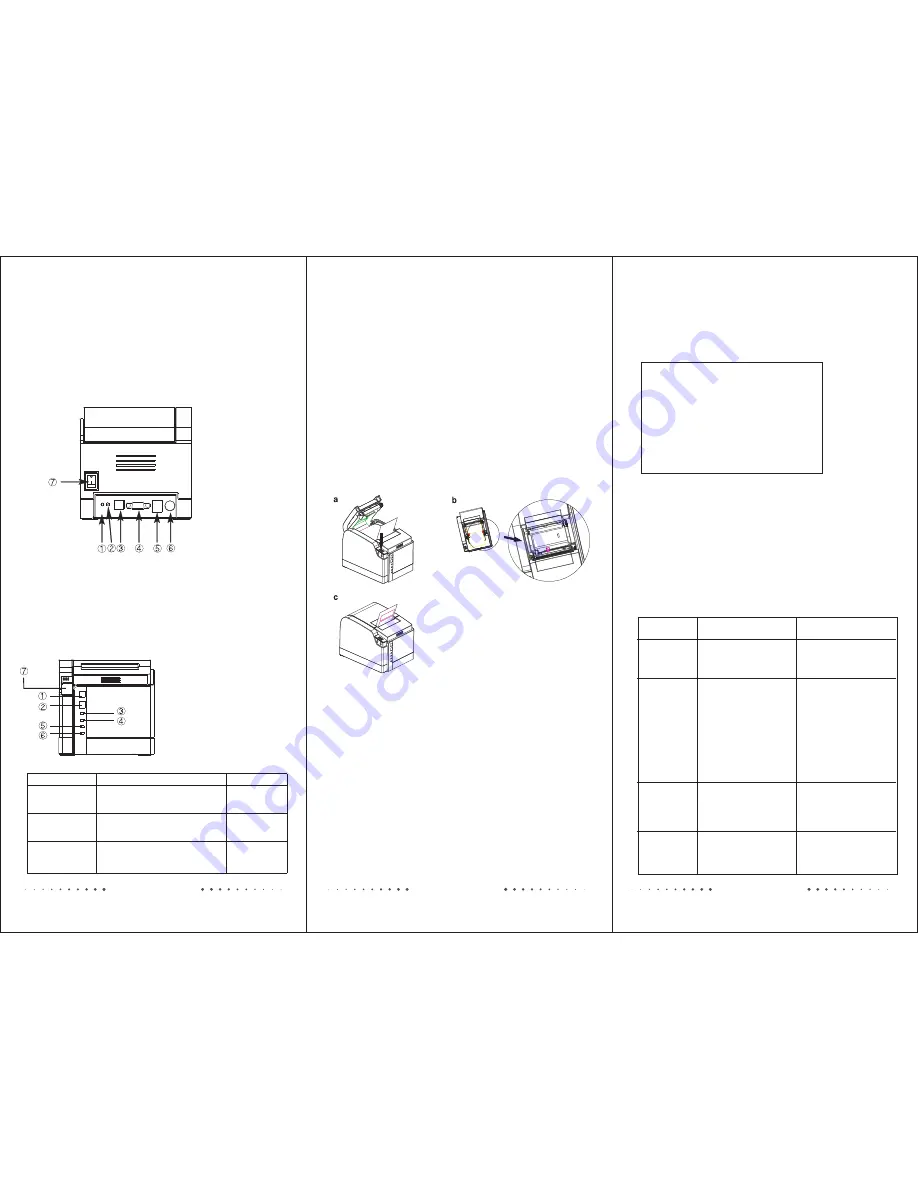
Printer connection:
Plug the power cable connector into the printer’s power port
properly.
Plug the USB cable connector into the printer’s USB port
properly.
Plug the cash drawer’s RJ-11 phone jack into the printer’s
cash drawer port properly.
1
.
Connection status indicator
2. Function button
3
.
USB port
4
.
Serial
port
5
.
Cashdrawer
port
6
.
Power port
7. Power switch
Indicators, Beeper and Buttons:
1
.
2. PAUSE button
3
.
Error indicator (Red)
4
.
Online/power indicator (Blue)
5
.
Label mode indicator (Orange)
6
.
Receipt mode indicator (Green)
7
.
Top cover open button
FEED button
Beeper
Indicators
Status
Red light (ERROR indicator)
flashes fast, Blue light (ONLINE
indicator) is OFF.
Red light (ERROR indicator)
flashes 2 times then dims, Blue light
(ONLINE indicator) is OFF.
Red light (ERROR indicator)
and
Blue light (ONLINE indicator)
flashes
.
alternately
Printer cover is
open
Paper
shortage
or gap sensor
calibrated error
Beep continuously
Beep 2 times
alternately
Beep 1 time
alternately
Print head
overheated
Print self
-
test
page
Turn off the printer power, press and hold on FEED button, then
turn on the printer power, after printing out self-test page, release
FEED button.
Turn on the printer, press the function
button.
Turn off the printer power, press and hold on the PAUSE button
and FEED button, then turn on the printer power, after printing a
page showed current printer mode, release two buttons. Repeat
the steps above to change the printing mode in between label and
receipt mode.
Print interface
information page
Change print mode (label and receipt)
Paper Roll Installation
a:
b:
c:
Connect printer with computer via USB cable, and then turn on
the printer power, a U-Disk appears in computer, which saved
the driver software into a zipped package and driver installation
manual. Please copy to your local disk and refer to the manual
for driver installation.
Driver software
Interface information (Bluetooth as example)
Turn on the printer, press the FUNC button, the printer will
print a receipt showed interface information, such as below:
b.
a.
According to the interface information, enter Bluetooth PIN
0000 or 1234 for connecting to the APP and then printing.
The limiting block can
be left-right sliding.
a.
b.
c.
Press the button to open the top cover.
Fix the paper roll into slot, make sure
the label paper thread through the
Limiting block.
Close the top cover, pay attention to
the front and back of label paper as
picture showing.
If using label paper roll, please
install it correctly as shown in
the picture.
Thermal Barcode Printer
Thermal Barcode Printer
Thermal Barcode Printer
Barcode software installation
1.
2.
3.
When use computer, enter www.smarnet.cc to download
Nicelabel software for barcode editing.
When use Android device, enter www.smarnet.cc to download
Gprinter.APK or GprinterHD.APK for barcode editing.
When use iOS device, enter APP store to install GPRINTER
for barcode editing.
Troubleshooting
Problem
Possible Cause
Recovery Procedure
*
dirty.
The print head sensor is
* Please use soft brush to
clean the sensor.
The following guide lists the most common problems that may
be encountered when operating this printer. If the printer still
does not function after all suggested solutions have been
invoked, please contact the Customer Service Department of
your purchased reseller or distributor for assistance.
Power indicator
does not
illuminate
Power adapter or cable
doesn’t connect to printer.
Power switch isn’t turned
on.
Poor print
quality
* Poor media quality.
* The print head is dirty.
* The platen roller is dirty.
* Change proper media roll.
* Please use the lint-free
cloth with 100% ethanol
to wipe the print head and
the platen roller.
Printer doesn't
detect the paper.
Gap sensor
calibration
error
* Poor media quality.
*
*
*
Reinsert
power
adapter
or
cable
properly.
Turn on the power switch.
*
*
Change proper media roll.
Don’t use the paper
roll
with
poor quality
or thick
Backing Sheet.
try to re-calibrate the gap
sensor as blow steps:
Change the printing mode
in thermal receipt mode,
install the 100mm height
label roll and then long
press PAUSE button, the
printer will feed paper 4
times, calibration done.
*
Interface information
INTERFACE: USB2.0
USB Printer & Mass Storage Device
U-disk size: 4M
INTERFACE: BLUETOOTH BLE4.0 & BT3.0
BLUETOOTH NAME: Printer_6BB3
BLUETOOTH PIN: 0000
BLUETOOTH LINK: 1 A 1 iOS
BLUETOOTH ADDR: 00:18:E4:0C:6B:B3
CONNECTION: DISCONNECT
Blutooth name
Bluetooth PIN
Bluetooth link
Bluetooth address
Connection states


