

1
.
Introduction
Thanks for choosing GP-1124T,GP-1125T series direct thermal transfer label
printer.
This series printer is built with 2sets of gear to drive motor,with capability of
handling 300meters long ribbon and large label roll.Printer inner volume is fit for 5"
OD(Outer Diameter)paper roll,if using external paper holder,you can install 8.4"OD
industrial grade label roll.
This printer is designed for real-time and batch label printing,with standard serial,
parallel,USB and Ethernet connection port. Direct thermal printing and thermal
transfer printing modes are all in one printer body,so you can choose various kinds of
printing materials,for example:thermal paper,plain paper,coated paper,silver paper,
plastic paper etc.
Common 1D barcode and 2D barcode fonts are built inside printer,also it support 4
direction printing,characters can be enlarged from 1 to 10 times .Besides,it supports
5 different size bitmap fonts,OCR-A and OCR-B fonts,together with 203dpi higher
print resolution,this series printer are your best choice among the same class.
Declaration: This is a class A product,fit for Non Tropic regions installation.This
product may cause radio interference in life environment,users may need to takead-
equatepreventive measures.
1
.
1Application
Field
Manufacturing & Warehousing logistic industry
Product labeling and marking
Warehouse management label
Category marking label
Operation instruction marking label
Distributing instruction marking label
Healthcare Retail
Patients marking Price Label marking
Medicine marking Product item marking
Specimen marking Jewelry product marking
Parcel Post
Mailing label
Office & Studio
2
.
LED
indicator
and
Function
There
are
two
buttons
and
three
LED
indicators
,
many
functions
can
be
realized
through
using
different
button
,
indicator
and
power
on
/
off
switch
.
2
.
1LED
indicator
Direct
thermal
printing
method
.
LED
Indicator
status
Descriptions
Power
indicator
is
on
,
Error
indicator
is
off
.
Printer
is
powered
on
and
in
normal
printing
status
Power
indicator
flashes
every
640ms
,
Error
indicator
is
off
.
Printer
is
paused
Power
indicator
is
off
,
Error
indicator
goes
for
80ms
,
then
goes
off
for
160ms
,
printer
start
beeping
.
Printer
cover
is
opened
Power
indicator
is
off
,
Error
indicator
goes
on
for
500ms
,
then
goes
off
for
6s
.
Label
gap
detection
error
Power
indicator
is
off
,
Error
indicator
flashes
every160ms
,
after
two
times
flashing
,
Error
indicator
goesoff
for
320ms
,
printer
start
beeping
.
Paper
out
Power
indicator
is
off
.
Error
indicator
flashes
every160ms
,
after
three
times
flashing
.
Error
indicator
goes
off
for
320ms
,
printer
start
beeping
.
Black
mark
detection
error
Error
indicator
flashes
every
160ms
.
Printer
overheated
protection
mode
is
activated
.
After 1minute,the
printer CPU will check print head
temperature again.When
temperature return normal,printer
will work normally.
2
.
2Thermal
transfer
printing
LED
Indicator
status
Descriptions
Ribbon
indicator
is
on
.
R
ibbon
is
installed
successfully
Ribbon
indicator
flashes
every
300ms
,
beeper
sounds
every
2
.
4s
Ribbon
improperly
installed
:
no
ribbon
,
or
ribbon
end
,
or
ribbon
broken
Note
:
Beeper
function
can
be
enabled
through
setting
DIP
switch
.
3
.
Button
Function
1
.
Feed
When
t
he
p
rinter
i
s
r
eady
(
L
ED
b
lue
f
ixed
),
c
lick
t
he
b
utton
,
l
abel
p
aper
i
nto
the
front
end
of
a
paper
label
.
2
.
job
timeout
The
p
rinter
i
n
t
he
p
rint
,
c
lick
t
he
P
AUSE
b
utton
t
o
p
rint
s
uspended
.
A
t
t
his
time
power
indicator
is
blue
flashing
.
Just
click
the
button
,
the
job
resume
normal
.
3
.
Start
function
The
p
rinter
h
as
s
ix
k
inds
o
f
p
ower
f
unction
c
an
b
e
u
sed
t
o
s
et
o
r
t
est
t
he
printer
hardware
.
In
the
boot
and
press
the
button
with
lamp
signal
release
key
can
start
these
functions
.
Six
Power
-
up
Functions
:
Function
Descriptions
Self
-
test
page
DIP
Switch
page
Debugging
Mode
Skip
AUTO
.
BAS
program
Printer
Initialization
Ribbon
Detection
A
.
Turn
off
the
printer
.
B
.
Make
sure
the
paper
roll
is
installed
correctly
and
the
printer
top
cover
is
closed
.
C
.
Press
and
hold
FEED
button
and
turn
on
the
printer
.
Selftest
page
will
be
printed
,
then
release
FEED
button
.
You
can
use
this
function
to
check
if
printing
function
is
normal
or
not
.
A
.
Turn
off
the
printer
.
B
.
Make
sure
the
paper
roll
is
installed
correctly
and
the
printer
top
cover
is
closed
.
C
.
Press
and
hold
PAUSE
button
and
turn
on
the
printer
.
When paper feed and then release
FEED
b
utton
,
D
IP
switch
page
will
be
printed
out
.
A
.
Turn
off
the
printer
.
B
.
Make
sure
the
paper
roll
is
installed
correctly
and
the
printer
top
cover
is
closed
.
C
.
Press
and
hold
PAUSE
and
FEED
button
and
turn
on
the
printer
.
When
Power
indicator
(
blue
)
and
Error indicator
(red) are on at the same time,release
PAUSE
a
nd
F
EED
button
,
printer
goes
to
Debugging
Mode
,
and
you
will
find
below
page
printed
out
:
********************
*
NOW
IN DUMP MODE*
***********************
User can use TSPL2 command to save a code auto
running file(AUTO.BAS)into flash.When turn on
printer,printer will run the program automatically.
If you want to skip AUTO.BAS program on power-up
then follow below steps.
Press and hold PAUSE and FEED button,then turn on
the printer.When Power indicator(blue)is off and
Error indicator(red)is on,release PAUSE and FEED
button,printer will skip running AUTO.BAS program,
and then Power indicator will be on.
A
.
Turn
off
the
printer
B
.
Press
and
hold
PAUSE
and
FEED
button
,
then
turn
on
the
printer
.
When
Power
indicator
(
blue
)
is
on
and
Error
indicaor
(
red
)
is
off
,
release
PAUSE
and
FEED
button
,
all
data
in
printer
DRAM
will
be
cleared
and
printer
setting
will
be
restored
to
factory
default
setting
.
Then
power
indicator
will
be
on
and
printer
goes
to
ready
status
.
*
Factory
default
settings
do
not
include
ribbon
setting
.
When
printer
power
turn
on
,
or
it
is
in
thermal
transfer
printing
mode
,
printer
will
automatically
detect
ribbon
status
,
to
check
if
ribbon
installed
,
or
ribbon
end
,
or
work
normally
.
After
ribbon
detecting
,
printer
will
be
set
to
thermal
transfer
printing
mode
or
direct
thermal
printing
mode
and
close
ribbon
rolling
motor
function
.
5
.
Troubleshooting
5
.
1Common
problem
Below
the
table
of
contents
is
generally
the
common
problems
and
solutions
;
if
you
have
been
in
our
proposed
methods
of
eliminating
the
fault
,
and
the
printer
is
not
normal
operation
,
co
check
with
your
purchase
customer
service
department
,
so
as
to
get
more
help
.
Problems
Possible
Reasons
Solution
andSuggestion
Power
indicator
not
“
ON
”
Plug
to
AC
outlet
and
plug
to
printer
not
well
connected
Check
power
connector
and
AC
outlset
if
plugs
are
correctly
connected
Printer
power
not
turned
on
Turn
on
power
switch
head
not
well
closed
Close
head
by
pressing
whole
head
mechanism
(or 2arrow location)
Ribbon
end
C
hange
new
ribbon
Ribbon
improperly
installed
Refer
to
Ribbon
Installation
steps
in
User
Manual
to
re
-
install
ribbon
Label
paper
end
Change
new
label
paper
Label
paper
improperly
installed
Gap
sensor
detection
error
Adjust
paper
specification
and
again
Label
paper
jamed
inside
printer
Clear
jamed
paper
Refer
to
Paper
Installation
steps
in
User
Manual
to
re
-
install
paper
Not
printing
Serial
cable
improperly
connected
1
.
Check
if
Pin
configuration
in
cable
two
sides
are
matching
each
other
;
2
:
Check
if
baud
rate
setting
on
PC
and
printer
are
the
same
,
If
in
TPSL
,
command
mode
,
We
suggest
960
,
n
,
8
,
1to
ensure
higher
reliability
.
3
.
Change
a
new
cable
USB
cable
improperly
connected
Check
if
USB
cable
connected
well
or
change
a
new
cable
Not
printing
Ethernet
cable
improperly
connected
1
.
Check
if
RJ
-
45
green
/
orange
LED
indicator
is
on
.
When
printer
receive
and
process
printing
data
,
LED
will
be
orange
color
;
2
.
Check
if
printer
IP
is
assigned
in
DHCP
mode
3
.
Check
if
fixed
IP
address
is
correctly
set
in
printer
property
.
Wait
for
some
minutes
to
make
sure
printer
is
connected
server
and
printing
a
selftest
page
to
confirm
printer
IP
address
.
4
.
Change
a
new
ethernet
cable
.
Ribbon
non
standard
Check
if
ribbon
model
and
specification
Ribbon
printing
side
wrong
installed
Check
and
re
-
install
ribbon
to
make
sure
printing
side
touch
label
paper
head
not
clean
Clean
head
and
again
density
setting
wrong
Suggest
density
set
to
be
7
head
cable
not
well
connected
Re
-
connect
head
cable
Step
Motor
cable
not
well
connected
Re
-
connect
step
motor
cable
Command
setting
wrong
Check
if
there
is
command
at
the
end
of
printing
file
;
or
if
there
is
CRLF
command
at
the
end
of
every
line
.
Not
good
printing quality
Ribbon and label improperly
installed
Re-install ribbon and/or label
Too much dust or adhesive
on print head
Print head damaged
Clean print head and print
again
Take selftest page to check if
printing are completely to
confirm if necessary to
change new print head
Data
miss
printing
in
one
or
two
sides
Label paper size wrong
setting
Check if label size set
correctly and same as your
label paper
Ribbon
wrinkle
Print head unbalanced stress;
ribbon & label improperly
installed;
Label feeding not smoothly
Reset the label print density
and adjust paper width
fixing stand to fit your label
paper size
Printing
not
stable
Printer in HEX Dump mode or
RS-232 setting wrong
Restart your printer and leave
Dump Mode or reset RS-232
PARAMETER
4
.
DIP
SWITCH
FUNCTION
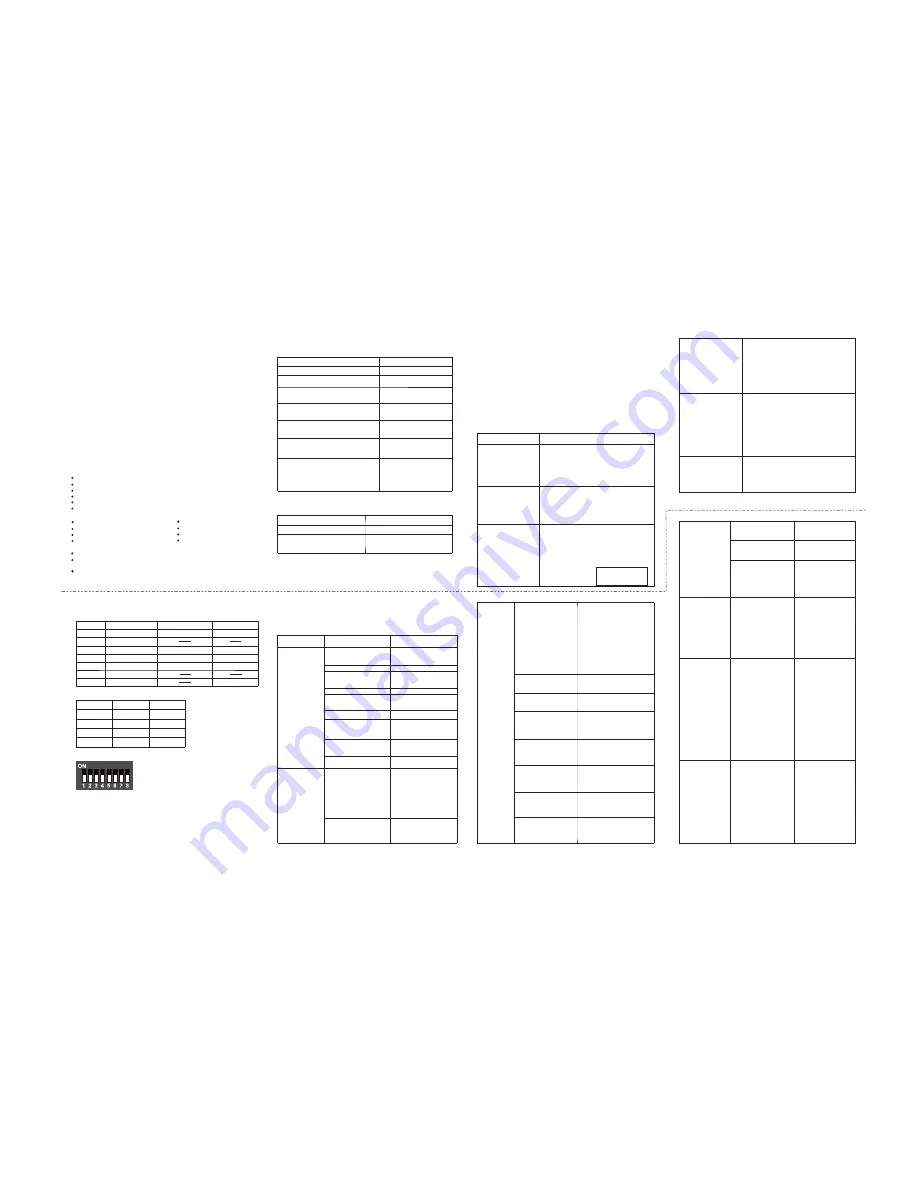
DIP No. Function ON OFF
1 Beeper Disabled Enabled
2 Reserved
3 Ribbon detect Disabled Enabled
4 Sensor High sensitivity Normal Sensitivity
5 Power on paper feed Disabled Enabled
6 Reserved
7&8 Baud rate set Default value
BAUD RATE:
7 8 BAUD RATE
OFF OFF 9600*
OFF ON 19200
ON OFF 38400
ON ON 115200
*is default value.


