background image

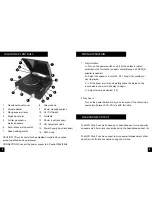
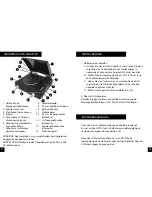
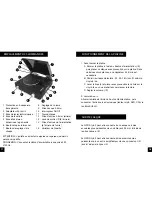
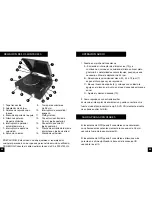
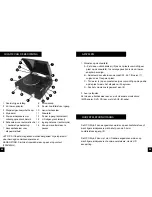
1.  Tapa translúcida 

9.  Toma para auriculares 

2.  Adaptador de 45 rpm 

  de 3,5 mm

3.  Palanca de reproducción  

10.  Interruptor de encendido/ 

  /pausa 

  apagado

4.  Brazo de soporte de la aguja  11.  Plato giratorio 

5.  Altavoces estéreo 

12.  Conector de entrada de  

  de gama dinámica 

  3,5 mm (parte posterior)

6.  Interruptor de parada l 

13.  Conector de salida I/D 

  automática/manua 

  (parte posterior)

7.  Interruptor de ajuste de 

14.  Clavija de entrada de toma de 

  velocidad 

  alimentación (parte de atrás)

8.  Botón de volumen 

15.  Mando de velocidad  


PRECAUCIÓN: Esta unidad no debe ajustarse ni repararse por 

cualquier persona, a no ser que sea personal de servicio cualificado.

CONEXIÓN: Conecte el cable de alimentación de CA a 230 V/50 Hz. 

UBICACIÓN DE LOS CONTROLES

1

2

3

4

5

6

7

8

9

10

5

11

12

13

15

14

1

2

2

2

4

5

6

7

8

9

0

11

12

13

15

14

1. Puesta en marcha del tocadiscos

A - Encienda el interruptor de alimentación (10) y, a 

continuación, coloque con cuidado el disco sobre el plato 

giratorio. En determinadas circunstancias, puede que sea 

necesario utilizar el adaptador de 45 rpm.

B - Seleccione la velocidad del disco: 33, 45 o 78 rpm (7) 

según el disco que vaya a reproducir.

C - Eleve el brazo de soporte (4) y coloque con cuidado la 

aguja en el disco en el punto en el que desee que empiece a 

sonar.

D - Ajuste el volumen deseado (10).

2. Cómo reproducir con entrada auxiliar

Encienda el interruptor de alimentación, puede conectar a otra 

fuente musical (reproductor de mp3, DVD, CD) mediante el cable 

de entrada auxiliar AUX-IN.

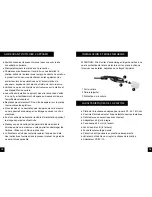
OPERACIÓN AUDIO

El tocadiscos de GPO puede 2 conectarse con auriculares o 

con altavoces más potentes mediante la conexión de 3,5 mm 

usando la toma de los auriculares (9).

El tocadiscos de GPO puede 2 conectarse a altavoces más 

potentes o a otro amplificador a través de la conexión I/D 

usando la línea I/D.

SALIDA PARA AURICULARES

23

24

Summary of Contents for STYLO

Page 1: ...RECORD PLA YER USER MANUAL UPDATED MARCH 2017 ...

Page 2: ...1 2 English 3 German 8 French 14 Spanish 20 Dutch 26 Warranty Support EN 34 CONTENT ...

Page 3: ...plugged during long period of inactivity Do not attempt to clean the unit with chemical solvents as this might damage the finish Use a clean dry cloth The user shall not try to maintain device beyond that which is described in this information form The guarantee would negate READ BEFORE OPERATION 3 speed turntable fit suitable to play at 33 45 78 rpm Belt drive and semi automatic play tone arm Cer...

Page 4: ...1 12 13 15 14 1 Play turntable A Turn on the power switch knob 10 then place a record carefully on the turntable In certain circumstances 45 RPM 2 adapter is needed B Select the speed of record 33 45 78rpm 7 according to vinyl to played C Lift the boom arm 4 and carefully place the stylus on the record where you would like play to begin D Adjust volume as desired 10 2 Play Aux in Turn on the power...

Page 5: ...roper care and attention must be taken to avoid damage to the unit 1 Safety first Ensure the unit is unplugged from the power 2 Holding the stylus boom arm steady carefully slide the red portion of the tip from the end of the boom arm housing you may need to tease the clip out with your thumbnail 3 Add the replacement stylus by simply sliding it back on to the end of the boom arm where you removed...

Page 6: ...rden Benutzen Sie keine chemischen Lösungsmittel zum Reinigen des Gerätes da diese die Oberfläche beschädigen könnten Verwenden Sie ein sauberes trockenes Tuch Der Benutzer darf nicht versuchen das Gerät über die in hinaus instand 2u Halten Die garantie kan dadurch venfallen BITTE VOR VERWENDUNG LESEN Plattenspieler mit drei Geschwindigkeiten passend für 33 45 78 rpm Riemenantrieb und halbautomati...

Page 7: ...eler abspielen A Drehen Sie den Ein Aus Schalter 10 und legen Sie dann vorsichtig eine Schallplatte auf den Plattenspieler In bestimmten Fällen wird ein Adapter für 45 rpm benötigt B Stellen Sie die Geschwindigkeit ein 33 45 78rpm 7 je nach abzuspielender Schallplatte C Heben Sie den Tonarm 4 an und setzen Sie den Stift vorsichtig an die Stelle der Schallplatte an der Sie das Abspielen beginnen mö...

Page 8: ...anspruchsvoll daher muss mit der notwendigen Vorsicht gehandelt werden um Schäden am Gerät zu vermeiden 1 Sicherheit geht vor Stellen Sie sicher dass das Gerät von der Stromversorgung getrennt ist 2 Fixieren Sie den Tonarm und schieben Sie den roten Bereich der Spitze vom Ende des Tonarms zum Tonarm Gehäuse eventuell müssen Sie den Clip mit dem Fingernagel verschieben 3 Setzen Sie den neuen Stift ...

Page 9: ...limentation pendant les longues périodes d inactivité N essayez pas de nettoyer l appareil à l aide de solvants chimiques dans la mesure où cela pourrait endommager les finitions Utilisez un chiffon propre et sec L utilisateur ne doit pas tenter de réparer l appareil au delà des instructions fournies dans le présent manuel La garantie ne serait plus applicable À LIRE AVANT D UTILISER L APPAREIL Pl...

Page 10: ...15 14 1 Faire tourner la platine A Allumer la platine à l aide du bouton d alimentation 10 puis placer un disque avec précaution sur la platine Dans certaines circonstances un adaptateur 45 tr min est nécessaire B Choisir la vitesse de lecture 33 45 78 tr min 7 selon le vinyle à lire C Lever le bras 4 et placer avec précaution la cellule sur le vinyle là où vous souhaitez commencer la lecture D Ré...

Page 11: ...opération est assez délicate et nécessite donc un soin et une attention particuliers pour éviter d endommager la platine 1 La sécurité avant tout Veillez à ce que la platine soit débranchée 2 Tenez fermement le bras de la cellule faites doucement glisser la partie rouge en dehors de l extrémité du bras Il se peut que vous deviez enlever le clip à l aide de l ongle de votre pouce 3 Placez la cellul...

Page 12: ...período de inactividad No intente limpiar la unidad con disolventes químicos ya que podrían dañar el acabado Utilice un paño limpio y seco El usuario no deberá llevar a cabo tareas de mantenimiento del dispositivo más allá de lo descrito en este manual de información Podría anular la garantía LEA ANTES DE PONER EN FUNCIONAMIENTO Plato giratorio de 3 velocidades apto para reproducir d iscos a 33 45...

Page 13: ...Puesta en marcha del tocadiscos A Encienda el interruptor de alimentación 10 y a continuación coloque con cuidado el disco sobre el plato giratorio En determinadas circunstancias puede que sea necesario utilizar el adaptador de 45 rpm B Seleccione la velocidad del disco 33 45 o 78 rpm 7 según el disco que vaya a reproducir C Eleve el brazo de soporte 4 y coloque con cuidado la aguja en el disco en...

Page 14: ...ración es muy delicada por lo que debe prestar especial atención y cuidado para evitar daños a la unidad 1 La seguridad es lo primero Asegúrese de que la unidad esté desconectada de la corriente 2 Sujete firmemente el brazo de soporte de la aguja deslice con cuidado la parte roja del extremo de esta es posible que necesite sacarlo con la ayuda de la uña del pulgar 3 Añada la aguja de repuesto simp...

Page 15: ...n worden als het toestel langere tijd niet gebruikt wordt Reinig het toestel niet met chemische oplosmiddelen aangezien deze de afwerking kunnen beschadigen Gebruik een schone droge doek De gebruiker mag het toestel uitsluitend onderhouden volgens de instructies in deze handleiding Anders vervalt de garantie LEZEN VOOR GEBRUIK Draaitafel met 3 snelheden geschikt voor het afspelen op 33 45 78 toere...

Page 16: ... 14 4 4 4 4 1 2 2 2 4 5 6 7 8 9 0 11 12 13 15 14 1 Afspelen op de draaitafel A Zet de aan uitschakelaar 10 aan en plaats voorzichtig een plaat op de draaitafel In sommige gevallen is de 45 toeren adapter benodigd B Selecteer de snelheid van de plaat 33 45 78 toeren 7 volgens de af te spelen plaat C Til de arm 4 op en plaats de stylus voorzichtig op de positie op de plaat waar u het afspelen wilt b...

Page 17: ...vereist een zorgvuldige uitvoering zodat schade aan het toestel voorkomen wordt 1 Veiligheid voorop Zorg ervoor dat de stekker van het toestel uitgetrokken is 2 Houd de stylusarm stabiel en schuif het rode gedeelte van de punt voorzichtig over het uiteinde van de armbehuizing het kan noodzakelijk zijn de clip met uw duimnagel vrij te maken 3 Plaats de vervangende stylus eenvoudigweg door deze teru...

Page 18: ...laced free of charge The guarantee does not include damage or failure resulting from misuse or damage in transit Your statutory rights under common law are not affected by this guarantee For service within the guarantee period contact your point of purchase For service outside the 12 month guarantee period contact ProtelX via returns protelx com where we will provide further assistance ProtelX Ltd...

Page 19: ......

Reviews: