GPI GPR-R220L Instructions For Use Manual Download Page 15


- 3 - 


Warnings and Precautions 


While the instrument is in operation be careful to avoid exposing your eyes to the laser 

beam for long Periods. 


A long exposure may be hazardous to your eyesight the laser beam is equivalent to a 

Class 2 laser. 


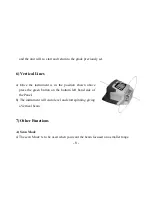
TRY  to  set  the  instrument  at  a  height  that  is  above  eye  level.  This  will  he1p  avoid 

accidental exposure to    the    beam    by    both    the    user    and passers by. 


When the instrument is not in use remove the batteries to avoid internal damage. 


Do  not  try  to  repair  the  instrument  yourself.  Have  it  repaired  by  an  Authorized 

Professional. 


When  setting  up  the  instrument  on  a  tripod  please  ensure  that  the  Tripod  is  placed 

firmly  on/into  the  ground 

  that  the  tripod  legs  are  securely  fastened  and  that  the 

instrument is securely screwed to the top of the tripod. 


The instrument should not be used or stored in temperatures about 50 degrees Celsius 

or below-20 degrees Celsius. 

Summary of Contents for GPR-R220L

Page 1: ...Rotary Laser INSTRUCTIONS FOR USE GPR R220L...

Page 2: ...2 Find your way around the GPR R220L 3 3 Getting set up 5 4 Horizontal Leveling 6 5 Sloping Leveling 7 6 Vertical Lines 8 7 Other Functions 8 8 The Detector 10 9 The remote control 0 10 Trouble shooti...

Page 3: ...des the following parts A Main Instrument B Laser line detector and Bracket C Remote Control for Instrument D Charger E Target F Glasses G Hard Case with Foam Insert H A replaceable battery Pack Pleas...

Page 4: ...3 2 Find your way around the GPR R220L Plumb up glass Laser module Handle Charge socket LCD Keypad panel Optical glass...

Page 5: ...4 Plus Right spin Minus Left spin Scanning Tilt H I alert Slope setting X Y axis switch Speed up On Off automatic Manual...

Page 6: ...trument or the battery pack Turn on the power The charger will show shone of 3 modes Red flashing light Battery not charging Red light Battery on Charge Green light Battery charged If the red 1ight sh...

Page 7: ...within 5 degrees of horizontal If the instrument appears level by eye then it should be within this range Using the horizon as a datum will help with this assessment If the instrument looks tilted the...

Page 8: ...the required gradient in the Y direction the Y direction is at right angles to the screen digital Pane1 f Press the X Y button again so that neither the X or Y letters are flashing g After a few secon...

Page 9: ...he instrument is in the position shown above press the green button on the bottom left hand side of the Panel b The instrument will Auto level and start spinning giving a Vertical beam 7 Other Functio...

Page 10: ...ed Control a To change the speed of the rotating beam pres Hare Tortoise Button b Speeds of 120rpm 300rpm and 600rpm can be obtained C Plumb up and down beams a The Instrument has both a plumb up beam...

Page 11: ...tton b A Sound button with 3 settings of f low high c A sensitivity button This will either give a narrow or a broader range of detection When the detector is too high a slower beep be emitted when to...

Page 12: ...e time not disturbing it It is powered by two 1 5V AA batteries When any of the buttons is activated a red LED light is emitted There are 7 buttons on the remote There is no Power button The top trian...

Page 13: ...ectly with the and in the correct orientation 2 Check the Power rating of the batteries are correct particularly if you are using rechargeable batteries 3 Please use the charger supplied with the inst...

Page 14: ...ional head speed 60 120 300 600 R P M Approximate scan angles 10 45 90 180 IR Remote control Available remote distanee 20m Operation temperature 20 C 50 C 4 F 122 F Power supply DC 4 8 6V 4 sections N...

Page 15: ...e beam by both the user and passers by When the instrument is not in use remove the batteries to avoid internal damage Do not try to repair the instrument yourself Have it repaired by an Authorized Pr...

Page 16: ...e dust and vibration Do not store in the back of your vehicle Avoid sudden changes in temperature Allow the instrument to acclimatize before use Transport the instrument in its carrying case and alway...

Page 17: ...5 Memo...

Page 18: ...Giant Precision Instrument Co Ltd No 16 Ln 134 Liancheng Rd Zhonghe Dist New Taipei City 235 Taiwan TEL 886 2 2246 7302 FAX 886 2 2246 7301...

Reviews: