background image

47

Appendix C - Advanced DVD Setup

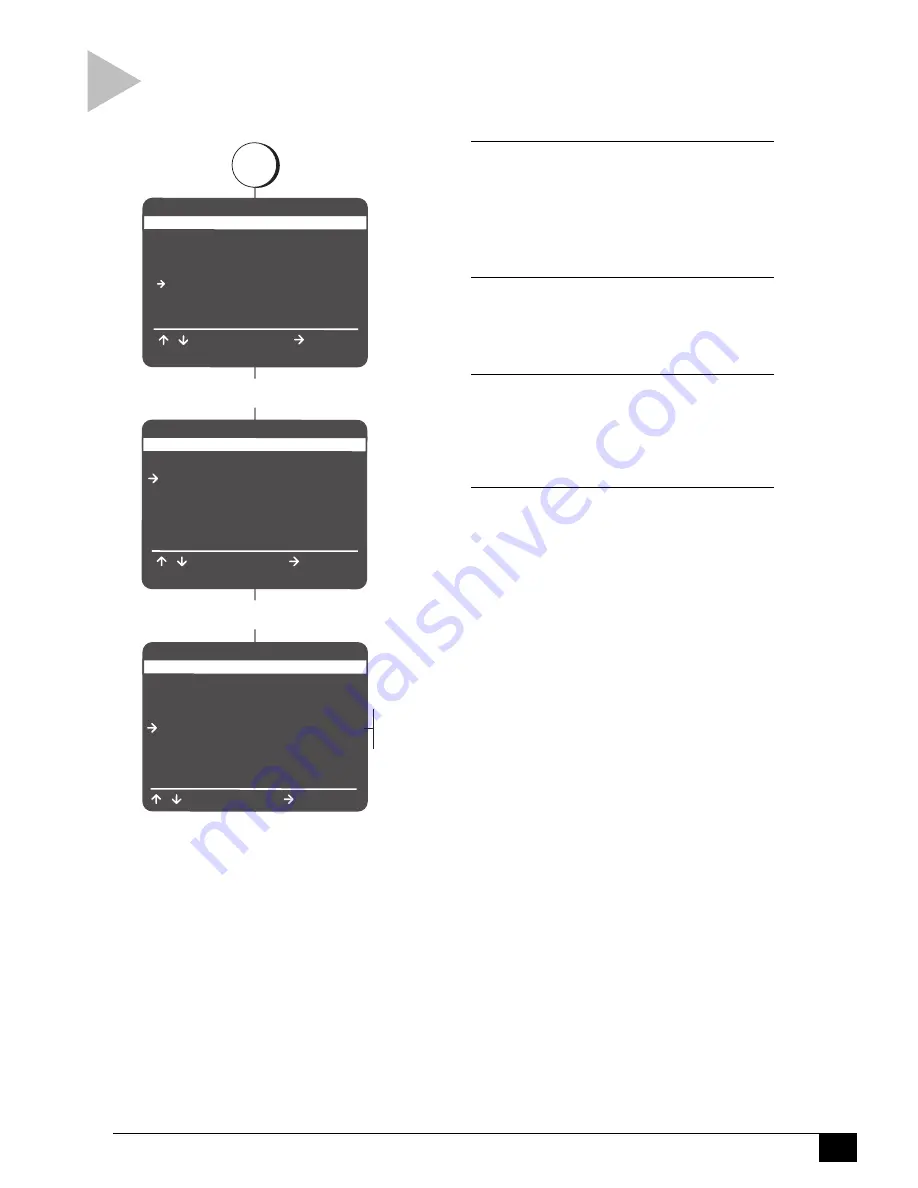
DYNAMIC COMPRESSION

1

O P E N   “ S E T U P   M E N U ”

Press SETUP/ENTER.

• Make sure the DVD deck is stopped

before pressing SETUP/ENTER. You will
not be able to enter the “DVD Setup”
menu if a DVD is playing.

2

S E L E C T   “ D V D   S E T U P ”

Use the UP/DOWN arrow keys to move the
pointer to “DVD Setup,” then press the
RIGHT arrow key to select.

3

S E L E C T   “ L A N G U A G E / A U D I O
S E T U P ”

Use the UP/DOWN arrow keys to move the
pointer to “Language/Audio Setup,” then
press the RIGHT arrow key to select.

4

S E T   “ D Y N A M I C   C O M P R E S S I O N ”

Use the UP/DOWN arrow keys to move the
pointer to “Dynamic Compression,” then
press the RIGHT arrow key to select from
the following:

On 

- The total dynamic range of the

DVD soundtrack will be compressed, so
quiet passages will be louder and loud
passages will be softer. This is conve-
nient for watching movies late at night,
or whenever you want to constrain the
volume to a steady level.

Off 

– The original dynamic range will be

preserved.

To Move

DVD SETUP

  TV Aspect Ratio 

 4:3PS

 Language/Audio 

Setup 

 Rating 

Control 


[None]

 Still 

Mode 


Auto

 Black 

Level 


Low

  Alt Video Out 

 Off

/

To Select

RETURN to Quit

To Move

LANGUAGE/AUDIO SETUP

 Audio 

[English]

 Subtitle 

[Automatic]

 Disc 

Menu 

[English]

 Dynamic 

Compression 

Off

  Dolby D Decoder 

No

 DTS 

Decoder 

No

/

To Change

Select DVD Setup

Select Language/Audio Setup

Off
On

SETUP MENU


Set Timer Recording

 Child 

Lock 

Off

 Set 

Clock

 DVD 

Setup


VCR & Channel Setup

 Language/Langue/Idioma

     /      To Move  


To Select

RETURN to Quit

press

SETUP

/ENTER

Dynamic Compression constrains the dynamic range of a
DVD soundtrack; i.e., the difference between the quietest
and loudest passages.

Summary of Contents for DVR4000

Page 1: ...S S C 4 0 0 0 1 0 7 2 3 0 1 DV R 4 0 0 0 U S E R S G U I D E D V D V C R C O M B O ...

Page 2: ...iceable parts inside Refer servicing to qualified personnel only C U I D A D O Para prevenir incendio riesgo de choque of interferencia enfadosa use solamente los accesorios recomendados Para prevenir electrochoque no use este enchufe polarizado con un cordón de extensión toma de corriente of cualquier otra toma a menos que los dientes puedan ser completamente insertados para prevenir exposición d...

Page 3: ...nu Navigation 14 4 SPECIAL DVD FEATURES 15 Title Chapter Time Selection 15 Angle Zoom 16 Subtitles Audio 3D Sound 17 Repeat Features 18 Bookmarks 19 Random Programmed Playback 20 5 VCR RECORDING 21 Basic Recording 21 Record Settings 22 Copying From DVD to VHS 23 6 TIMER RECORDING 24 Timer Recording 24 Timer Recording Errors 26 7 SEARCH INDEX 27 About Index Marks 27 Index Search Scan 28 Special Sea...

Page 4: ...gs 38 Manual Clock Settings 39 Daylight Savings Time 40 Channel Settings 41 Child Lock 42 Auto Play Rewind 43 Front Panel Dimmer 44 APPENDIX C ADVANCED DVD SETUP 45 TV Aspect Ratio 45 DVD Language Preferences 46 Dynamic Compression 47 Rating Control Settings 48 Changing Password 49 Still Mode Black Level 50 APPENDIX D HELP 51 Troubleshooting 51 Technical Specifications 53 Warranty 54 INDEX 55 ...

Page 5: ...ion to ensure reliable opera tion of the video unit and to protect it from overheating These openings must not be blocked or covered Never place your DVD VCR on a bed sofa rug or other simi lar surface on or near a radiator or heat reg ister This video unit should not be placed in a built in installation such as a bookcase or rack unless proper ventilation is provided or the manufacturer s instruc...

Page 6: ...re use S E R V I C I N G Do not attempt to service this video unit your self as opening or removing covers may ex pose you to a dangerous voltage or other hazards Refer all servicing to qualified ser vice personnel D A M A G E R E Q U I R I N G S E R V I C E Unplug this video unit from the wall outlet and refer servicing to qualified service per sonnel under the following conditions a When the pow...

Page 7: ... guide you through initial setup of your DVD VCR including basic connections and Auto Setup U N P A C K I N G 2 I N S E R T B AT T E R I E S Remove the battery cover by pushing down on the thumb tab and sliding the cover in the direction of the arrow Insert two 1 5V AA batter ies as shown paying atten tion to the correct polarities When finished slide the cover until it clicks back into place 1 2 ...

Page 8: ...If you used the RF connection in Step 2 set the CH Channel switch on the back panel of the DVD VCR to 3 or 4 whichever is not an active channel in your area If you used the Line Connec tion skip to Step 4 4 P L U G I N D V D V C R Connect the DVD VCR power cord to a standard 120V 60Hz wall outlet 5 T U R N O N T V A N D D V D V C R Turn on your television and press POWER on your DVD VCR 6 S E T T ...

Page 9: ... make sure you have connected an antenna or basic cable to the IN FROM ANT jack on the DVD VCR back panel Press SETUP ENTER to continue 3 R U N A U T O S E T U P As soon as you press SETUP ENTER the DVD VCR will automatically perform the following steps Auto Channel Search Automatically detects whether an antenna or cable is connected then searches for all active channels in your area If Auto Chan...

Page 10: ...onnection to all TVs new or old Child Lock to protect children from tampering with DVD VCR English French Spanish on screen programming Records from DVD to VHS unless DVD is copy protected with Macrovision D V D F E AT U R E S 10 bit video digital to analog converter and 27MHz advanced digital filter Playback of 96KHz 24 bit sources Dolby Digital output DTS digital output for DTS enhanced DVDs Con...

Page 11: ... DVD VCR remote control The keys are described in four sections System Deck Select Keys TV Control Keys DVD Control Keys and VCR Control Keys 1 2 3 4 5 6 7 8 9 0 100 DVD TV VIEW VCR VOL CH SHUTTLE 3D SOUND TV VCR TRK AUTO TRK POWER OPEN CLOSE ZOOM MODE REPEAT SKIP F ADV DISPLAY CLOCK COUNTER CLEAR LCV ANGLE MUTE TV CONTROL KEYS 0 9 Press to select channels directly 100 Press to select cable channe...

Page 12: ... DVD is playing press to create the illusion of surround sound with only two speakers ANGLE While a DVD is playing press to view the same scene from different angles not available on all DVDs SKIP SEARCH BACK While a DVD is playing press once to return to the previous track Press and hold to search in reverse STOP Press to stop the DVD from playing PLAY PAUSE Press to play a DVD Press again to pau...

Page 13: ...counter to zero 0 00 00 Also press to clear certain entries in the menu system REWIND While a tape is stopped press to rewind the tape While a tape is playing press to review the tape visual search in reverse STOP Press to stop the tape in the VCR deck PLAY PAUSE Press once to play the tape in the VCR deck While a tape is playing or recording press to pause FAST FORWARD While a tape is stopped pre...

Page 14: ...rch in reverse 1 6 7 89 10 11 12 13 2 3 4 5 The following is an overview of the DVD VCR front panel F R O N T P A N E L 8 P L A Y P A U S E Press to play a DVD Press again to pause playback Press once to play the VHS tape in the VCR deck While a tape is playing or recording press to pause 9 S T O P Press to stop playback in the active deck 10 DVD SKIP SEARCH FORWARD While a DVD is playing press on...

Page 15: ...ur television with the Line connection it is only appli cable with the RF connection see page 2 The following is an overview of the keys and inputs located behind the front panel flap door F L A P D O O R 5 V O L U M E Press to adjust the volume up or down 6 L I N E 1 V I D E O I N P U T Connect to the video output yellow of an external video source such as a camcorder or video game 7 L I N E 1 L ...

Page 16: ...isplays without the clock hands to indicate that a recording is in progress and blinks when the DVD VCR is paused The following is an overview of the DVD VCR front panel display 1 11 3 4 5 2 6 7 12 10 9 8 18 17 16 15 14 13 19 F R O N T P A N E L D I S P L A Y 1 0 R E C O R D S P E E D I N D I C A T O R The DVD VCR record speed is set to SP or SLP 1 1 V C R D E C K I N D I C A T O R The VCR deck is...

Page 17: ...es Use these audio outputs ONLY with the composite video output yellow 6 L I N E O U T T O T V S V I D E O O R C O M P O N E N T Connect to your television with standard RCA cables Use these audio outputs ONLY with the Component or S Video outputs 7 C O M P O N E N T V I D E O O U T Connect to your television with component video cables red green and blue For audio use the Line Out or Digital Audi...

Page 18: ...vious chapter track press SKIP FORWARD or SKIP BACK To search forward or backward at variable speeds press and hold SEARCH FORWARD or SEARCH BACK To play in slow motion at variable speeds first press PLAY PAUSE then press SEARCH FORWARD Each press will increase the rate of slow motion playback To stop playback press STOP once To resume playback from the same place in the movie CD press PLAY PAUSE ...

Page 19: ...and hold F FORWARD or REWIND To cue ahead one minute at a time up to 5 minutes press SKIP F ADV 1 5 times To replay the last 30 seconds of tape press MODE REPEAT To gradually increase the cue speed press SHUTTLE repeatedly To slow down the tape pause then gradually increase the review speed press SHUTTLE repeatedly To adjust tracking manually press TRK To resume automatic tracking press AUTO For V...

Page 20: ...tions in certain menus C L E A R K E Y Clears options in certain menus R E T U R N K E Y Confirms selections in certain menus F R O N T P A N E L M E N U K E Y S The following front panel keys can also be used to control the menu system Setup behind flap door SETUP ENTER Play Pause UP arrow key Stop DOWN arrow key Rewind LEFT arrow key Fast Forward RIGHT arrow key 1 2 3 4 5 6 7 8 9 0 100 DVD TV VI...

Page 21: ... C h a p t e r o r Tr a c k Use the LEFT RIGHT arrow keys to select Chapter or Track then use the UP DOWN arrow keys to select from all available chapters tracks on the disc Press SETUP ENTER to jump to the desired chapter track The C icon will light on the Front Panel Display followed by the current chapter track number T i m e Use the LEFT RIGHT arrow keys to select Time then use the number keys...

Page 22: ...el display during playback 2 Press ANGLE to view the Angle Selection menu 3 Use the UP DOWN arrow keys to select one of the available screen angles Z O O M With the Zoom feature you can zoom in at 2 or 4 times normal magnification while watching a DVD 1 While a DVD is playing or paused press ZOOM to display the magnifying glass icon on the screen 2 Use the arrow keys to move the magni fying glass ...

Page 23: ...nd Sound with only two speakers 1 While playing a DVD press 3D SOUND 2 Use the UP DOWN arrow keys to turn 3D Sound On or Off 3 Press 3D SOUND again to confirm your selection press 100 3D SOUND Follow these steps to select among all available subtitle languages and audio tracks on your DVD or to activate 3D Sound A U D I O Many DVDs provide multiple language and audio setup options such as Dolby Di...

Page 24: ...seconds A B R E P E AT The A B Repeat function allows you to repeat any segment of a DVD or CD over and over again Simply mark the beginning point A and the ending point B of the segment you want to review 1 While playing a DVD press MODE REPEAT 2 Use the LEFT RIGHT arrow keys to select A B Repeat the A will blink when A B Repeat is selected 3 Press SETUP ENTER at the beginning of the segment you ...

Page 25: ...R The place holder will change to a number 1 2 or 3 4 The bookmark is set To add up to 3 bookmarks repeat steps 2 3 To cancel a bookmark select it and press CLEAR To exit the Bookmark menu press MARK again J U M P T O B O O K M A R K S 1 During playback press MARK 2 Use the LEFT RIGHT arrow keys to move to a previously set bookmark 3 Press SETUP ENTER to play the book mark To cancel the bookmark p...

Page 26: ...e a DVD CD is stopped press MODE REPEAT 2 Use the UP DOWN arrow keys to move the pointer to Programmed Play then press the RIGHT arrow key to select 3 Use the UP DOWN arrow keys to move the pointer to the desired chapter track in your playback list then press SETUP ENTER to add it to the list Continue in this fashion until all desired chapters tracks are added To change a selection press CLEAR 4 P...

Page 27: ...ear on the on screen display followed by the num ber of minutes the DVD VCR will record Continue pressing REC to add up to 9 hours and 30 minutes When the record ing time has elapsed the DVD VCR will stop recording automatically OTR Loop Record When you reach OTR 9 30 press REC again to enter OTR Loop mode The VCR deck will record over and over again until you press STOP This can be used for conti...

Page 28: ...e stamped R e c o rd S o u rc e Set your VCR to record from the following sources Auto Whatever is currently visible on screen Tuner The DVD VCR s built in televi sion tuner Line 1 An external source such as a camcorder connected to the front line inputs Line 2 An external source such as a satellite receiver connected to the rear line inputs DVD A DVD playing in the DVD deck Follow these steps to ...

Page 29: ...Y on the DVD VCR front panel The DVD will begin playing and the VCR will begin recording If the DVD disc menu appears you may need to press PLAY PAUSE manually to begin copying 4 S T O P T H E C O P Y P R O C E S S When the DVD is finished playing press VCR on the remote control and then press STOP to end the copy You must stop the copy process manually when the DVD movie ends or the DVD may repla...

Page 30: ...ow key S e t M o n t h Enter the month as a 2 digit number e g for January press 01 S e t D a y Enter the day as a 2 digit number e g for the ninth press 09 S e t H o u r Enter the hour as a 2 digit number e g for 12 00 press 12 S e t M i n u t e s Enter the minutes as a 2 digit number e g for 12 00 press 00 S e t A M P M Press 1 for AM or 2 for PM 6 T I M E R R E C O R D I N G This chapter provid...

Page 31: ...e record speed 1 A u t o Activates Complete Program Record see note on page 26 2 S P Standard Play Use for best quality a T 120 tape will record for 2 hours 3 S L P Super Long Play Use for maximum recording time a T 120 tape will record for 6 hours SET TYPE 1 4 1 Su Mo Tu We Th Fr Sa 1 2 3 4 5 6 7 8 9 10 11 12 13 14 15 16 17 18 19 20 21 22 23 24 25 26 27 28 29 30 31 1 Aug 2001 10 30PM 1H00M 1 Time...

Page 32: ...lete Program Record CPR adjusts the recording speed to make sure you won t run out of tape before the Timer Recording is complete With Record Speed set to Auto the DVD VCR will begin recording in SP It will then calculate how much time is remaining on the tape and adjusts the record speed to SLP if necessary If there is not enough room to record the entire show the DVD VCR will record in SLP until...

Page 33: ... t i c I n d e x M a r k s The DVD VCR places an Index Mark on your tape the moment you start recording This includes standard recording One Touch Recording Timer Recording or copying M a n u a l I n d e x M a r k s You can place an Index Mark manually any time a tape is recording by pressing SEARCH INDEX Index will flash briefly on the On Screen Display while the mark is recorded 7 Press for Manu...

Page 34: ...se Index Scan with the Date Time Stamp to quickly find Timer Recordings on your tapes For example when Index Scan stops at an Index Mark and plays a few seconds of tape you will see the date and time the show was recorded Follow these steps to locate recordings by scanning or searching for Index Marks press INDEX MENU Index S c a n P r e s s F F o r R E W S e a r c h 1 9 9 T h e n F F R E W R E T ...

Page 35: ...rposes e g you can advance the tape directly to the beginning of the desired scene Press 1 for positive or 2 for negative counter values Use the 0 9 keys to enter the desired time in hours minutes and seconds Press CLEAR if you need to back up and reenter a number Press SEARCH INDEX to advance the tape to the specified time R e t u r n t o 0 0 0 0 0 Advances your videotape to tape counter position...

Page 36: ...your TV 1 C O N N E C T S V I D E O O U T T O T V Connect an S Video cable from the S Video Out on the back panel of the DVD VCR to the S Video Input on your television OR C O N N E C T C O M P O N E N T V I D E O O U T T O T V Connect a component video cable from the Component Video Out on the back panel of the DVD VCR to the Component Video Input on your television 2 C O N N E C T A U D I O O U ...

Page 37: ... The Component Video Output will be enabled The S Video output will be dis abled S V i d e o The S Video Output will be enabled The Component video output will be disabled press SETUP MENU Set Timer Recording Child Lock Off Set Clock DVD Setup VCR Channel Setup Language Langue Idioma To Move To Select RETURN to Quit To Move DVD SETUP TV Aspect Ratio 4 3PS Language Audio Setup Rating Control None S...

Page 38: ... or Digital Audio Out jacks OR Connect to Stereo Line Inputs OR Connect to the Digital Audio Input of an A V Receiver with a Dolby Digital and or DTS Decoder DIGITAL AUDIO OUT CONNECTION 1 C O N N E C T D V D V C R T O A V R E C E I V E R Connect EITHER a digital optical cable OR a digital coaxial cable from the Digital Audio Out jacks on the back panel of the DVD VCR to their corre sponding Digit...

Page 39: ...D E C O D E R Use the UP DOWN arrow keys to move the pointer to Dolby D Decoder then press the RIGHT arrow key to select from the following No Indicates that your A V Receiver is NOT equipped with a Dolby Digital Decoder Yes Indicates that your A V Receiver is equipped with a Dolby Digital Decoder 5 S E T D T S D E C O D E R Use the UP DOWN arrow keys to move the pointer to DTS Decoder then press ...

Page 40: ... you can perform the following functions Wa t c h D e v i c e Press TV VIEW until playback from Line 1 or Line 2 appears on your TV screen R e c o rd D e v i c e Press TV VIEW until playback from Line 1 or Line 2 appears on your TV screen then press REC on the VCR deck make sure a tape is inserted and the VHS deck is selected Ti m e r R e c o rd F ro m D e v i c e Select Line 1 or Line 2 as your R...

Page 41: ...utlet 5 T U R N O N T V D V D V C R C A B L E B O X Press POWER on the remote control TV and Cable Box Follow these instructions to connect a Cable Box to your DVD VCR Input Output Cable Box VHF UHF TV From Cable Wall Outlet C A B L E B O X H O O K U P 6 S E T D V D V C R O U T P U T C H A N N E L Set the CH channel switch on the back panel of the DVD VCR to 3 or 4 whichever is NOT used by your ca...

Page 42: ...IN From Ant jack on the back panel of the DVD VCR 2 C O N N E C T T H E V C R T O C A B L E B O X Connect the RF cable from the TV Out on the back panel of the DVD VCR to the In from Cable jack on the Cable Box 3 C O N N E C T C A B L E B O X T O T V Connect an RF cable from the Out to TV jack on the Cable Box to the Antenna In connection on the back of the TV Input Output Cable Box VHF UHF TV Fro...

Page 43: ...guage Langue Idioma menu all menus will be translated into English French or Spanish Follow these steps to set the On Screen menu language to English French or Spanish 1 O P E N S E T U P M E N U Press SETUP ENTER 2 S E L E C T L A N G U A G E L A N G U E I D I O M A Use the UP DOWN arrow keys to move the pointer to Language Langue Idioma then press the RIGHT arrow key repeatedly to set the On Scr...

Page 44: ...ically detects your local time zone Eastern Selects Eastern Standard Time Central Selects Central Standard Time Mountain Selects Mountain Standard Time Pacific Selects Pacific Standard Time Alaska Selects Alaska Standard Time Hawaii Selects Hawaii Standard Time C l o c k S e t C h a n n e l Auto Automatically searches for a local channel broadcasting the time Ch If you know of a station in your ar...

Page 45: ...mber e g 2001 01 Set Day Enter the day as a 2 digit num ber e g the ninth 09 Set Hour Enter the hour as a 2 digit number e g 12 xx 12 Set Minute Enter the minute as a 2 digit number e g xx 25 25 Set AM PM Press 1 for AM 2 for PM 6 S AV E S E T T I N G S Press SETUP ENTER to save and exit the menu system N O T E If you choose Set Clock then Auto Clock Set will automatically turn off and Time Zone a...

Page 46: ...he pointer to Daylight Savings then press the RIGHT arrow key to select from the following Auto The DVD VCR will automatically use local channel information to deter mine the status of Daylight Savings Time in your area and then set the clock accordingly Off The DVD VCR will not adjust the clock for Daylight Savings Time On The DVD VCR will adjust the clock for Daylight Savings Time as follows One...

Page 47: ...l S e a rc h Automatically searches for all available channels and stores them in memory When finished the DVD VCR will display the lowest channel found A d d R e m o v e C h a n n e l Use the 0 9 keys to enter the channel number you wish to add or remove then press the RIGHT arrow key to add or remove the channel S h o w We a k C h a n n e l s Yes Channels with weak signal strength will be displa...

Page 48: ...ront panel keys are locked N O T E S You must use the remote control to disable Child Lock and resume normal front panel operation Auto Play Rewind and Auto Power On features are also disabled with Child Lock on Follow these steps to prevent children from tampering with the DVD VCR Child Lock disables all front panel keys so the DVD VCR can only be operated with the remote control SETUP MENU Set T...

Page 49: ...lowing Both Enables both Auto Play and Auto Rewind Play Enables Auto Play only Tapes without Record Safety Tabs will play automatically when you insert them Rew Enables Auto Rewind only Tapes will rewind automatically when they are done playing None Disables both Auto Play and Auto Rewind N O T E Only tapes that are missing the Record Safety Tab will play automatically when inserted VCR CHANNEL SE...

Page 50: ... E T U P M E N U Press SETUP ENTER 2 S E L E C T V C R C H A N N E L S E T U P Use the UP DOWN arrow keys to move the pointer to VCR Channel Setup then press the RIGHT arrow key to select 3 S E T PA N E L D I S P L AY Use the UP DOWN arrow keys to move the pointer to Panel Display then press the RIGHT arrow key to select from the following Auto The Front Panel Display will dim between the hours of...

Page 51: ...rops by panning and scanning to keep the most impor tant part of the picture visible wide screen movies to fit a standard 4 3 television screen 4 3LB Letterbox This method displays the full width of the widescreen movie on a standard 4 3 television As a result black bars will appear at the top and bottom of the screen 16 9 Widescreen This method allows you to view the full 16 9 picture on a widesc...

Page 52: ...e DVD deck is stopped before pressing SETUP ENTER You will not be able to enter the DVD Setup menu if a DVD is playing 2 S E L E C T D V D S E T U P Use the UP DOWN arrow keys to move the pointer to DVD Setup then press the RIGHT arrow key to select 3 S E L E C T L A N G U A G E A U D I O S E T U P Use the UP DOWN arrow keys to move the pointer to Language Audio Setup then press the RIGHT arrow ke...

Page 53: ...ynamic range of the DVD soundtrack will be compressed so quiet passages will be louder and loud passages will be softer This is conve nient for watching movies late at night or whenever you want to constrain the volume to a steady level Off The original dynamic range will be preserved To Move DVD SETUP TV Aspect Ratio 4 3PS Language Audio Setup Rating Control None Still Mode Auto Black Level Low A...

Page 54: ...ditional Rating Control settings are necessary Yes Indicates that a password is required to view some DVDs and to view Rating Control options The menu will change as shown 5 E N T E R PA S S W O R D Enter a 4 digit password using the 0 9 keys on the remote control Remember to write down your password and store it in a safe place 6 S E L E C T C H A N G E R AT I N G L E V E L Use the UP DOWN arrow ...

Page 55: ...nter a new 4 digit password using the 0 9 keys on the remote control 5 R E E N T E R PA S S W O R D Enter the same 4 digit password using the 0 9 keys on the remote control to confirm your password 6 C O N F I R M N E W PA S S W O R D After you reenter the password a menu will appear to indicate whether or not the password has been successfully changed Press SETUP ENTER to continue Press SETUP ENT...

Page 56: ...and set the following S t i l l M o d e Auto Selects Still Mode automati cally by detecting motion in the scene Frame Select if you want to see fine text more clearly than in Auto mode Field Select if the screen shakes in Auto mode B l a c k L e v e l High Standard NTSC reference black level for consistent brightness contrast across all sources Low Enhanced black level for in creased brightness co...

Page 57: ...CR will play Region 1 encoded discs only Cannot record on DVD deck The DVD deck does not allow recording Can I connect to surround sound system Yes you can connect the DVD VCR to an audio video receiver or amplifier using the coaxial or optical digital outputs or analog outputs What types of discs can I play DVD Video CD Digital Audio and CD Video Picture has black bars Make sure your TV Aspect Ra...

Page 58: ...g copy or record Place piece of tape over record safety tab opening VCR automatically plays and rewinds To turn Auto Play Rewind off see page 43 Tape counters not moving on VCR deck To display tape counters the VCR deck requires control track which is only present on prere corded tapes No menu or On Screen Displays Tape may be blank snow appears on screen If so menus and On Screen Display cannot b...

Page 59: ... inch VHS system 4 rotary head helical scanning FM azimuth luminance chrominance converted sub system phase shift AUDIO TRACK Normal 1 track Hi Fi 2 track PLAY RECORD TIME T 180 tape SP 3 hours SLP 9 hours FF REW TIME T 120 tape 2 minutes HEADS Video DA 4 rotary Audio 2 rotary heads Hi Fi 1 stationary head Linear Control 1 stationary head Erase 1 full track 1 audio track WOW FLUTTER Less than 0 00...

Page 60: ...96 to determine the nearest authorized Go Video service center W h a t a re t h e E x c e p t i o n s This warranty does not cover 1 Normal maintenance service such as video head cleaning 2 Damage from misuse abuse neglect or accident natural disasters or Acts of God 3 Cabinetry decorative parts A C adapters knobs or buttons 4 The foreign country use of this product 5 Go Video product which has be...

Page 61: ...A V 34 RF Antenna 2 S Video 30 Stereo 32 Copy DVD to VCR 23 indicator 10 key 9 23 Customer Service 51 D Date Time Stamp 22 28 Day 39 Daylight Savings Time 40 Deck Status indicator 10 Digital Audio Out 11 Direct Time Search 29 Disc Menu 46 Disc Menu key 6 Disc Type indicator 10 Display key 6 7 15 Dolby Digital 5 1 10 Dolby Digital Decoder 4 33 Down Arrow key 14 DTS 4 10 DTS Decoder 33 DVD Control k...

Page 62: ...28 Search 12 13 Search Features 27 29 Search Index Marks 28 Search Index key 7 8 27 Set Timer key 7 Setup key 9 Setup Enter key 6 7 14 Show Weak Channels 41 Shuttle keys 7 13 Simulcast 7 Skip 12 Skip F Adv key 6 7 Skip Search Back key 6 8 Skip Search Forward key 6 8 Slow Motion 12 SLP 21 25 SP 21 25 SP SLP key 7 8 21 Stereo 7 Stereo indicator 10 Still Mode 50 Stop key 6 7 8 Subtitle 46 Subtitle ke...

Page 63: ...CONTROL Require Password No Change Password Change Rating Level To Select RETURN to Quit SUBTITLE LANGUAGE To Move Italiano Nederlands More Deutsch English Francais Espanol Automatic ENTER to Select RATING CONTROL Enter Password Use 0 9 Keys RETURN To Go Back DISC MENU LANGUAGE English Francais Espanol Deutsch Italiano Nederlands More ENTER to Select To Move CHANGE RATING LEVEL To Change Level Pre...

Page 64: ...ting innovative digital entertainment products including digital televisions Internet media players DVD players and high end home theater components for the digital living room We take pride in our ability to deliver unparalleled customer support and are honored to have received the prestigious Inside Track award for Supplier Loyalty two years running Should you have any questions feel free to con...

Reviews: