


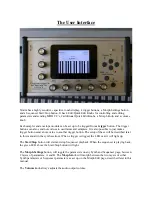


The User Interface
Xmini has a highly sensitive capacitive touch display, 4 trigger buttons, a Morph Settings button
and a Sequencer Start/Stop button. It has 4 Edit/Quick Edit Knobs for controlling and editing
parameters and sending MIDI CC’s, 2 additional Quick Edit Knobs, a Morph knob, and a volume
knob.
Each sampler and envelope module can be set up to be trigged from a
trigger
button. The trigger
buttons can also send note values to oscillators and samplers. It is also possible to just make a
trigger button send a note value to another trigger button. The setup of these will be described later
in this manual (in the synth section). When a trigger is trigged, the LED near it will light up.
The
Start/Stop
button
will start and stop Sequencer playback. When the sequencer is playing back,
the green LED above the Start/Stop button will light.
The
Morph Settings
button, will toggle the parameters on any Synth and Sequencer page, between
2 layers of parameters, A and B. The
Morph
knob will morph between the two layers of either
Synth parameters or Sequencer parameters, as set up on the Morph Edit page, described later in this
manual.
The
Volume
knob always adjusts the audio output volume.
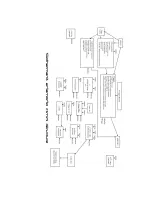
Summary of Contents for Anamono Xmini
Page 1: ...Gotharman s aNamoNo Xmini Modular Synthesizer User Manual V 2 27...
Page 11: ......
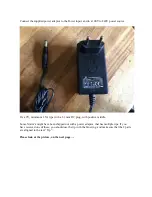
Page 12: ...Turn it on Push the I on the power switch Your Xmini should now turn on...
Page 13: ......
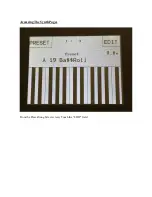
Page 29: ...Accessing The Synth Pages From the Preset Song Select screen Touch the EDIT field...
Page 47: ...Sub Modulates the level of the sub oscillator square wave...
Page 65: ...Gfeed Modulates the G Ray feedback...
Page 73: ...Outp Modulates the output level of the VCA...
Page 89: ...Xdis Complete destruction of the sound...
Page 101: ...Feed FM feedback Adjusts the portion of the output signal that is fed back to the input...
Page 135: ...Enter the sequencer From the Preset Select Screen touch the EDIT field...
Page 136: ...Touch SEQUENCER...
Page 154: ...Touching EXIT will exit you to the Sequencer Modules page...
Page 162: ...More preset parameters From the Preset Select page touch the Edit field...
Page 163: ...Now touch MORE...
Page 170: ...Examples of different octave settings...
Page 171: ......
Page 196: ...Touch MORE...
Page 224: ...Turn Edit Knob 1 to 4 to select character 5 to 8 of the sample name Touch NEXT to go on...
Page 225: ...Turn Edit Knob 1 to 4 to select character 9 to 12 of the sample name Touch NEXT to go on...
Page 248: ...11 Touch the UPD button...
Page 251: ...Programming processor counter in the bottom counts up...
Page 255: ...And a filter board...
Page 257: ...Remove the 4 screws in the corners of the left endplate using the Phillips screwdriver...
Page 258: ...Pull the endplate leftwards...
Page 261: ...Old filterboard is out...
Page 266: ...Written by Flemming Christensen Gotharman 2017 www gotharman dk...


