background image

30

MDE-RTnetwork-3076V1.2


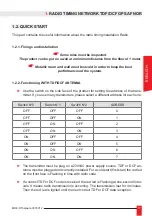
En una primera instalación, tiene la posibilidad de forzar el emisor en emisión per-

manente activando el switch número 8 en ON. El Led de la cara delantera se ilumi-

nará en permanencia..


Tenga en cuenta que si el modo instalación está activado, el emisor no se sincroni-

zará por la antena TDF/DCF.


Si el modo instalación está activado antes que el emisor se haya sincronizado por 

lo menos una vez, la hora transmitida será la de la base de tiempos del emisor, que 

funcionará en autónomo desde 0H00.00s.

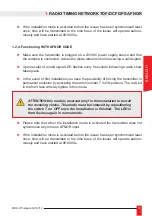
1.2.3. Puesta en marcha del emisor radio GPS


Verifique que el emisor está conectado a la corriente 

230VAC y que la antena está 

conectada. El diodo de la cara delantera permanece encendido hasta haber reci-

bido un valor válido (alrededor de 10 minutos desde la primera puesta en marcha).


Desde la recepción de un valor válido, el led parpadea cada 3 segundos, indicando 

que se produce la emisión radio.


Si el led de la cara delantera permanece encendido o apagado permanentemente, 

verifique la posición de su antena GPS.


En una primera instalación, tiene la posibilidad de forzar el emisor en emisión per-

manente activando el switch número 7 en ON. El Led de la cara delantera se ilumi-

nará en permanencia.

ATENCIÓN este modo está reservado únicamente a la instalación 

para testar todos los relojes receptores. Este modo debe de desac

-

tivarse volviendo a posicionar el switch 8 en OFF una vez que la 

instalación haya finalizado. El Led de la cara delantera parpadea de 

nuevo en modo normal..


ATENCIÓN este modo está reservado únicamente a la instalación 

para testar todos los relojes receptores Este modo debe de desac

-

tivarse volviendo a posicionar el switch 7 en OFF una vez que la 

instalación haya finalizado. El Led de la cara delantera parpadea de 

nuevo en modo normal.

1. 

RADIO TIMING NETWORK TDF/DCF GPS AFNOR

Summary of Contents for RADIO TIMING NETWORK DCF

Page 1: ...TIMING NETWORK TDF DCF GPS AFNOR RADIO TIMING R P TEUR REPEATER REPETIDOR FUNKVERST RKER MODE D EMPLOI PAGE 3 USER GUIDE PAGE 13 MODO DE EMPLEO P GINA 25 BEDIENUNGSANLEITUNG SEITE 37 MDE RTnetwork 307...

Page 2: ...nvironnement il vous incombe de vous d barrasser de cet quipement dans un site de collecte pr vu cet effet s par ment des ordures m nag res Pour de plus amples informations contactez votre revendeur v...

Page 3: ...ge de l metteur radio GPS 6 1 2 4 D marrage de l metteur radio AFNOR 7 1 3 Configuration du produit 8 1 3 1 Configuration des param tres d mission 8 A R glages standards TDF DCF 8 B R glages standards...

Page 4: ...rtzienne aux horloges La transmission radio permet de faciliter l instal lation du produit en supprimant la liaison filaire entre l metteur et les horloges tout en conser vant une grande pr cision INS...

Page 5: ...um 8 veillez param trer des adresses diff rentes Switch N 0 Switch N 1 Switch N 2 ADRESSE OFF OFF OFF 0 OFF OFF ON 1 OFF ON OFF 2 OFF ON ON 3 ON OFF OFF 4 ON OFF ON 5 ON ON OFF 6 ON ON ON 7 V rifiez q...

Page 6: ...tion d un signal valide la led clignote toutes les 3 secondes indiquant qu une mission radio a lieu Si la led en face avant reste allum e ou teinte en permanence v rifier la position de votre antenne...

Page 7: ...n cas de premi re installation vous avez la possibilit de forcer l metteur en mis sion permanente en activant le switch num ro 7 sur ON La Led en face avant reste allum e en permanence Veuillez noter...

Page 8: ...AFNOR si UTC en entr e A chaque r ception correcte du code GPS la borne rentre dans un cycle d mission radio destination des horloges p riode de 3 secondes Configuration des fuseaux et d calages hora...

Page 9: ...aux horloges La transmission radio permet de faciliter l instal lation du produit en supprimant la liaison filaire entre l metteur et les horloges tout en conser vant une grande pr cision INSTALLATION...

Page 10: ...secteur 230VAC L chelle lumineuse en face avant donne une indication du niveau de r ception de l information re ue Cette indicateur peut varier de 1 segment allum 8 segments L installation de l ampli...

Page 11: ...MDE RTnetwork 3076V1 2 11 NOTES FRANCAIS...

Page 12: ...4877 38 GORGY TIMING RC 74 B 38 Toutes modifications d ordre technique ou esth tique peuvent tre apport es sans pr avis support gorgy timing fr SUPPORT TECHNIQUE DEPUIS LA FRANCE SUR UN POSTE FIXE GOR...

Page 13: ...13 MDE RTnetwork 3076V1 2 USER GUIDE RADIO TIMING NETWORK TDF DCF GPS AFNOR RADIO TIMING REPEATER ENGLISH...

Page 14: ...protection of persons and the environment you must dispose of this equipment in a collection site provided for this purpose separately from household waste Contact your reseller collec tion site or t...

Page 15: ...nctioning WITH TDF DCF ANTENNA 17 1 2 3 Functioning WITH GPS ANTENNA 18 1 2 4 Functioning WITH AFNOR CODE 19 1 3 PRODUCT CONFIGURATION 20 1 3 1 SETUP 20 A TDF DCF Setup 20 B GPS or AFNOR Setup 20 2 RA...

Page 16: ...AFNOR DCF or TDF The advantage is to have wireless solution easy to install between transmitter and receiver clocks without mosing accuracy TYPICAL INSTALLATION RTCP 09 12 dry contacts outputs 20 59...

Page 17: ...nsmitters please select a different address for each one Switch N 0 Switch N 1 Switch N 2 ADRESS OFF OFF OFF 0 OFF OFF ON 1 OFF ON OFF 2 OFF ON ON 3 ON OFF OFF 4 ON OFF ON 5 ON ON OFF 6 ON ON ON 7 The...

Page 18: ...ial operation Upon receipt of a valid signal LED flashes every 3 seconds indicating a radio show takes place If the LED on the front stays on and off constantly check the position your GPS antenna In...

Page 19: ...at the antenna is connected Across the diode remains lit until receiving a valid signal Upon receipt of a valid signal LED flashes every 5 seconds indicating a radio show takes place In the event of f...

Page 20: ...r AFNOR Setup The product is automatically configured The transmitter must receive a correct information from the GPS antenna or AFNOR input Then the information are transmitted to the receivers This...

Page 21: ...transmission allows an easy installation of the product by removing the wire connection between the transmitter and the clocks while pre serving a high degree of accuracy TYPICAL INSTALLATION RTCP 09...

Page 22: ...rce The lumi nous scale on the front face gives an indication of the level of reception of received information This indicator can vary from 1 lit segment to 8 segments The installation of the repeate...

Page 23: ...23 MDE RTnetwork 3076V1 2 NOTES ENGLISH...

Page 24: ...30 85 33 email gorgy gorgy timing fr www gorgy timing com RADIO TIMING LEDI LEDICA HANDI are trademarks by GORGY TIMING Number of statement for training provider activity 82 38 04877 38 Gorgy Timing R...

Page 25: ...25 MDE RTnetwork 3076V1 2 MODO DE EMPLEO RADIO TIMING NETWORK TDF DCF GPS AFNOR RADIO TIMING REPETIDOR ESPA OL...

Page 26: ...cumbencia el deshacerse de este equipo en un lugar previsto a tal efecto separadamente de los deshechos del hogar Para ampliar esta informaci n contacte con su revendedor su lugar de recogida o a las...

Page 27: ...en marcha del emisor radio GPS 30 1 2 4 D marrage de l metteur radio AFNOR 31 1 3 CONFIGURACI N DEL EQUIPO 32 1 3 1 Configuraci n de los par metros de emisi n 32 A Reglajes est ndares TDF DCF 32 B Re...

Page 28: ...ansmisi n radio facilita la instalaci n del equipo suprimiendo el cableado entre el emisor y los relojes no sin ello conservar una gran pre cisi n INSTALACI N T PICA RTCP 09 12 Salidas por contacto se...

Page 29: ...configurar direcciones diferentes para cada uno de ellos Switch N 0 Switch N 1 Switch N 2 DIRECCI N OFF OFF OFF 0 OFF OFF ON 1 OFF ON OFF 2 OFF ON ON 3 ON OFF OFF 4 ON OFF ON 5 ON ON OFF 6 ON ON ON 7...

Page 30: ...ta en marcha Desde la recepci n de un valor v lido el led parpadea cada 3 segundos indicando que se produce la emisi n radio Si el led de la cara delantera permanece encendido o apagado permanentement...

Page 31: ...o que ha recibido el c digo correctamente En caso de una primera instalaci n tiene la posibilidad de forzar el emisor en emi si n permanente activando el switch n mero 7 en ON El LED de la cara delant...

Page 32: ...ajes est ndares GPS En cada recepci n correcta del c digo GPS el borne entra en un ciclo de emisi n radio hacia los relojes periodo de 3 segundos Configuraci n de las zonas horarias La configuraci n d...

Page 33: ...permite facilitar la instala ci n del equipo suprimiendo el enlace por cable entre el emisor y los relojes conservando una gran precisi n INSTALACI N T PICA RTCP 09 12 Salidas por contacto seco 20 59...

Page 34: ...El indicador lumi noso de la cara delantera da una indicaci n del nivel de recepci n de la informaci n recibida Este indicador puede variar de 1 segmento iluminado a 8 segmentos La instalaci n del am...

Page 35: ...35 MDE RTnetwork 3076V1 2 NOTAS ESPA OL...

Page 36: ...ESPA A Tel 34 93 508 83 53 Fax 34 93 508 83 54 www gorgy timing es email gorgy gorgy timing es RADIO TIMING LEDI LEDICA HANDI sont marcas registradas GORGY TIMING Gorgy Timing RC74B38 Cualquier modif...

Page 37: ...37 MDE RTnetwork 3076V1 2 BEDIENUNGSANLEITUNG RADIO TIMING NETWORK TDF DCF GPS AFNOR RADIO TIMING FUNKVERST RKER DEUTSCH...

Page 38: ...Stromst rke un terst tzen In Europa im Rahmen vom Schutz von Personen und der Umwelt ist es in Ihrer Verantwortung dieses Ger t in einer Sammelstelle f r diesen Zweck getrennt vom Hausm ll zu entsorg...

Page 39: ...41 1 2 3 Standardeinstellung GPS 42 1 2 4 Einschalten des code AFNOR Senders 43 1 3 EINSTELLUNG DES GER TES 44 1 3 1 Einstellung der Sendeparameter 44 A Standardeinstellungen TDF DCF 44 B Standardeins...

Page 40: ...vorhandener Anlagen einen enormen Vorteil Die Nebenuhren ben tigen je nach Typ nur noch einen Netzanschluss 230V Alle Uhren einer Anlage zeigen die offizielle Zeit an ob analoge Zeigeruhr oder Digital...

Page 41: ...2 ADRESS OFF OFF OFF 0 OFF OFF ON 1 OFF ON OFF 2 OFF ON ON 3 ON OFF OFF 4 ON OFF ON 5 ON ON OFF 6 ON ON ON 7 berpr fen Sie ob das Ger t unter Spannung ist 230VAC Der Indikator LED Anzeige auf der Fron...

Page 42: ...usrichtung der GPS Antenne W hrend der ersten Inbetriebnahme k nnen Sie das Sendesignal manuell aktivieren indem Sie den Dip Schalter Nr 7 auf ON stellen Diode f r den Empfang leuchtet dauernd Wenn de...

Page 43: ...en indem Sie den Dip Schalter nr 7 auf on stellen Diode f r den Empfang leuch tet dauernd Bitte beachten Sie dass wenn der Installationsmodus aktiviert ist der Sender nicht synchronisiert wird Wenn de...

Page 44: ...ch die Hauptuhr erneut Wiederholungszyklus B Standardeinstellungen GPS Bei korrektem GPS Code Empfang sendet die Hauptuhr in einem Zyklus von 3 Sekunden die Zeitinformation an die Nebenuhren Konfigura...

Page 45: ...t bei neuen Anlagen und der Modernisierung vorhandener Anlagen einen enormen Vorteil Die Nebenuhren ben tigen je nach Typ nur noch einen Netzanschluss 230 V Alle Uhren einerAnlage zeigen die gleiche o...

Page 46: ...erden 2 2 2 Einschalten des Funkverst rkers berpr fen Sie ob das Ger t unter Spannung ist 230VAC Der Indikator LED Anzeige auf der Frontseite informiert Sie ber die Empfangsst rke Ein Balken schwacher...

Page 47: ...47 MDE RTnetwork 3076V1 2 NOTES DEUTSCH...

Page 48: ...zt GORGY TIMING GORGY TIMING RC 74 B 38 nderungen der Technik und Gestaltung vorbehalten Num ro de d claration d activit de prestataire de formation 82 38 04877 38 support gorgy timing de GORGY TIMING...

Page 49: ...49 MDE RTnetwork 3076V1 2 NOTES...

Page 50: ...ier modificaci n de orden t cnico est tico o de color pueden realizarse sin previo aviso RADIO TIMING LEDI LEDICA HANDI are trademarks by GORGY TIMING GORGY TIMING RC 74 B 38 Any technical aesthetic c...

Reviews: