background image

305814

Tools required: socket wrench / spanner Nr. 8, slot and cross screwdriver

1. Use the slot screwdriver to remove the covers A and B.
2. Undo / remove the hinges (C, D, E1) and the door (F, G), starting from the top and working your 

way down. Make sure the door is not damaged.

3. Move the covers (H) to the opposite side. 
4. 

Upper compartment door (F)

: move the hinges (J) and the cover (M) to the opposite side.  

5. 

Lower compartment door (G)

: move the hinges (L) and the cover (M) to the opposite side.

6. Start from the bottom and work your way up: attach and secure the lower hinge (E2) supplied in 

a bag; mount the door (G); fasten the hinge (D); mount the door (F); and fasten the hinge (C). Do 
not forget to use the washers, placing them as they were before the door was removed. 

7. Attach the covers A and B. 
8. 

Changing the handle position:

 remove the covers, undo the screws, and attach the handle to 

the opposite side. Place the covers on the opposite side. Use the covers supplied in a bag to 
cover the slot where the handle was initially attached.

Save the hinge E1 in case you need to change the direction of door opening again at a later time. 

9

Changing the door opening direction

Summary of Contents for RK60319OBK

Page 1: ...GB Instructions for use Refrigerator freezer ...

Page 2: ...eratures higher than 0 C The freezer is intended for use in households for freezing fresh food and for long term storage of frozen food up to one year depending on the type of food Important warnings 3 A few tips on how to save power with your refrigerator freezer combo 4 Appliance description 5 Installation and connection 7 Changing the door opening direction 9 Operating the appliance 10 Recommen...
Page 3: ...for at least 2 hours Thus operation errors due to the effect of transport on the cooling system will be much less likely to occur The appliance must be connected to the power mains and grounded in compliance with the effective standards and regulations The appliance may not be used outdoors and should not be exposed to rain The appliance must be disconnected from the power mains unplug the power c...

Page 4: ...r household waste disposal service or the shop where you purchased the product Observe the installation instructions Do not open the appliance door more frequently than necessary Occasionally check whether air can circulate freely behind the appliance Condenser unit mounted on the appliance back wall must be kept clean at all times see section Cleaning the appliance If the seal is damaged or loose...

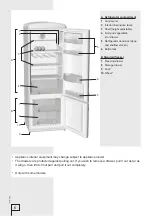
Page 5: ... it will go then lift its front part and pull it out completely Only with some models A Refrigerator compartment 1 Control unit 2 Interior illumination lamp 3 Shelf height adjustable 4 Fruit and vegetables bin drawer 5 Refrigerator door rack deep and shallow version 6 Bottle rack B Standard freezer 7 Freezing drawer 8 Storage drawer 9 Foot 10 Wheel 5 Appliance description ...

Page 6: ...er pull it out as far as it will go then lift its front part and pull it out completely Only with some models A Refrigerator compartment 1 Control unit 2 Interior illumination lamp 3 Shelf height adjustable 4 Fruit and vegetables bin drawer 5 Refrigerator door rack deep and shallow version 6 Bottle rack B Standard freezer 7 Freezing drawer 8 Storage drawer 9 Foot 10 Wheel 6 ...

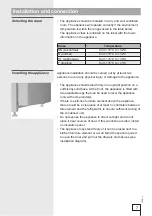
Page 7: ...ight position on a sufficiently solid base At the front the appliance is fitted with two adjustable legs that can be used to level the appliance only with some models If there is a kitchen furniture element above the appliance there should be a clearance of at least 5 centimeters between this element and the refrigerator to ensure sufficient cooling of the condenser unit Do not expose the appliance t...

Page 8: ...socket Nominal voltage and frequency are indicated on the label with basic information on the appliance The appliance should be connected to the power mains and grounded in compliance with the relevant effective standards and regulations The appliance will withstand short term deviations from the nominal voltages but not more than from 6 to 6 Connecting the appliance 8 ...

Page 9: ...ide 6 Start from the bottom and work your way up attach and secure the lower hinge E2 supplied in a bag mount the door G fasten the hinge D mount the door F and fasten the hinge C Do not forget to use the washers placing them as they were before the door was removed 7 Attach the covers A and B 8 Changing the handle position remove the covers undo the screws and attach the handle to the opposite si...

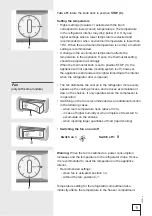
Page 10: ...with some models Model without fan Model with fan Turn on rotate the thermostat knob clockwise towards position 7 Turning the appliance on off Remark At OLD TIMER appliances alteration of door opening direction is not possible 10 Operating the appliance Reverse door swing ...
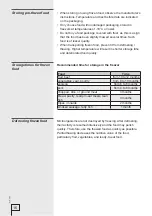
Page 11: ... the refrigerator door is opened The fan distributes the cool air in the refrigerator more evenly speeds up the cooling process and reduces accumulation of dew on the shelves It only operates when the compressor is in operation Switching on the fan is recommended as an additional function in the following cases when room temperature rises above 30 C in case of higher humidity or when droplets of d...

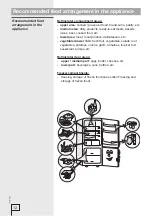
Page 12: ...le drawer bin fresh fruit vegetables salads root vegetables potatoes onions garlic tomatoes tropical fruit sauerkraut turnips etc Refrigerator door areas upper medium part eggs butter cheeses etc lower part beverages cans bottles etc Freezer compartments freezing storage of frozen food see section Freezing and storage of frozen food Recommended food arrangement in the appliance 12 Recommended food...

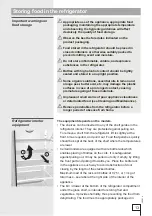
Page 13: ...epends on the models The shelves can be inserted to any of the shelf guides in the refrigerator interior They are protected against pulling out To remove a shelf from the refrigerator lift is slightly at the front tilt as required and pull it out Food that perishes quickly should be kept at the back of the shelf where the temperatures are lower Certain models are equipped with wire bottle rack whi...

Page 14: ...nger than in the traditional refrigerator Food remains fresh for long time and it preserves its taste and nutritive ingredients It reduces decay and loss of mass so fruit and vegetables are more fresh and natural The drawer must be tightly closed to provide optimum operation Moisture level in the drawer depends upon the moisture of stored food and on the frequency of opening the drawer When you bu...

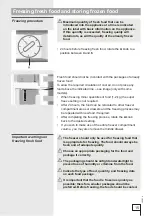
Page 15: ...eas or drawers and the freezing process may be repeated with new food if required After completing the freezing process rotate the A knob back to the desired setting If you wish to make use of the entire freezer compartment volume you may also remove the middle drawer The freezer should only be used for freezing food that is appropriate for freezing The food should always be fresh and of adequate ...

Page 16: ...orated food quality Recommended time for storage in the freezer Food Time fruit beef from 10 to12 months vegetables veal poultry from 8 to 10 months venison from 6 to 8 months pork from 4 to 6 months chopped dice or ground meat 4 months bread pastry ready to eat meals lean fish 3 months tripes innards 2 months smoked sausage fatty fish 1 month Microorganisms are not destroyed by freezing After defro...

Page 17: ...e freezer and protect them from thawing Disconnect the appliance rotate the thermostat knob A to STOP 0 the position and unplug the power cord from the wall outlet Leave the door open until the frost or ice can be easily removed from the surfaces using e g a plastic scraper Be careful not to damage the freezer interior surfaces Remove the frost or ice from the freezer using a cloth before it melts...

Page 18: ...oling board that cools the refrigerator interior are a trough groove and an opening through which melted water is discharged from the appliance interior The through and the opening should never be blocked therefore check them often and clean as required e g using a plastic straw Frost and ice accumulated in a layer of 3 5 mm will cause an increase in power consumption therefore it should be remove...

Page 19: ...may result form the following Door is opened to often or it is left open too long Warm food was placed in the refrigerator Food or a container are in contact with the refrigerator interior back wall Poor door sealing If the seal is dirty or damaged clean it or replace it Water is dripping from the refrigerator Blocked water discharge opening or water from thawed ice is dripping past the water coll...

Page 20: ...tely fitted and that the noise is not caused by vibrating cans bottles or other containers in contact with each other COMBI HZS3167 en 01 17 Instructions for use of the appliance can also be found on our website at www gorenje com http www gorenje com Problem Cause or remedy Replacing the bulb Before replacing the bulb disconnect the appliance from the power mains unplug the power cord from the wal...

Reviews: