background image

15

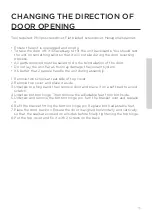
CHANGING THE DIRECTION OF 

DOOR OPENING 

Tool required: Philips screwdriver, Flat bladed screwdriver, Hexagonal spanner.

•  Ensure the unit is unplugged and empty.

•  To take the door off, it is necessary to tilt the unit backwards. You should rest 

the unit on something solid so that it will not slip during the door reversing 

process.

•  All parts removed must be saved to do the reinstallation of the door.

•  Do not lay the unit flat as this may damage the coolant system.

•  It’s better that 2 people handle the unit during assembly.

1. Remove two screws at rear side of top cover.

2. Remove top cover and place it aside.

3. Unscrew top hinge and then remove door and place it on a soft pad to avoid 

scratch.

4 Unscrew bottom hinge. Then remove the adjustable feet from both side.

5. Unscrew and remove the bottom hinge pin, turn the bracket over and replace 

it.

6. Refit the bracket fitting the bottom hinge pin. Replace both adjustable feet.

7. Place the door back on. Ensure the door is aligned horizontally and vertically, 

so that the seals are closed on all sides before finally tightening the top hinge.

8. Put the top cover and fix it with 2 screws on the back.

Summary of Contents for R4142ANW

Page 1: ...EN www gorenje com www gorenje com DETAILED INSTRUCTIONS FOR USE OF UPRIGHT REFRIGERATOR ...

Page 2: ...We wish you find a lot of pleasure in its use The appliance is intended solely for household use The refrigerator is intended for storing fresh food at temperatures above 0 C Please visit our website where you can enter your appliance model number indicated on the rating plate or the warranty sheet to find detailed description of your appliance tips on use troubleshooting service information instr...

Page 3: ...PROTECTION 9 ADVICE FOR SAVING POWER WITH REFRIGERATION APPLIANCES 10 INSTALLATION AND CONNECTION 13 APPLIANCE DESCRIPTION 14 OPERATING THE APPLIANCE 15 CHANGING THE DIRECTION OF DOOR OPENING 17 APPLIANCE INTERIOR EQUIPMENT 18 RECOMMENDED DISTRIBUTION OF FOOD IN THE APPLIANCE 19 STORING FOOD IN THE REFRIGERATOR 23 DEFROSTING THE APPLIANCE 24 CLEANING THE APPLIANCE 25 TROUBLESHOOTING 27 INFORMATION...

Page 4: ...end saving this instruction manual for future reference and attach it to the appliance if it is sold in the future Check for any damage or irregularities on your appliance If you find your appliance is damaged notify the retailer from which you have purchased the appliance Before connecting the appliance to the power mains let the appliance rest in a vertical position for a minimum of 2 hours This...

Page 5: ... not work call a service technician Do not attempt a repair of the LED lighting yourself as there is danger of contact with high voltage IMPORTANT SAFETY INSTRUCTIONS WARNING Do not use any electric devices inside the appliance except for those allowed by the manufacturer of this refrigeration appliance WARNING Do not use mechanical devices or other means to accelerate the defrosting process other...

Page 6: ...utside the reach of children It presents danger of injury or suffocation Do not let the children play with the appliance Cleaning and user maintenance shall not be made by children without supervision When removing a used appliance disconnect the power cord remove the door and leave the shelves in the appliance This will prevent children from locking themselves in the appliance Warning regarding t...

Page 7: ... of an error or power supply failure do not open the freezer compartment unless the freezer has not operated for over 16 hours After this period use the frozen food or provide sufficient cooling e g a replacement appliance Technical information on the appliance Rating plate can be found in the appliance interior It indicates data on voltage gross and net volume type and amount of refrigerant and i...

Page 8: ...the product please contact the relevant municipal body in charge of waste management your waste disposal service or the store where you bought the product Packaging is made of environmentally friendly materials that can be recycled disposed of or destroyed without any hazard to the environment Removing an obsolete appliance To protect the environment take the obsolete appliance to an authorized ho...

Page 9: ... refrigerator allow it to cool down to room temperature Defrost frozen food in the refrigerator compartment To make use of the entire freezer compartment interior volume remove some of the drawers as described in the instruction manual Defrost your conventional freezer when an approximately 3 5 millimetre layer of frost or ice has built up on the refrigerated surfaces Make sure the layout of shelv...

Page 10: ...ces radiating heat such as a cooker a stove a radiator water heater etc and do not expose it to direct sunlight The appliance should stand at least 3 cm away from an electric or gas cooker or at least 30 cm away from an oil or solid fuel stove If the distance between such source of heat and the appliance is smaller use an insulating panel Note Place the appliance in a sufficiently large room There...

Page 11: ...spacers at the rear of the unit Space Requirement Keep enough space of door open Keep at least 50mm gap at two sides Levelling the unit To do this adjust the two levelling feet at front of the unit If the unit is not level the doors and magnetic seal alignments will not be covered properly ...

Page 12: ...t safety socket Nominal voltage and frequency are indicated on the rating plate label with basic information on the appliance The appliance must be connected to the power mains and grounded in compliance with the effective standards and regulations The appliance will withstand short term deviations from the nominal voltage but not more than 6 ...

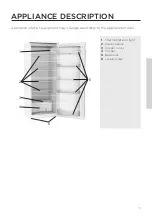
Page 13: ...13 APPLIANCE DESCRIPTION 1 2 3 4 6 5 1 Thermostat and light 2 Glass shelves 3 Crisper cover 4 Crisper 5 Balconies 6 Leveling feet Appliance interior equipment may change according to the appliance model ...

Page 14: ...direction i e to the right A change in the environment temperature will affect the temperature in the appliance Adjust the setting with the A dial accordingly Positions towards the thicker part of the sign mean a lower temperature in the appliance cooler Settings towards the thinner part of the sign mean a higher temperature warmer If the temperature of the room where the appliance is installed is...

Page 15: ...tter that 2 people handle the unit during assembly 1 Remove two screws at rear side of top cover 2 Remove top cover and place it aside 3 Unscrew top hinge and then remove door and place it on a soft pad to avoid scratch 4 Unscrew bottom hinge Then remove the adjustable feet from both side 5 Unscrew and remove the bottom hinge pin turn the bracket over and replace it 6 Refit the bracket fitting the...

Page 16: ...16 1 2 3 4 5 6 8 7 ...

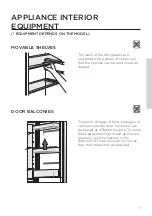
Page 17: ... can be placed at different heights To make these adjustments proceed as follows gradually pull the balcony in the direction of the arrows until it comes free then reposition as required MOVABLE SHELVES The walls of the refrigerator are equipped with a series of runners so that the shelves can be positioned as desired DOOR BALCONIES ...

Page 18: ...c Crisper fresh fruit vegetables salads root vegetables potatoes onions garlic tomatoes sauerkraut turnips etc Sections in the refrigerator compartment door upper middle door bins eggs butter cheese etc lower door bins beverages cans bottles Do not store fruit bananas pineapples papaya citruses and vegetables zucchini eggplant cucumbers bell peppers tomatoes and potatoes sensitive to low temperatu...

Page 19: ...t it from emitting or receiving odours and humidity Do not store inflammable volatile and explosive substances in the refrigerator Bottles with high alcohol content should be tightly sealed and stored in an upright position Some organic solutions essential oils in lemon and orange peel butter acid etc may damage the plastic surfaces in case of a prolonged contact causing damage and premature agein...

Page 20: ... 2 to 4 95 7 to 10 days Beetroot 0 95 3 to 5 months Broccoli 0 95 100 10 to 14 days Cabbage young 0 98 100 3 to 6 weeks Carrots ripe 0 98 100 4 to 5 months Lettuce winter 0 95 100 2 to 3 weeks Garlic 0 65 70 6 to 7 months Kohlrabi 0 98 100 2 to 3 months Brussels sprouts 0 90 95 3 to 5 weeks Cabbage Chinese 0 95 100 2 to 3 months Cabbage late varieties 0 98 100 3 to 4 months Carrots 0 95 100 2 week...

Page 21: ... 2 90 95 up to 5 days Brussels sprout 0 to 2 90 95 1 to 2 weeks Gooseberries 0 to 2 90 95 3 to 4 weeks Cucumbers 4 to 10 95 10 to 14 days Potatoes 7 to 10 90 95 up to 9 months Avocado unripe 7 to 10 85 95 up to 6 weeks Bell peppers 7 to 10 90 95 2 to 3 weeks Tomatoes 10 to 12 85 90 4 to 7 days Beans seeds 15 40 50 6 to 10 months Pears 3 90 95 2 to 7 months Apricots 1 90 95 1 to 3 weeks Strawberrie...

Page 22: ...2 to 3 months Plums 0 to 2 90 95 2 to 5 weeks Fruit chopped 0 to 2 90 95 up to 10 days Apples 0 to 4 90 95 1 to 12 months Melons 4 90 95 15 days Oranges 4 to 7 90 95 2 to 4 weeks Tangerines 5 to 8 90 95 2 to 4 weeks Mango 10 to 13 85 95 2 to 3 weeks Melons 10 to 13 85 95 1 to 2 weeks Pineapples 10 to 13 85 95 2 to 4 weeks Lemons 11 to 13 90 95 2 to 3 weeks Watermelon 12 to 15 85 95 1 to 3 weeks Ba...

Page 23: ... through an opening in the refrigerator rear wall into a tray fitted above the compressor from where they will evaporate Make sure the opening in the back wall in the refrigerator interior is never blocked by food or any other object If an excessive layer of ice is formed on the rear wall of refrigerator interior 3 5 mm switch off the appliance and defrost the appliance manually AUTOMATIC REFRIGER...

Page 24: ... cleaners containing alcohol for cleaning plastic materials To avoid defrost water overflowing into the fridge periodically clean the drain hole at back of fridge compartment Use a cleaner to clean the hole as showed in right picture After cleaning switch the appliance back on and insert the food Appliance interior can be cleaned with lukewarm water to which you can add some vinegar Before cleanin...

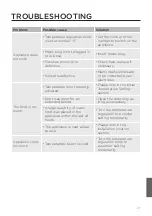
Page 25: ...by an electrician The food is too warm Temperature is not properly adjusted Please look in the initial Temperature Setting section Door was open for an extended period Open the door only as long as necessary A large quantity of warm food was placed in the appliance within the last 24 hours Turn the temperature regulation to a colder setting temporarily The appliance is near a heat source Please lo...

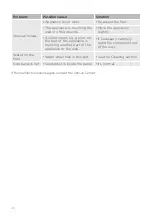
Page 26: ...e slightly A component e g a pipe on the rear of the appliance is touching another part of the appliance or the wall If necessary carefully bend the component out of the way Water on the floor Water drain hole is blocked See the Cleaning section Side panel is hot Condenser is inside the panel It s normal If the malfunction shows again contact the Service Center ...

Page 27: ...etimes unusual or loud noises may appear during appliance operation these are mostly the result of improper installation The appliance must stand level and stable on a solid base The appliance may not be in contact with a wall or adjacent furniture Make sure the interior equipment sits firmly in its place and that the noise is not caused by rattling cans bottles or other containers placed next to ...

Page 28: ...Gorenje d d Partizanska 12 SI 3320 Velenje Slovenija info gorenje com www gorenje com en 11 17 ...

Reviews: