background image

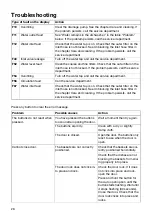
Troubleshooting

Action

Type of fault on the display

Clear the drainage pump. See the chapter Care and cleaning. If
the problem persists, call the service department.

Overfilling

F10

See “Water remains in the dishwasher” in the table “Problem”
below. If the problem persists, call the service department.

Water outlet fault

F11

Check that the water tap is on. Check that the outer filter on the
inlet hose is not blocked. See Unblocking the inlet hose filter in
the chapter Care and cleaning. If the problem persists, call the
service department.

Water inlet fault

F12

Turn off the water tap and call the service department.

Inlet valve leakage

F40

Clean the coarse and fine filters. Check that the outer filter on the
inlet hose is not blocked. If the problem persists, call the service
department.

Water level fault

F52

Turn off the water tap and call the service department.

Overfilling

F54

Call the service department.

Circulation fault

F56

Check that the water tap is on. Check that the outer filter on the
inlet hose is not blocked. See Unblocking the inlet hose filter in
the chapter Care and cleaning. If the problem persists, call the
service department.

Water inlet fault

F67

Press any button to clear the error message.

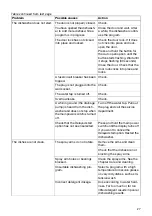
Action

Possible causes

Problem

Wait a moment then try again.

You have pressed the buttons
too soon after opening the door.

The buttons do not react when
pressed.

Clean with a dry or slightly
damp cloth.

The buttons are dirty.

Open the door. The buttons only
react to use when the door is
open.

The door is closed.

Check that the baskets are cor-
rectly positioned horizontally.

The baskets are not correctly
positioned.

Cannot close door.

Check that the dishes are not
blocking the baskets from slid-
ing properly into place.

Check the door lock. If it does
not click into place and lock,
open the door.

The door lock does not click in-
to place and lock.

Press and hold the button for
the Auto open option until the
button starts flashing. Wait until
it stops flashing (60 seconds).
Close the door. Check that the
door lock clicks into place and
locks.

26

Summary of Contents for GS671C60W

Page 1: ...Operating instructions Dishwasher GS671C60W GS671C60X ...

Page 2: ...pper basket 12 Lower basket 13 Using the dishwasher 13 Add detergent 14 The main power switch 14 PROGRAMS Select program 15 Select option 16 Starting the dishwasher 16 TIME Time remaining 16 Stopping or changing a program 16 If you want to load more dishes 16 If the dishwasher is turned off due to a power failure 17 Once the program has finished 17 How to get the best drying results 17 Unloading t...

Page 3: ...e dishwasher 32 Adjust the height and slide the dishwasher into place 33 Attach the plinth 33 Drainage connection 34 Connection to water supply 34 Electrical connection 35 Remove dishwasher worktop 36 Service 37 Technical data and energy labelling 37 Technical data 37 Information for consumers 37 Information for test institute 3 ...

Page 4: ... indicator Rinse aid indicator Program selector Install the dishwasher see the chapter Installation Following this open the door and press the main power switch to start using the machine The first time the dishwasher is switched on it is important that you choose the right settings to ensure good dishwashing results See the chapter Before washing for the first time 4 ...

Page 5: ...ions on how to use the machine and understand the risks that can occur Cleaning of the machine must not be carried out by children without supervision Damaged mains cables must only be replaced by a qualified electrician Only use the dishwasher in household type environments for dishwashing household dishes All other use is prohibited Never place dishes with solvent residues in the dishwasher due ...

Page 6: ...e product during transport The packaging material is recyclable Separate the different packaging materials to help reduce raw material use and waste Your dealer can take the packaging for recycling or direct you to the nearest recycling centre The packaging is comprised of Corrugated cardboard made from up to 100 recycled material Expanded polystyrene EPS with no added chlorine or fluorine Support...

Page 7: ...ed consumption during regeneration The dishwasher s built in water softener is regularly regenerated to maintain its function Regeneration extends the dishwashing program and increases energy and water consumption Just how often the dishwasher s water softener is regenerated depends on the selected setting Example If the Ecoprogram is run with a water hardness of 14 dH 25 fH the water softener is ...

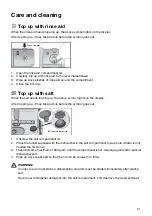
Page 8: ...t stains a dishwashing program must be started immediately after adding salt Set the Rinse aid The chapter Settings describes how to set the rinse aid dosage Top up with rinse aid Drying is faster and a better result is achieved if you use rinse aid You will also achieve a better dishwashing result with clear and spotless dishes Press to open 1 Open the rinse aid compartment lid 2 Carefully top up...

Page 9: ...f combined energy and water consumption This program is used to assess compliance with EU legislation on ecodesign The dishwashing program is designed for an effective wash using as little energy and water as possible The program washes at a low temperature for a long time Select option Auto open Better drying results are achieved if you use the Auto open option which automatically opens the dishw...

Page 10: ...shes as thoroughly as possible All dirty surfaces should face inwards and downwards Dishes should not be placed in or on each other Angle dishes with hollows such as cups so that the rinse water will run off This is also important for plastic items Make sure small items cannot fall through the dishwasher basket place them in the top cutlery tray NOTE Check that the spray arms can rotate freely The...

Page 11: ... the upper basket with both hands and lift it up 3 Repeatedly lift the basket with both hands to change its position The upper basket can be set in three positions When the upper basket is in the highest position lifting it will return it to the lowest position Note that both sides of the basket must always be set to the same height Foldable tines The foldable tines can be folded up or down to mak...

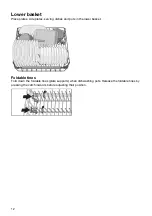
Page 12: ...side plates serving dishes and pots in the lower basket Foldable tines Fold down the foldable tines plate supports when dishwashing pots Release the foldable tines by pressing the catch inwards before adjusting their position 12 ...

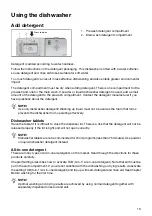
Page 13: ...d as the foam that forms prevents the dishwasher from operating effectively Dishwasher tablets Halve the tablet if it is difficult to close the dispenser lid There is a risk that the detergent will not be released properly if the lid is tight and will not open correctly NOTE Dishwasher tablets are not recommended for short programs less than 75 minutes Use powder or liquid dishwasher detergent ins...

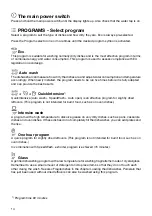
Page 14: ...ensive1 QuickIntensive Auto wash SpeedWash Auto open is an effective program for slightly dried leftovers This program is not intended for burnt food such as on oven dishes Intensive wash A program with a high temperature to dissolve grease on very dirty dishes such as pans casserole dishes and oven dishes If these dishes do not completely fill the dishwasher you can add plates and the like One ho...

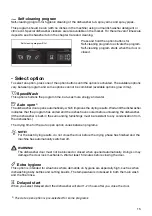
Page 15: ...automatically which improves the drying results Wait until the dishwasher indicates that the program has ended and the dishes have cooled before unloading the dishwasher If the dishwasher is built in the surrounding furnishings must be resistant to any condensation from the dishwasher The drying time for the Auto open option varies between programs NOTE For the best drying results do not close the...

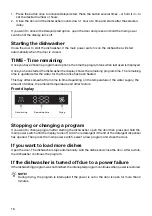
Page 16: ...l rinse has been heated This may differ somewhat from time to time depending on the temperature of the water supply the amount of dishes the ambient temperature and other factors Front display Dishwashing Remaining time Drying Stopping or changing a program If you want to change program after starting the dishwasher open the door then press and hold the main power switch until the display turns of...

Page 17: ...ch as cups so that the rinse water will run off This is also important for plastic items Top up with rinse aid or increase the rinse aid dosage level Activate the Auto open option Allow the dishes to cool before unloading the dishwasher Unloading the dishwasher Hot porcelain is more fragile Leave the dishes to cool in the dishwasher before unloading them Unload the lower basket first to avoid any ...

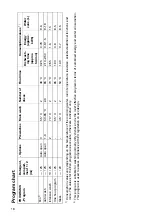
Page 18: ...C 2 10 25 Intensive wash 8 5 0 8 1 00 65 C 2 55 C 25 One hour program 8 5 0 7 1 40 50 C 2 45 C 20 Glass 1 Consumption values vary depending on the temperature of the incoming water room temperature load size selected additional functions and more The values for the Eco program are accurate others are indicative only 2 This program is suitable for washing normally dirty dishes and is the most effec...

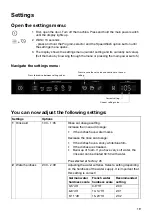
Page 19: ... setting Current setting Current setting value You can now adjust the following settings Options Settings Rinse aid dosage setting 1 00 1 05 Rinse aid 1 Increase the rinse aid dosage If the dishes have water marks Decrease the rinse aid dosage If the dishes have a sticky white blue film If the dishes are streaked Build up of foam If you have very soft water the rinse aid can be diluted 50 50 with ...

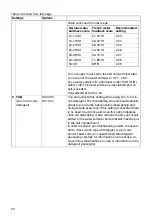
Page 20: ... 04 You can activate this setting when using 3 in 1 All in one detergent The dishwashing programs automatically adapt to provide the best possible dishwashing and drying results every time If this setting is activated there is no need to add rinse aid since this option disables rinse aid dispensing It also reduces the amount of salt added to the water softener Note that salt must be put in the sal...

Page 21: ...ts on the display After topping up it may take a while before the symbol goes out Salt compartment lid 1 Unscrew the salt compartment lid 2 Place the funnel supplied with the dishwasher in the salt compartment top up hole Water is only needed the first time 3 Then add salt a maximum of 630 gram until the compartment is full Use large grain salt or special dishwasher salt 4 Wipe up any excess salt ...

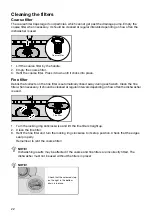
Page 22: ...ally rinsed away during each wash Clean the fine filter when necessary It should be cleaned at regular intervals depending on how often the dishwasher is used Fine filter 1 Turn the locking ring anticlockwise and lift the fine filter straight up 2 Clean the fine filter 3 Refit the fine filter and turn the locking ring clockwise to its stop position Check that the edges seal properly Remember to re...

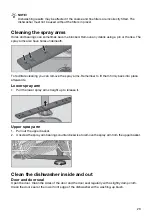
Page 23: ...g you can remove the spray arms Remember to fit them firmly back into place afterwards Lower spray arm Pull the lower spray arm straight up to release it Upper spray arm 1 Pull out the upper basket 2 Unscrew the spray arm bearings counterclockwise to remove the spray arm from the upper basket Clean the dishwasher inside and out Door and door seal Open the door Clean the sides of the door and the d...

Page 24: ...witch and unplug it from the wall socket 2 Remove the coarse filter and the fine filter 3 Scoop out the water from the dishwasher tub 4 In order to inspect the drainage pump remove the coloured stop on the right in the bottom drain 5 Turn the pump wheel located behind the drainage pump stop by hand Carefully remove any items 6 Refit the drainage pump stop along with the fine and coarse filters 7 P...

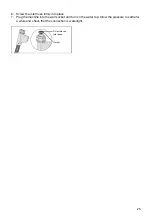
Page 25: ...nlet hose firmly into place 7 Plug the machine into the wall socket and turn on the water tap Allow the pressure to settle for a while and check that the connection is watertight Outer filter on inlet hose Gasket 25 ...

Page 26: ...t F56 Check that the water tap is on Check that the outer filter on the inlet hose is not blocked See Unblocking the inlet hose filter in the chapter Care and cleaning If the problem persists call the service department Water inlet fault F67 Press any button to clear the error message Action Possible causes Problem Wait a moment then try again You have pressed the buttons too soon after opening th...

Page 27: ...urned off Check Overflow leaks Turn off the water tap Pull out the plug and call the service department A whirring sound the drainage pump is heard from the dish washer and does not stop when the main power switch is turned off Press and hold the main power switch until the display turns off if you want to cancel the Delayed start option Restart the dishwasher Check that the Delayed start option h...

Page 28: ...nless steel or sil ver In order to avoid marks and tar nishing separate dishes made from different metals such as silver stainless steel and alu minium All stainless steel can cause spots on silver if they come into contact during dishwashing Aluminium can also cause spots on dishes Check that the salt compart ment lid is properly tightened Otherwise call the service de partment The water softener...

Page 29: ... The program is taking longer than estimated 1 minute appears in the display Clean the coarse and fine filters The filters are blocked Water remains in the dishwash er Check that the filter handle is locked in the stop position The filters are not fitted cor rectly Clean the drainage pump See the chapter Care and cleaning Debris in the drainage pump Check that the coloured stop on the right in the...

Page 30: ...its in the dish washer Activate the Auto open option The Auto open option is not ac tivated The dishes are not dry enough Fully load the dishwasher The dishwasher is not fully loaded Top up with rinse add or in crease the rinse aid dosage See the sections Before wash ing for the first time and Set tings Rinse aid needs topping up or dosage is set too low Inactivate the setting TAB 3 in 1 All in on...

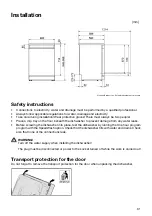
Page 31: ...th the dishwasher to prevent damage from any water leaks Before screwing the dishwasher into place test the dishwasher by running the One hour program program with the SpeedWash option Check that the dishwasher fills with water and drains Check also that none of the connections leak WARNING Turn off the water supply when installing the dishwasher The plug must be disconnected or power to the socke...

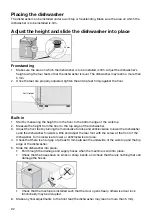
Page 32: ...loor to the top edge of the dishwasher 3 Adjust the front feet by turning them clockwise to raise and anticlockwise to lower the dishwasher Lean the dishwasher forwards a little and adjust the rear foot with the screw at the front of the dishwasher Turn clockwise to lower or anticlockwise to raise 4 Check that there is an air gap of at least 3 mm between the underside of the worktop and the top ed...

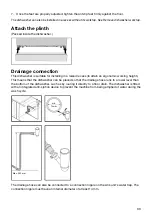
Page 33: ... an ergonomic working height This means that the dishwasher can be placed so that the drainage hose runs to a lower level than the bottom of the dishwasher such as by routing it directly to a floor drain The dishwasher is fitted with an integrated anti siphon device to prevent the machine from being emptied of water during the wash cycle min 14 mm Max 950 mm The drainage hose can also be connected...

Page 34: ...cold water supply if the building is heated using oil electricity or gas Connection to hot water supply Connect the dishwasher to the hot water supply max 70 C if the building is heated using an energy efficient means such as district heating solar power or geothermal power Choosing a hot water connection cuts dishwashing times and reduces the dishwasher s energy consumption NOTE Do not exceed the...

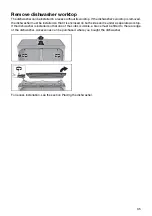
Page 35: ...her must be installed so that it is enclosed on both sides and is under a separate worktop If the dishwasher is installed so that one of the sides is visible a brace must be fitted to the rear edge of the dishwasher Accessories can be purchased where you bought the dishwasher For recess installation see the section Placing the dishwasher 35 ...

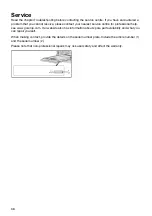
Page 36: ...t service centre for professional help see www gorenje com Our website also has information about spare part availability and what you can repair yourself When making contact provide the details on the serial number plate Include the article number 1 and the serial number 2 Please note that non professional repairs may risk user safety and affect the warranty 36 ...

Page 37: ... link to the European Product Database for Energy Labelling EPREL Or else visit https eprel ec europa eu directly Follow the instructions to search by model name See the information on the serial number plate Make a note of the model name 3 Information for test institute Information about this product can be found in the European Product Database for Energy Labelling EPREL and can also be ordered ...

Page 38: ...We reserve the right to make changes GORENJE gospodinjski aparati d o o Partizanska 12 3320 Velenje Slovenia Phone 386 0 3 899 10 00 Fax 386 0 3 899 28 00 www gorenje com 846357 a3 ...

Reviews: